29
Leica IP S
Instrument Setup 4
5. To fasten the unload station to the instrument, place the wider end of the three oblong holes
(→ "Fig. 12-9") over the heads of the three collar screws (→ "Fig. 12-3").
Note
The enlarged detail (→ "Fig. 12-5") shows the correct location of the collar screw once the unload
station has been locked in place correctly.
6. Press the unload station against the installation surface, pushing it simultaneously to the right
until it locks in place (see enlarged detail (→ "Fig. 12-5")). If the unload station does not easily
slide past the shielding cover, slightly lift the front end of the device.
7. Close lid (→ "Fig. 12-6"), make sure the unload station does not obstruct the lid.
Warning
When working with the manual unload station the slides imprinted must be removed in regular
intervals. Otherwise they will start piling up in the unload station, printing will stop and error code 44
will be displayed.
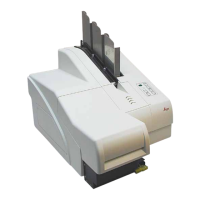
4.5 Automated unload station (optional)
Optionally available for the printer is an automated multi-level slide unload station, where the imprinted
slides are collected on individually removable and stackable trays (→ "Fig. 13-6") in the order in which
they were printed.
The multi-slide unload station comes complete with 10 trays, all of which can be inserted
simultaneously. Each tray holds up to 11 slides.
Installing the multi-slide unload station:
1. Unpack the automated unload station and set it up at the designated location.
Warning
Important! Prior to installation, the printer must be switched off and unplugged from power supply.
The manual removal system described in (→ p. 28 – 4.4 Installing the manual unload station) must
not be mounted prior to setup. The collar screws (→ "Fig. 12-3") also have to be removed.
2. Place the instrument onto the unload station.
Warning
2 persons are required to do this!
3. Hold the printer on both sides (right and left) and place it so that the two rear bolts
(→ "Fig. 13-1") fit into the baseplate first, as shown in (→ "Fig. 13").
4. Then carefully lower the front part of the printer unto the third bolt (→ "Fig. 13-2") so that
the plug connection (→ "Fig. 13-3") locks into place in the printer base plate and the printer
remains securely fastened on the unload station.