1. Remove the DC power from the flowmeter.
2. Remove the cable from the flowmeter connector.
3. Attach the necessary cable wires according to the pin specifications in Table 5.
4. For usage of a fuse at the power input (24 VDC) a 200 mA slow-blow type is recommended. Consider inrush
current specification (see Table 2), when choosing the fuse type and the AC/DC power supply.
5. Attach the cable to the flowmeter connector.
6. Before powering on check again all wiring connections. Confirm that the terminals are securely fastened and
that there is no possibility of short circuit.
3.1.3 Configuration of Flowmeter Data
The flowmeter comes configured with the sensor specific data already stored in it. A calibration sheet
including the calibration data (the K-Factor and the 5 Calibration Values) is also part of the package. In case
this data should have to be changed to the users specific needs LEVIFLOW
®
Configuration Software can be
used. Consult the configuration “Configuration-SW User Manual” (Levitronix
Doc.# PL-4501-00) for
handling with the LEVIFLOW
®
configuration software.
Note: The LFIF-06 flowmeter needs configuration software version V1.34 or higher.
3.2 Mechanical and Hydraulic Installation
3.2.1 Instructions
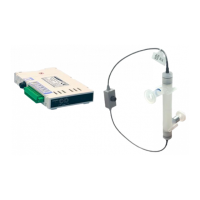
1. In order to mechanically fix the sensor body 4 threads (see Figure 2) can be used.
2. Assure that at the mounting location the allowed ambient temperature is not exceeded (see Table 2)
3. The flow circuit should be completely filled with fluid. The converter DSP (Digital Signal Processor) contains
special algorithms, which increase the robustness of the measurement against bubbles. However, assure
that excessive bubbles are avoided in the circuit.
4. Ideal mounting position for the flow sensor is upward flow direction to avoid the stagnation of bubbles and
particles in the measuring tube.
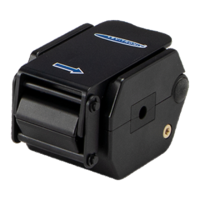
5. Make sure that the arrow mark on the flowmeter shows into the direction of the flow in the hydraulic circuit.
6. Avoid excessive vibrations such as in the neighborhood of displacement pumps. Insufficient contact of the
transducer (within the sensor) onto the pipe wall caused by vibration may result in inaccurate measurement.
7. The flowmeter measures flow velocity. In order to obtain fully developed flow pattern for accurate velocity
measurement, straight run of 60 mm upstream and of 40 mm downstream is recommended. If non-uniform
turbulent flow or swirl flow is expected, install longer upstream straight run and/or a flow-rectifier.
8. To install on pipe that has open end, the sensor should be mounted in lower position of the pipe line.
9. The flowmeter should be mounted where pressure in the pipe is above the atmospheric pressure.
10. Devices like valves are recommended to be installed downstream of the sensor in order to prevent formation
of bubbles in the liquid. An upstream valve may form bubbles reducing the intensity of the ultrasound signal
and interfering with measurement.
11. A bypass pipe run (including bypass valve and shutoff valve) is recommended for easy zero adjustment and
maintenance.
12. Please confirm that the maximum pressure is below the in Table 2 specified pressure of the sensor.
13. After setup a “Zeroing” is recommended. Assure that the sensor is completely filled with the according fluid
and is free of bubbles. Stable liquid properties should be assured by flushing the circuit with the final liquid
until temperature and viscosity becomes stable. After this zero flow shall be realized. Then push the “ZERO”
button on the flowmeter for about 3 seconds. During adjustment the “High” and “LOW” LEDs are blinking.
14. In the following cases a re-zero is recommended:
a. 30 minutes after power-on of a cool converter and sensor
b. Change of fluid properties (temperature, viscosity, density)
c. Change of chemistry
d. Change of the hydraulic circuit
 Loading...