AREA 27
TELEPHONE ENTRY SETUP
Area 27 is used to configure the telephone directory entries
by length, starting display point, PBX dialing digit and
sorting. (A Model AE-1 or AE-2 telephone entry module is
required to use these functions.)
Each of the following activities are performed in programming
Area 27. From the main menu, use [
⇑
], [
⇓
] or enter “27” on the
keypad to scroll to “Telephone Entry Setup, Enter Program
Area 27” and press [OK]. Press [
*
] when finished to return to
the main menu.
☞
NOTE: The Model AE-1 or AE-2 Telephone Entry Module
must be installed for these programming steps to function.
Configuring Directory
➊
Use [
⇑
] or [
⇓
] to scroll to “Max Directory Entries”. Enter the maximum
number of directory entries expected. Press [OK].
➋
Use [
⇑
] or [
⇓
] to scroll to “Directory Code Length”.
➌
Use [
⇐
] or [
⇒
] to select 1-4 for the number of directory digits. Press
[OK] when desired selection is blinking.
➍
Unit displays: “Directory Begins At”. Use [
⇐
] or [
⇒
] to select
“Beginning(A) Middle(M)” for where the directory display starts at. Press
[OK] when desired selection is blinking.
➎
Use [
⇑
] or [
⇓
] to scroll to “Sort Directory Names”. Use [
⇐
] or [
⇒
] to
select “YES” or “NO” to sort the names. Press [OK] when desired
selection is blinking.
➏
Use [
⇑
] or [
⇓
] to scroll to “Assign Postal Key Door”. Use [
⇐
] or [
⇒
] to
select the relay channel that the postal key will activate. Press [OK]
when desired selection is blinking.
Setting PBX Dialing Digit
➊
Use [
⇑
] or [
⇓
] to scroll to “PBX Dialing Digit”.
➋
Use [
⇐
] or [
⇒
] to select “OFF” or 0-9 for the number the AE-1 or AE-2
will dial before dialing a tenant’s telephone number. Press [OK] when
the desired selection is blinking.
Setting Talk Time
➊
Use [
⇑
] or [
⇓
] to scroll to “Set Talk Time”.
➋
Enter the length of talk time allowed up to 255 seconds (default is 60
seconds). Press [OK].
Editing Display Messages
➊
Use [
⇑
] or [
⇓
] to scroll to “Edit Display Messages”.
➋
Enter the message number to be edited (1-40) and press [OK].
➌
Unit displays: “Edit Display Message”. Customize display message for
your needs and press [OK].
Deleting All Telephone Entries
➊
Use [
⇑
] or [
⇓
] to scroll to “Delete All Tlph. Entries”.
➋
Use [
⇐
] or [
⇒
] to choose “Yes” or “No”. Press [OK] when desired
selection is blinking. All directory entries will be deleted.
Adjusting the Speaker/Microphone Balance
This adjustment is factory set and normally does not need
changing.
➊
With the AE-1or AE-2 telephone entry module connected to the active
phone line, attach an AC voltmeter to the AE-1’s or AE-2’s speaker.
➋
Use [
⇑
] or [
⇓
] to scroll to “Adjust Hybrid Level”. Press [OK].
➌
Adjust the AE-1’s or AE-2’s HYBRID LEVEL control for a
minimum
voltage reading on the voltmeter.
➍
Press [OK] when finished.
Set Priority Access Function
➊
Use [
⇐
] or [
⇒
] to select relay to access and replace 0 with a 1.
➋
Press [OK] when finished.
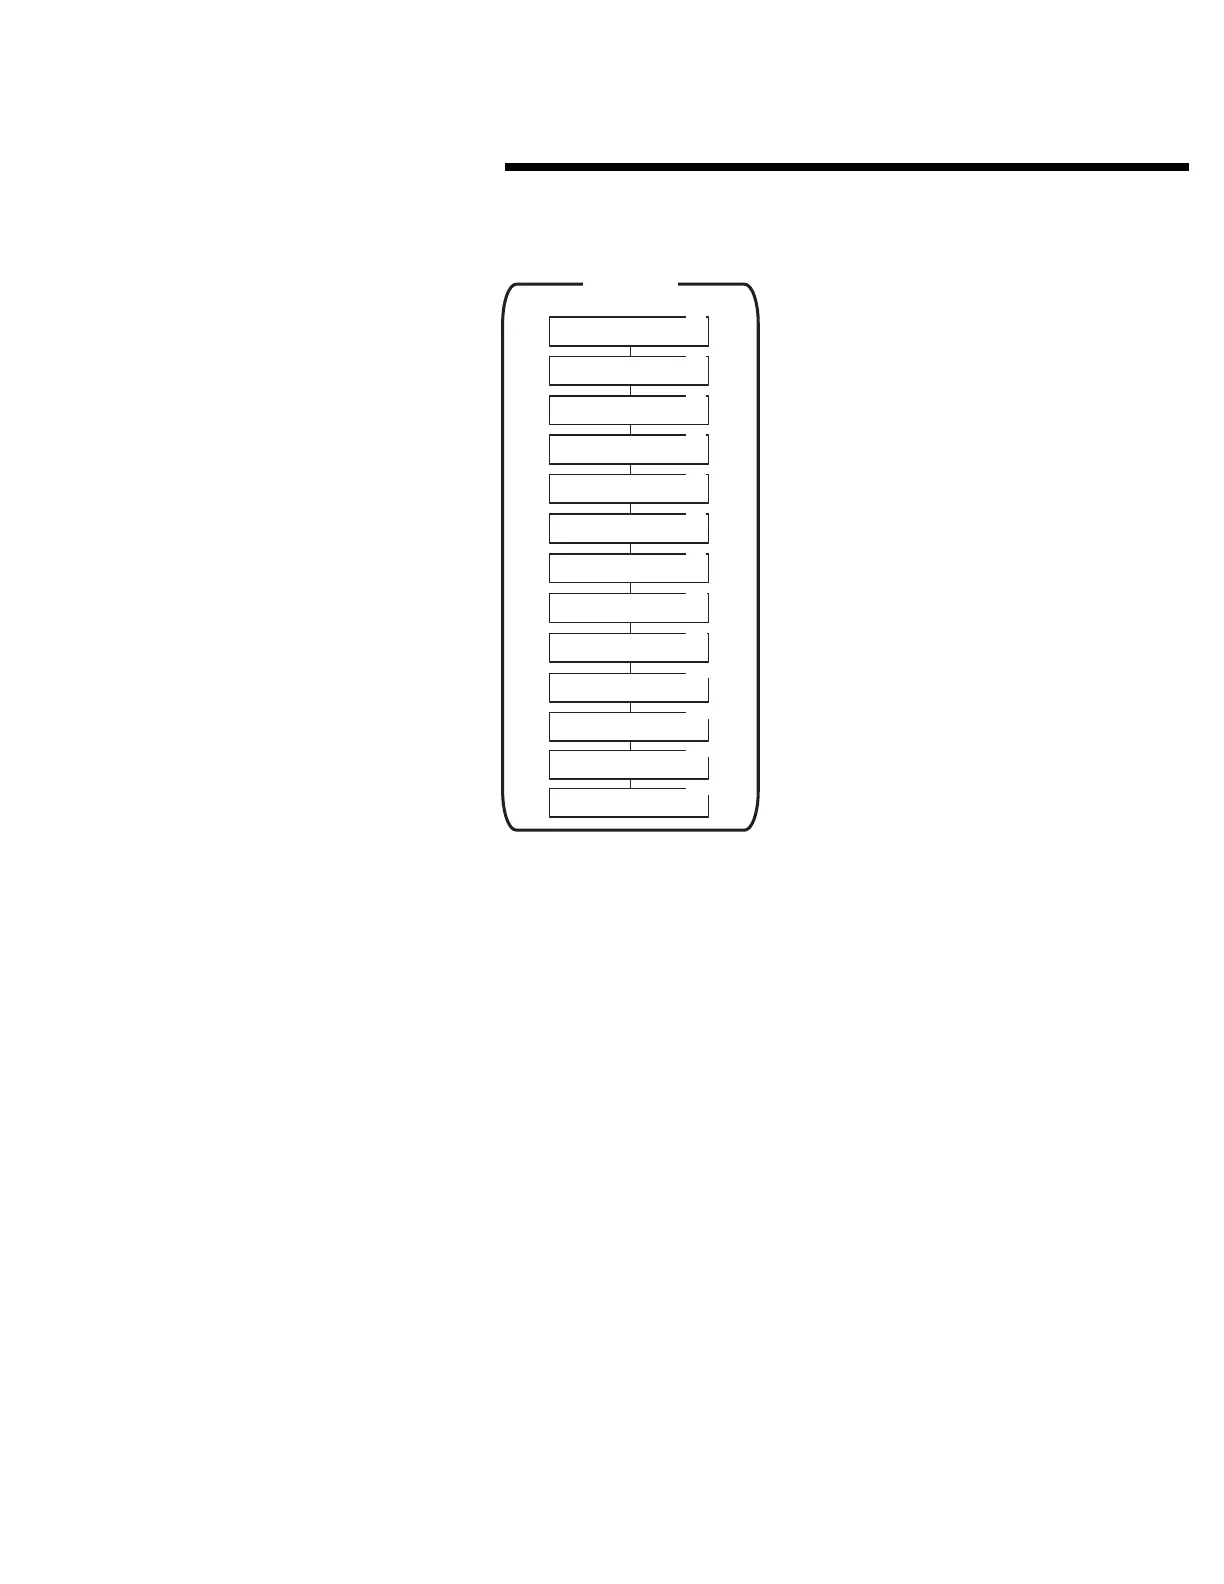
TELEPHONE ENTRY SETUP
AREA 27
27.1
27.2
27.3
27.4
27.6
Directory Code Length
1 2 3 4
Directory Begins At
Beginning(A) Middle(M)
PBX Dialing Digit
Off 9 8 7 6 5 4 3 2 1 0
27.7
27.8
27.9
27.10
Sort Directory Names Now
Yes No
Edit Display Messages
Message Number: 00
Set Talk Time
Talk Time Seconds: 060
Edit Display Message
Max Directory Entries
Maximum Entries: 00000
Delete All Tlph. Entries
Yes No
27.5
27.11
Assign Postal Key Door
CH-A CH-B CH-C CH-D Buttons
Adjust Hybrid Level
Press OK To Start/Stop
27.12
Display Brightness
Dim Low Med High
27.13
Priority Access ABCD
0=No 1=Yes 0000
59