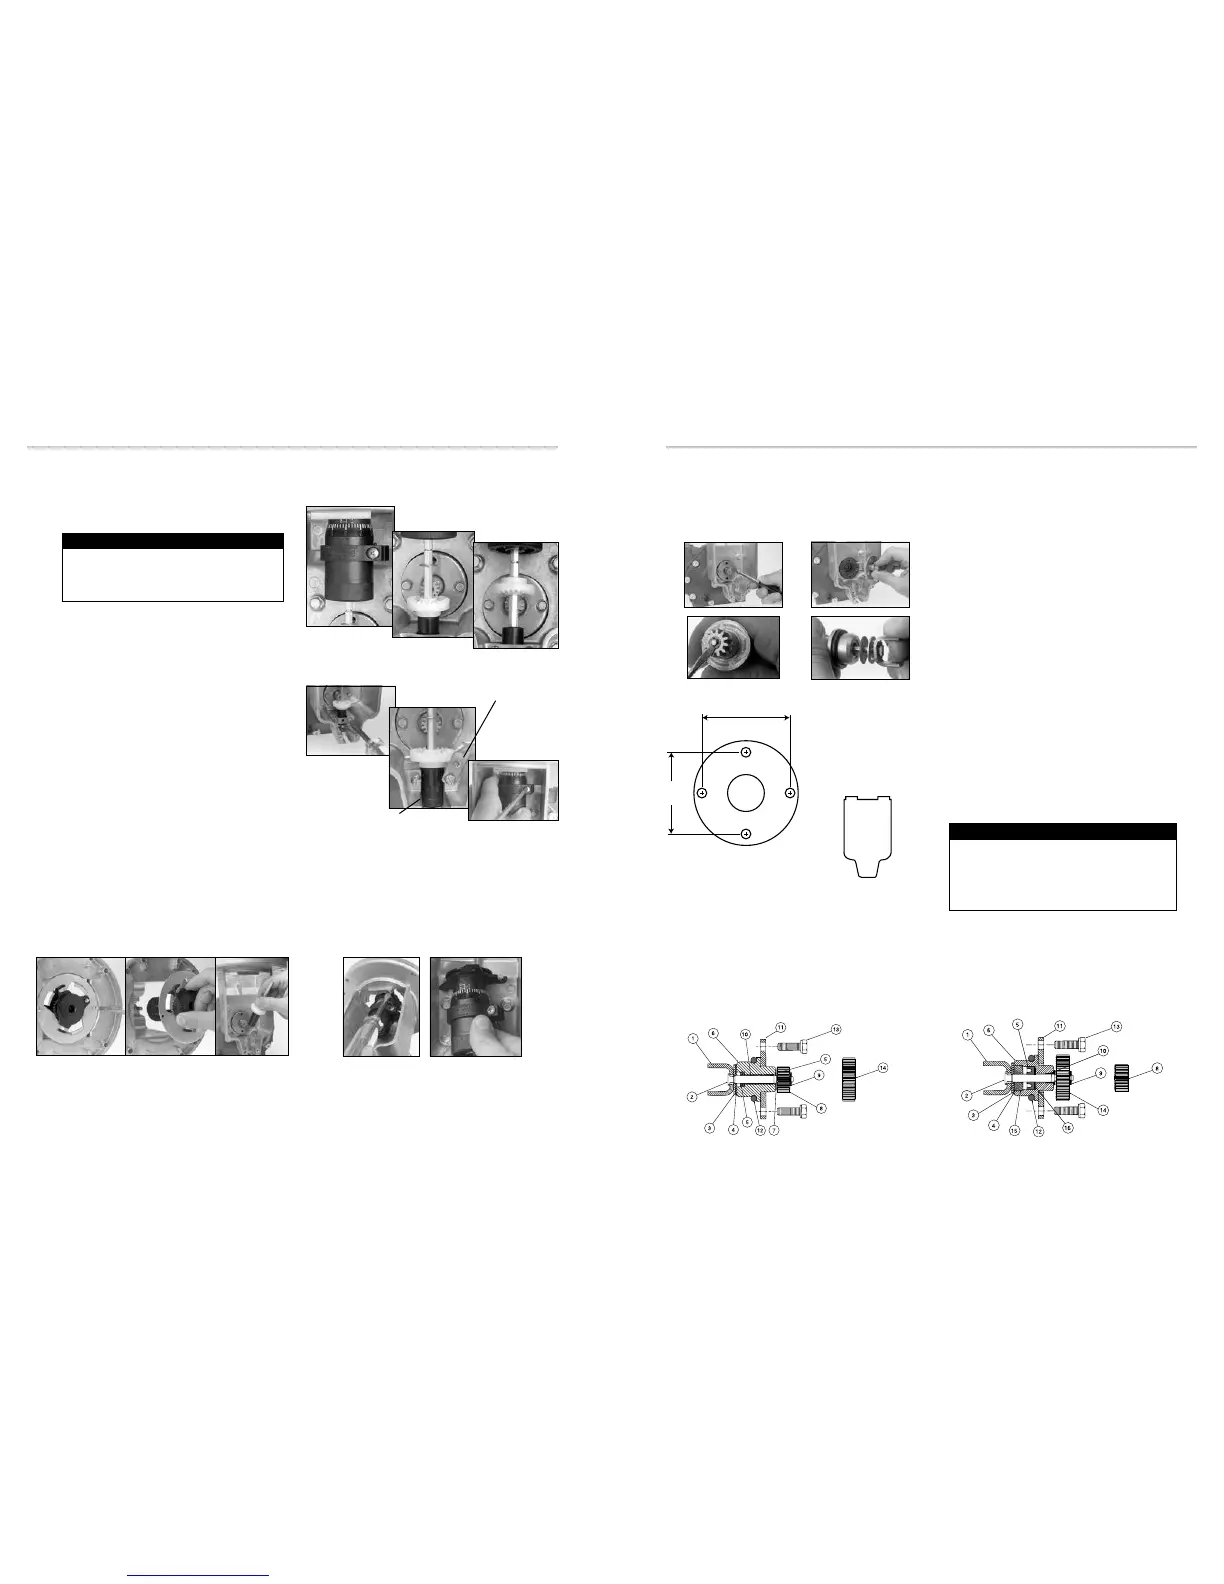
After prolonged use, the packing gland may show leakage from the metering chamber. Leakage is a sign of wear,
resulting from the type of product being metered, the operating temperature, and other system conditions. If the
packing gland shows leakage, it should be replaced or repaired. The packing gland can be serviced in the eld.
1. Remove the two screws on the packing gland retaining
plate with a 5/16” socket and ratchet drive extension or
5/16” nut driver.
2. Pull out the packing gland.
3. Pry off the retaining ring with a standard screwdriver.
4. Pull the driver out from the assembly.
Standard Packing Gland LPG Packing Gland
Item 11 (below)
Dust Cover for 1⅝" holes
PACKING GLAND RETAINING PLATE
The retaining plate for the packing gland has four holes:
two drilled 1½" holes on center and two drilled 1⅝" holes
on center. If your meter has a counter adapter dust cover
(item 0366) shaped like the illustration on the left, mount
the retaining plate using the two 1⅝" holes. If your meter
does not have the counter adapter dust cover like the
illustration on the left, mount the retaining plate using the
two 1½" holes.
1. Driver
2. Shaft
3. Stainless steel thrust washer
4. Rulon thrust washer
5. Buna/Viton/PTFE “U” Cup
6. Aluminum/stainless housing
7. Washer - Nylon
8. Output gear 2:1
9. Retaining ring
10. Bushing
11. Retaining plate
12. Buna/Viton/PTFE O-ring
13. Two retaining plate screws
14. Output gear 1:1
15. Carbon Guide Bearing
16. Washer - Stainless Steel
SERVICING THE DRIVE COMPONENTS SERVICING THE DRIVE COMPONENTS
All internal pressure must be relieved to zero pressure
before disassembly or inspection of the strainer, vapor
eliminator, any valves in the system, the packing gland,
and the front or rear covers. See the Relieving Internal
Pressure warning on page 13.
! WARNING
1. Record the adjuster micrometer setting and note the
adjuster drive gear position.
2. Use a standard screwdriver to loosen (or remove) the two
retaining spring screws.
3. Swing the retaining spring off the adjuster drive bushing.
4. Loosen the adjuster mounting clamp screw with a phillips
head screwdriver.
5a. Removing the adjuster from the top of the meter.
1. Remove screws that secure adjuster mounting plate
to counter adapter.
2. Lift adjuster mounting bracket with the adjuster out of
the counter adapter.
3. Remove the adjuster drive assembly from the
housing.
5b. Removing the adjuster from the front of the meter.
1. Remove the adjuster drive assembly from the adapter
and from the housing.
2. Remove the slotted head screw that secures the
adjuster to the mounting plate.
3. Slowly pull the adjuster out through the front of the
meter, rotating it from left to right to clear the adjuster
mounting plate
4. Pull the adjuster down to remove from the meter.
Removing the adjuster from the top Removing the adjuster from the front
Adjuster Drive Bushing
Retaining Spring
Make sure to return the adjuster drive gear to its original
position when reinstalling or the meter counter will run
backwards. The gear will be set either below or above
the packing gland pinion.
Reassemble to the Original Position
15
14
 Loading...