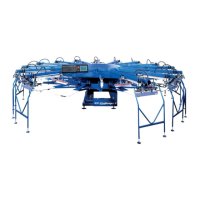
M&R Printing Equipment, Inc. - Glen Ellyn, Illinois
32
A small L.E.D. located in the tip of the toggle handle will
illuminate confirming activation. When in the “Single”
position the L.E.D. will be GREEN. When in the “Double”
position the L.E.D. will be ORANGE.
Front/Rear Toggle Switch:
This toggle switch permits the system operator to
command the selected print station to stop in either the
“Front” or “Rear” position. Generally, this switch is used
whenever the Operator desires to complete the print cycle
with the screen frame flooded with ink, to reduce the
chance of ink drying in the image. When this toggle switch
is placed in the “Front” position, the print carriage will stop
at the front (outside) of the screen frame, with the image
area flooded with ink. When placed in the “Rear” position,
the print carriage will stop at the rear (inside) of the print
head, and the image area will be clear of ink. A small, red
L.E.D. located in the tip of the toggle handle will illuminate
confirming that the switch is set for “Front” stop. (See
illustration on page 35)
Print Start/Print Finish Toggle Switch:
This toggle switch is provided as a convenience when
initially starting or finishing a print run. It is designed to
eliminate the need to individually turn “ON” or “OFF” print
stations. Placing this toggle switch in the “Print Start”
position will automatically command each print station that
is selected to “ON”, to print sequentially at the start of a
print run. (See illustration on page 34)
Test Print Toggle Switch:
This toggle switch is designed to aid the system operator
when it is desired to print only one garment to check for reg-
istration or image quality. When this toggle switch is placed
in the “ON” position, the control system will automatically
and sequentially command each print station which is
selected to “ON”, to print one complete flood/print cycle.
The result will be one printed garment at the end of the print
sequence, ready for inspection. In this way, the press
Operator is not required to manually turn “ON” and “OFF”
individual print stations to print one sample garment. (See
illustration on page 34)
Operation Mode Toggle Switch:
This toggle switch has three positions: “Automatic” at the
top position; “Stop” at the middle position; and “Manual”
at the lower position. This switch commands the system to
operate in either “Automatic” or “Manual” mode of opera-
tion. To operate the index system one complete cycle, press
the toggle switch down to “Manual”.
You will note that the toggle switch does not “latch” in the
“Manual” position, but returns via a spring-loaded action to
the middle or “OFF” position when released.
The index system will cycle one time, along with any print
stations that are selected to “ON”. Placing this toggle
switch in the “Automatic” position while the index table is
in motion, will command the index system to operate in the
automatic mode. The dwell time for automatic operation is
adjusted via the L.C.D. operator interface control panel to
the extreme right of the Main Control panel. Instructions on
how to adjust the index dwell time are available on page 34
of this manual.
NOTE: When the Operation Mode toggle switch is
selected to the middle or “OFF” position, the index sys-
tem will NOT operate.
Emergency Stop Push Button:
This large, red mushroom-shaped push button is designed
to stop the system operation only in an emergency
situation. D
O NOT USE THIS PUSH BUTTON TO STOP SYSTEM
OPERATION UNDER NORMAL OPERATING CONDITIONS.
To stop the system in an Emergency situation, press the red
mushroom-shaped button “In.” This will result in all print
stations shutting down, the retraction of the index fork and
shut down of all system operation. Once pushed “In,” the
Emergency Stop push button will remain locked in this
position to prevent any further operation of the system. To
start the system operation once again, turn the red
mushroom shaped Emergency Stop Push Button clockwise
one quarter turn, until it pops out then press the green
“Reset” push button.
WARNING! DO NOT ATTEMPT TO
RESUME SYSTEM OPERATION
UNTIL YOU HAVE IDENTIFIED AND
CORRECTED THE CAUSE OF THE
EMERGENCY STOP COMMAND.
TEST ALL SAFETY DEVICES
BEFORE RESUMING OPERATION.
Reset Push Button:
The green colored “Reset” push button is provided to
“reset” the control system logic in the event of a Emergency
Stop command or activation of one of the safety devices.
This push button also is used to lower the index table dur-
ing set-up procedures.
WARNING!
IN THE EVENT OF AN EMERGENCY STOP
OR SAFETY SYSTEM SHUT DOWN OF THE EQUIP-
MENT, DO
NOT PRESS THE RESET PUSH BUTTON
UNTIL YOU HAVE IDENTIFIED AND CORRECTED THE
CAUSE OF THE EMERGENCY STOP OR SAFETY SHUT
DOWN.
WARNING!
Operator Controls
 Loading...