The Marposs E9 is an electronic unit designed for in-process applications, specifically for gauging systems on grinders. This instruction manual (Manual code No. D2090001U1, issued September 2000) provides a comprehensive guide for its operation and maintenance.
Function Description:
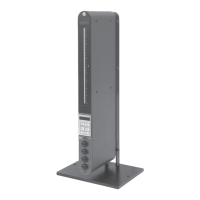
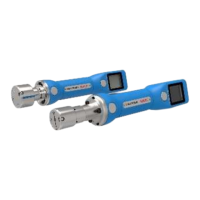
The Marposs E9 gauging system is applied to grinders to enhance their performance. It consists of two primary components: a measuring head and an electronic amplifier.
The measuring head's contacts touch the workpiece during the grinding cycle. The mechanical movements resulting from the grinding process are converted into electrical signals by transducers within the measuring head and then transmitted to the electronic amplifier.
The electronic amplifier processes these signals and displays the difference between the actual measurement value and the desired final value on a meter located on its front panel. The amplifier can be configured in various ways depending on the specific application, including versions with controls for automatic cycles, without controls for read-only cycles, and with analog output.
Important Technical Specifications:
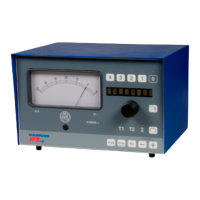
The manual details the conformation of both the front panel and the back of the E9 unit, highlighting various controls, indicators, and connectors.
- Power-on pushbutton (1): To switch the unit on.
- Power-on LED (2): Indicates when the unit is powered on. In applications with memory (oscillating head or workpieces with interrupted surfaces), this LED's underlighting indicates that the measurement is stored during moments when contact is not made with the surface being ground.
- Readout meter (3): Displays the difference between the actual and target measurement values. The scale can be white or yellow, and in metric or inches.
- LED for automatic switching of sensitivity (4):
- Led off: The scale value must be multiplied by 10.
- Led on: The scale value is the actual one.
- Adjustment of mechanical zero of meter (5): A screw under the closing plug allows for mechanical zero adjustment when the equipment is off.
- Manual/Automatic switch (6):
- Position (manual mode): No control signals are given out.
- Position (automatic mode): The electronic amplifier operates automatically. This is the normal operating position.
- Cycle-start LED (7): Indicates the start of a cycle.
- Potentiometer for adjustment of delay time (8): Adjusts the delay between the start of the grinding cycle and the enabling of the gauging system (controls).
- LEDs relevant to controls (9): Light up to indicate activation of relevant controls.
- Potentiometers for adjusting firing points of controls (10): Determine the activation points for respective controls.
- Pushbuttons for displaying firing points of controls (11): When pressed, the meter indicates the firing point of the selected control.
- Selector switch for selection of contacts (12) (where present):
- Position 1: First contact connected.
- Position 2: Second contact connected.
- Position Σ: Algebraic sum of contacts is obtained. Normal operating position.
- Potentiometer for electric zero-setting (13): Used for electric zero-setting of the gauging system on a master workpiece. Available in 1-turn, 10-turns with window, or 10-turns with dial types. Its position should not be changed during the grinding cycle.
- Plate with indication of adjustment range (14): Indicates the range of potentiometer 13. For type "a" potentiometers, ranges can be 100 microns (0.04”) or 1000 microns (0.4"). For type "b" or "c" potentiometers, it indicates displacement per division (e.g., 0.2 µm for a 100-micron range).
- Plate for identification of electronic amplifier (T1)
- Plate with indication of mains voltage and fuse rating (T2)
- Identification plate of I/O module (T3)
- Connector for mains voltage input (H1)
- Connector for input/output signals (H2)
- Connector for measuring head 1 (W1)
- Connector for measuring head 2 (W2) (optional)
- Connector for analog output (W3) (optional)
- Note: W2 and/or W3 may not be present depending on the specific application.
Usage Features:
Adjustment of Delay Time (2.2.1):
The delay time (potentiometer 8) must be adjusted to ensure the gauging system is enabled only when the measuring head is correctly positioned over the workpiece. An electric retraction can be enabled during the delay to facilitate the upward movement of contacts.
Adjustment of Firing Points of Controls (2.3.1):
The E9 unit can have various control configurations (None, 1+zero, 2+zero, 3+zero controls). To adjust firing points:
- Set switch 6 to manual mode.
- Set controls from third to first (right to left). The final dimension control (0) is preset to activate at zero.
- Press the relevant pushbutton 11 and adjust potentiometer 10 until meter 3 shows the desired firing point.
- Set switch 6 to automatic mode.
Enabling of Amplifier to Automatic Cycle (2.5):
- Switch the unit on (pushbutton 1).
- Set switch 6 to manual mode and position the measuring head over the master workpiece.
- Check the zero-setting. Minor corrections can be made with potentiometer 13. If significant, a complete zero-setting is required.
- Ensure controls are correctly set using pushbuttons 11.
- Return the measuring head to its home position and set switch 6 to automatic mode.
- Warning: If the amplifier does not provide correct measurements in automatic mode, consult the Installation Manual for "Internal Programming and adjusting operations."
Maintenance Features:
Adjustment of Mechanical Zero of Meter (2.1, point 5):
If the meter does not read exactly zero when the equipment is off, adjust the screw under the closing plug. This must always be done with the equipment switched off.
Zero-setting of Measuring Head (3):
This is a critical maintenance operation to ensure accuracy and repeatability. It involves two stages:
-
Preparation:
- Set selector switch 6 to manual mode.
- Set zero-setting potentiometer 13 to the center of its range.
- Load the master workpiece into the machine.
-
Gauging System Zero-setting: This involves acting on the measuring head and electronic amplifier using specific mechanical methods:
-
Zero-setting with micrometric screw (3.1.1) (Figure 3):
- Loosen screw 1 and move contact 2 back.
- Loosen screws 3 and 4.
- Slide fork assembly on rod F to set distance between contacts 5 and 6 approximately equal to the workpiece diameter.
- Tighten screw 3.
- Move contacts to the master workpiece's central line, rotate knurled ring 7 until the meter indicator is near zero, then tighten screw 4.
- Move fork CF to find the maximum measurement value on the meter.
- Slide contact 2 to touch the workpiece, then tighten screw 1.
- Correct meter reading if necessary by loosening screw 4 and rotating ring 7, then retighten.
- Bring meter indicator to zero using potentiometer 13.
- In working conditions (workpiece and wheel revolving, coolant on), correct any differences with potentiometer 13.
-
Zero-setting with deflection guides (3.1.2) (Figure 4):
- Bring measuring head to position.
- Loosen screws 2 and 3.
- Move contacts to touch workpiece.
- Tighten screws 2 and 3.
- Set selector switch 12 (if present) to position 1.
- Adjust screw 1 to read zero on the meter.
- Set selector switch 12 to position 2.
- Adjust screw 4 to read zero on the meter.
- Set selector switch 12 to position Σ.
- If needed, adjust potentiometer 13 to read zero.
- Note: For single-contact heads, perform operations relevant to contact T1.
-
Zero-setting with screw guides or pawls (3.1.3) (Figure 5):
- Bring head to measuring position.
- Loosen screws 2 and 3.
- Set selector switch 12 (if present) to position 1.
- Adjust screw 1 to read zero, then tighten screw 2.
- Set selector switch 12 to position 2.
- Adjust screw 4 to read zero, then tighten screw 3.
- Set selector switch 12 to position Σ.
- If needed, adjust potentiometer 13 to read zero.
- Note: For single-contact heads, perform operations relevant to contact T1.
-
Zero-setting on support (3.1.4) (Figure 6):
- Bring head to measuring position.
- Loosen nuts 1 and 2.
- Set selector switch 12 (if present) to position 1.
- Turn knob 4 to read zero, then tighten nut 1.
- Set selector switch 12 to position 2.
- Turn knob 3 to read zero, then tighten nut 2.
- Set selector switch 12 to position Σ.
- If needed, adjust potentiometer 13 to read zero.
- Note: For single-contact heads, perform operations relevant to parts indicated in Figure B.
-
Quick zero-setting with handle (3.1.5) (Figure 7):
- Set selector switch 12 (if present) to position Σ.
- Turn knob 1 towards SET UP as far as it will go.
- Bring head to measuring position.
- Bring contacts on the sample workpiece.
- Turn knob 1 towards RUN as far as it will go, without pressing on contacts.
- If needed, adjust potentiometer 13 to read zero.
- Verify both contacts are within meter range using selector switch 12; if not, repeat zero-setting.
General Maintenance Note:
All servicing or special maintenance operations must be carried out by authorized personnel. Unauthorized tampering will void the equipment warranty.