D2090001U1
14
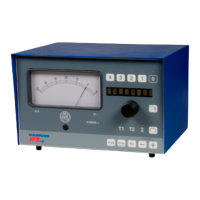
2.3 Controls
References in Figure 1 on page 8.
The controls are signals that are fed to the machine tool during the grinding cycle in
order to change the speed of stock removal in relation to the dimension of the
workpiece.
9
LEDs for controls.
They light up to indicate that the relevant control has been activated.
10
Potentiometers for adjusting firing points of controls.
They determine the firing points of the respective controls.
11
Pushbuttons for displaying firing points of controls.
When one of these pushbuttons is pressed, the meter indicates the firing
point of the control.
NOTE
The following number of controls can be present on the panel:
None
1 + zero control (sparkout, end of cycle)
2 + zero control (finish-grinding, sparkout, end of cycle)
3 + zero control (rough-grinding, finish-grinding, sparkout, end of cycle)
2.3.1 Adjustment of Firing Points of Controls
• Put the unit in the manual mode (switch 6 in position
)
• Set the controls, starting from the third one and ending with the first one (from left
to right). The final dimension control (0 È
ÈÈ
È) is preset to be activated at zero.
• Press the relevant pushbutton 11, and at the same time act on the potentiometer
10 so as to cause the meter 3 to indicate the desired firing point.
• Put the unit in the automatic mode (switch 6 in position
V
V
V
V
).