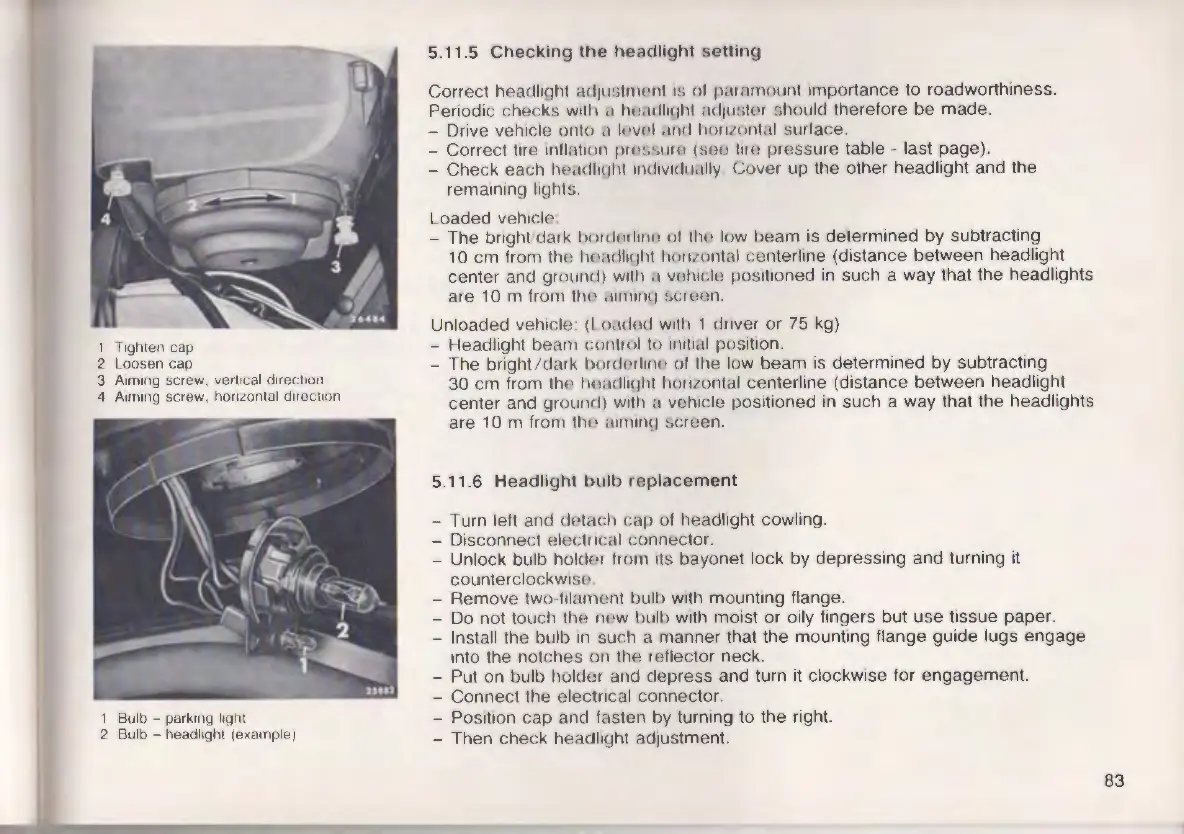
1 Tighten cap
2 Loosen cap
3 A1m1ng screw, vertical direction
4 A1m1ng screw, honLontal direct ion
1 Bulb - parking light
2 Bulb - headlight (example)
5.11.5 Checking the headlight set ting
Correct headlight adjU'..>lnwnt 1i, of P<II nmoun t importance to roadworthiness .
Periodic checks w1t1,
ii 11o,lClhql1t acf1w,to1 shmrld therefore be made.
- Drive vehicle onto
.1 h•vol ,111<1 ho11.1rn1tal surface.
- Corre ct tire infl.111011 pr
l''i 'i lll •, ( •,oo 111 L' pressu re table - last page).
- Check each lw,1dllqht 111ehv1<hi.llly Covf! 1 up the other headlight and the
remaining light s
Loaded vehicle
- The brightldark brncl111l11u• of
tlw low beam is determined by subtract ing
10 cm from the ho,1Cll11Jht l11111Lo11tal centerline (distance between head light
center and ground ) w1tll " vol11Gll' pos1t1oned in such a way that the headlights
are 1 O m from th<' .11111111tJ
•,< 1 oon
Unloaded vehic le
(I o,11lod w1t11 1 ch1ver or 75 kg)
- Headlight beam control lo 111111<11 position.
- The bright /da rk l>orcfnrl11H• of the low beam is determined by subtracting
30 cm from the lm i1<lli1Jht ho11LOntal cente rline (distance between headlight
center and ground) with a vehicle positioned in such a way that the headl ights
are
10 m from the ,111111n(J screen.
5.11.6 Headlight bulb replacement
- Turn left and detach cap of headlight cowl ing.
- Disconnect elect rical connector.
- Unlock bulb holcte, from its bayonet lock by depressing and turning it
counterclockw1so
- Remove two-filame nt bulb with mounting flange .
- Do not touch the new bulb with moist or oily fingers but use tissue pape r.
- Install the bulb 1n such a manner that the mounting flange guide lugs engage
into the notches on tM reflector neck.
- Put on bulb holder and depress and turn it clockwise for engagement.
- Connect the electncal co nnector.
- Position cap and fasten by turning to the right.
- Then check headlight adjustme nt.
83
 Loading...