Do you have a question about the Metra Electronics 95-6511 and is the answer not in the manual?
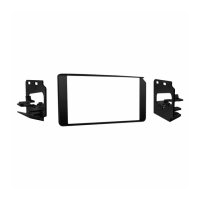
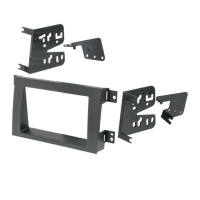
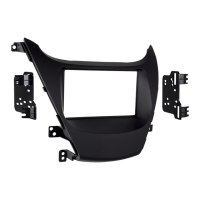
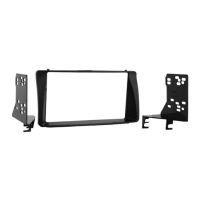
Lists key features like Double DIN Radio Provision and Stacked ISO Units Provision.
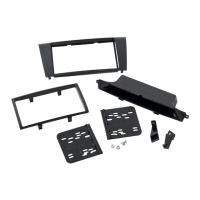
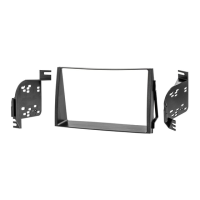
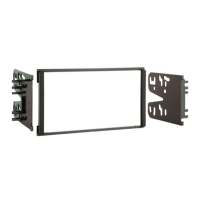
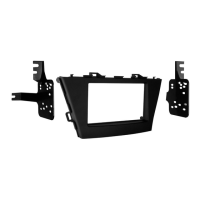
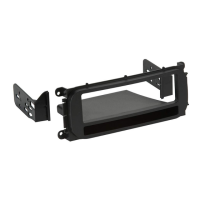
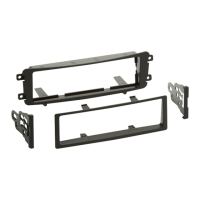
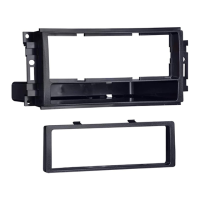
Details the parts included in the kit, such as Double DIN Brackets/Trim Plate.
Lists required harnesses and antenna adapters for installation.
Lists necessary tools for the installation process.
Disconnect the negative battery terminal to prevent an accidental short circuit.
Unsnap and remove the storage cup holder assembly.
Remove screws from bottom edge of center dash trim panel and remove panel.
Remove screws securing the radio, unplug and remove the radio.
Disconnect the negative battery terminal to prevent an accidental short circuit.
Unclip entire panel surrounding radio including a/c vents and clock.
Remove 7MM screws securing radio, unplug and remove radio.
Disconnect the negative battery terminal to prevent an accidental short circuit.
Remove screw covers and Phillips screws facing up above radio.
Lift up panel above radio, remove Phillips screws at front edge of trim panel.
Remove plastic push pins and slide panel to access bottom radio trim screws.
Remove Phillips screws exposed at the bottom edge of the radio trim panel.
Unclip and remove entire panel surrounding radio including climate controls.
Remove Phillips screws securing radio, unplug and remove radio.
Disconnect the negative battery terminal to prevent an accidental short circuit.
Unsnap and remove the center dash trim panel.
Remove screws securing the radio, disconnect and remove the radio.
Disconnect the negative battery terminal to prevent an accidental short circuit.
Unclip and remove the center console trim panel.
Unclip the center dash trim panel.
Remove screws securing the radio, disconnect and remove the radio.
Remove screws securing the radio rear support bracket and remove bracket.
Disconnect the negative battery terminal to prevent an accidental short circuit.
Unclip and remove the trim panel surrounding the radio.
Remove Phillips screws securing the radio.
Unsnap and remove center dash panel.
Remove 7mm screws securing the radio, unplug and remove radio.
Disconnect the negative battery terminal to prevent an accidental short circuit.
Unclip entire panel surrounding radio and climate controls, including a/c vents.
Remove 7MM screws securing radio, unplug and remove radio.
Disconnect the negative battery terminal to prevent an accidental short circuit.
Unclip and remove the entire factory radio trim panel including the a/c controls.
Remove 7MM screws securing radio to dash to remove.
Note on cutting metal bracket in sub-dash for Double DIN radio chassis clearance.
Disconnect the negative battery terminal to prevent an accidental short circuit.
Unsnap and remove the small and larger trim around the console shifter.
Remove one Phillips screw from inside the small storage pocket.
Unsnap and remove the dash panel from around the radio including climate controls.
Remove Phillips screws securing the radio, unplug and remove radio.
Disconnect the negative battery terminal to prevent an accidental short circuit.
Unclip and remove the lower center trim below a/c controls.
Remove Phillips screws exposed behind lower center panel.
Unclip and remove the upper center trim starting towards the rear of the panel.
Remove Phillips screws exposed behind upper center panel.
Unclip entire panel surrounding radio and climate controls, including a/c vents.
Remove 7MM screws securing radio, unplug and remove radio.
Note on cutting metal bracket in sub-dash for Double DIN radio chassis clearance.
Disconnect the negative battery terminal to prevent an accidental short circuit.
Unsnap and move shifter trim to the side.
Unsnap center dash trim panel, do not remove until climate controls are removed.
Remove Phillips screws holding climate control panel to backside of center dash panel.
Remove 7MM screws securing radio, unplug and remove radio.
Metal bracket in sub-dash needs removal for aftermarket Double DIN radio depth.
Disconnect the negative battery terminal to prevent an accidental short circuit.
Remove T25 Torx screw in the compartment next to the cup holders.
Remove Phillips screws in the pocket below the climate control in the front of the center console.
Remove 9/32" screws in the cup holders.
Push down on collar below shifter then pull shifter straight up to remove.
Unclip and remove the top of the center console including the cup holders.
Unclip trim panel from accessory socket on radio trim panel, then remove T25 Torx screw.
Remove T25 Torx screws from the top of the radio trim panel.
Unclip and remove the entire radio trim panel including the climate controls.
Remove 9/32" screws securing the radio.
Attach the Double DIN brackets/trim plates to the Double DIN Radio using screws.
Attach the Double DIN brackets/trim plates to the stacked ISO units using screws.
Details EIA color code and recommended wiring connection method (Strip, Splice, Solder, Tape).
| Color | Black |
|---|---|
| ISO DDIN Radio Provision | Yes |
| Painted | Yes |
| Material | Plastic |
| Wiring and Antenna Connections | Included |
| Product Type | Dash Kit |
| Type | DDIN |
| Compatible With | 2006-Up Opel GT, 2007-2010 Pontiac Solstice |