4. MEASURING PREPARATION
4-1. The original screen
4-2. Entry the measurement Screen
SCREEN 1(4-2) SCREEN 2(4-2)
1) When the bottom right corner "NO DISK" and showed flashing, it indicates the
SD CARD is not inserted (as SCREEN 1)
2) The bottom left display of screen 2 will show as " SD Check "along with
blinking while inserting SD CARD then disappears after several seconds that
indicates the data from SD CARD has been read completed.
4-3. The summary description of keyboard
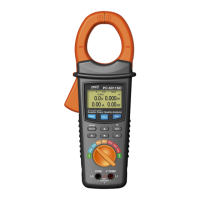
1) Function Rotary switch(3-13,Fig.1):Select the measurement function rotary
switch.
2) FUNC KEY (3-4,Fig.1): Press the key to select the screen display.
3) HOLD KEY (3-5,Fig.1): Press the key to freeze the display reading.
4) REC KEY (3-6,Fig.1): The data record key for Sd Card.
5) SETUP(ENTER) KEY (3-7,Fig.1): Press the key to setup the function before
measuring or select function input determine.
6) EXIT( ) KEY (3-9,Fig.1): Press the key to exit setting screen or
measurement screen LCD backlight key .
7) ▲ KEY (3-8,Fig.1): Press the key to move the cursor up in setting screen.
8) ▼ KEY (3-11,Fig.1): Press the key to move the cursor down in setting
screen.
9) ◄ KEY (3-10,Fig.1): Press the key to move the cursor left in setting screen
or harmonic analysis left Key.
10) ► KEY (3-12,Fig.1): Press the key to move the cursor right in setting
screen or harmonic analysis right Key.
6