Do you have a question about the MSI MS-7392 and is the answer not in the manual?
Intellectual property notice for the document.
Lists registered trademarks and the document's revision history.
Provides contact information and website links for technical assistance.
Caution regarding the danger of explosion if the battery is incorrectly replaced.
A comprehensive list of 12 safety precautions for handling and operating the equipment.
Statement on FCC compliance for Class B digital devices and interference limits.
Notices regarding modifications and the use of shielded cables for compliance.
Overview of the P31/G31 Neo2 Series mainboards and their capabilities.
Details processor, FSB, chipset, memory, and LAN support.
Outlines audio, IDE, SATA, and RAID capabilities.
Lists floppy port, back panel connectors, pinheaders, and expansion slots.
Specifies the ATX form factor and mounting hole details.
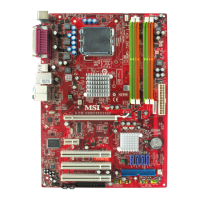
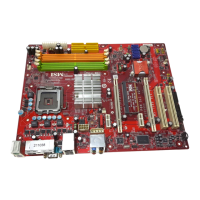
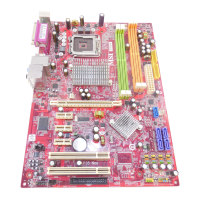
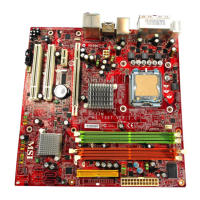
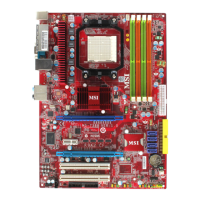
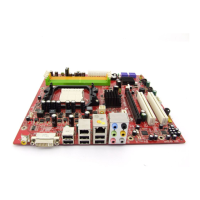
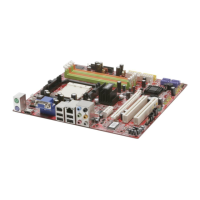
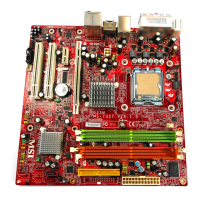
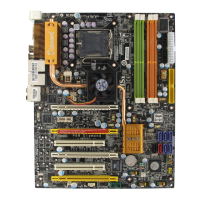
Visual diagram identifying mainboard components with page references.
Images and names of items included in the product package.
Overview of hardware setup procedures and safety precautions.
Diagram showing component positions on the mainboard with references.
Crucial advice on CPU installation, thermal paste, and preventing overheating.
Details on CPU pin-pad and surface, including alignment keys.
Steps for protecting the CPU socket and installing the cooler.
Instructions on seating the CPU correctly and securing the load plate.
Steps for attaching the heatsink and confirming its proper installation.
Table detailing valid memory module combinations for dual and single channel modes.
Step-by-step guide for inserting memory modules into DIMM slots.
Important notes on DDR2 compatibility, channel modes, and density limits.
Details the ATX 24-pin (ATX1) and 12V (JPW1) power connectors.
Advice on required power supply wattage and connector usage.
Describes Mouse/Keyboard, Parallel, Serial, VGA, 1394, and USB ports.
Details the RJ-45 LAN jack and its LED indicators for network status.
Explains the function of each colored audio jack for different sound outputs.
Describes the FDD1 and IDE1 connectors and IDE master/slave configuration.
Details SATA connectors and warnings about cable folding.
Explains fan connectors, pinout, and CPU fan speed control options.
Describes connectors for chassis intrusion, audio input, and TPM modules.
Provides pinout definitions for front panel connectors (switches, LEDs, speaker).
Defines pin assignments for High Definition and AC'97 audio on the front panel.
Details connectors for IEEE1394 and S/PDIF digital audio interfaces.
Provides pin definitions for front USB connectors and emphasizes correct wiring.
Explains the purpose and operation of the JBAT1 jumper for clearing CMOS settings.
Describes PCI Express and PCI slots, including transfer rates and IRQ routing.
Overview of the BIOS Setup program and its purpose.
Explains the Power-On Self Test and how to access the BIOS setup.
Guides on how to read and interpret the BIOS version information.
Lists and explains the keyboard shortcuts used within the BIOS setup interface.
Describes how to use the F1 key to access the BIOS setup help screen.
Menu for setting date, time, and other basic system parameters.
Menu for configuring advanced system features and AMI-specific options.
Menu for enabling/disabling onboard peripherals.
Menu for configuring system power saving features.
Menus for Plug and Play/PCI settings and hardware monitoring.
Menus for overclocking, voltage adjustments, and loading default settings.
Options for setting BIOS passwords and saving/exiting setup.
Settings for system date, time, and IDE/SATA device detection.
Explains SATA device settings like LBA mode, DMA, and S.M.A.R.T.
Option to configure the type of floppy drive installed.
Read-only display of system information including CPU, BIOS version, and memory status.
Settings for Boot Sector Protection and Full Screen Logo Display.
Options for Quick Booting and Boot Up Num-Lock LED status.
Enables or disables the APIC for expanding IRQ resources.
Configuration options for CPU features like Execute Disable Bit and Hyper-Threading.
Details chipset features like High Precision Event Timers (HPET).
Settings for boot device order and Trusted Computing/TPM support.
Options for enabling/disabling USB, LAN, and HD Audio controllers.
Settings for IDE, SATA, and RAID controllers.
Options for configuring serial and parallel ports.
Settings for ACPI functionality and system standby states (S1/S3).
Configuration of suspend timeouts, power button behavior, and AC power loss recovery.
Options for configuring devices that can wake the system from sleep modes.
Settings for primary graphics adapter and PCI latency timer.
Specifies the IRQ line for each PCI slot.
Explains how to set and manage IRQ lines, and the concept of IRQ signaling.
Settings for chassis intrusion detection and CPU smart fan speed control.
Displays system health information like temperatures, fan speeds, and voltages.
Read-only display of current CPU and DRAM frequencies.
Explanation of the automatic overclocking feature and its levels.
Options for Intel EIST, CPU FSB frequency, and adjusted CPU frequency.
Introduces the sub-menu for detailed DRAM timing adjustments.
Explains various DRAM timing settings like CAS# Latency and RAS#.
Options for adjusting DDR memory frequency and PCI-E frequency.
Details voltage adjustments and the function of Spread Spectrum for EMI reduction.
Explains how to load BIOS default settings for system stability.
Details how to load factory default settings for optimal performance.
Guides on managing BIOS passwords for system security.
Introduction to the utility and its system requirements for installation.
Explains how to launch the Dual Core Center from system tray, desktop, or start-up menu.
Notes on full functionality requirements and introduction to the main interface buttons.
Describes environment settings and user profile management for custom configurations.
Explains the sub-menus for monitoring and adjusting system parameters.
Details the automatic overclocking feature and its operation.
Guides on monitoring and adjusting CPU, FSB, GPU, and memory clock speeds.
Explains how to view and adjust various system voltages for performance tuning.
Guides on monitoring and setting fan speeds for optimal cooling.
Explains how to view system temperatures for CPU, GPU, and motherboard.
Guides on setting custom clock, fan speed, and voltage values and saving them as profiles.
Explains setting system temperature and fan speed thresholds with warning options.
Guides on selecting and applying saved user profiles.
Introduces the 10-channel DAC and 7.1 sound playback features of the ALC888 audio chip.
Step-by-step instructions for installing the Realtek HD Audio driver on Windows XP/2000.
Guides on finishing the driver installation and restarting the computer.
Explains how to launch the HD Audio Configuration tool from the system tray.
Describes options for choosing sound effects and environment simulations.
Guides on using the equalizer, loading/saving presets, and resetting settings.
Details the 10-band equalizer and its functional buttons for saving, loading, and resetting.
Highlights pre-optimized equalizer settings for quick user enjoyment.
Explains Karaoke mode features like vocal cancellation and key adjustment.
Guides on adjusting individual volume levels for front and rear audio panels.
Details the Multi-Stream feature for simultaneous audio output from different sources.
Explains how to set up and play multiple audio sources simultaneously.
Guides on controlling playback devices and selecting output ports.
Describes mute functions and tool options for volume controls.
Explains how to select recording devices and mute inputs.
Details tool options for recording volume controls and multi-streaming.
Guides on configuring multi-channel audio operations and speaker setups.
Details options for disabling front panel jack detection and muting rear output when headphones are plugged in.
Explains recommended sampling rates and output source settings for S/PDIF.
Guides on testing individual speakers or using the auto test feature.
Explains microphone settings for reducing noise and canceling acoustic echoes.
Guides on adjusting 3D positional audio and selecting audio environments.
Provides information about the audio utility, driver versions, and codecs.
Illustrates speaker jack connections for 2-channel stereo output.
Illustrates speaker jack connections for 4-channel output.
Illustrates speaker jack connections for 6-channel output.
Illustrates speaker jack connections for 8-channel output.
Introduces the ICH7R controller and its support for SATA RAID levels.
Details SATA II features and provides explanations for RAID levels 0, 1, 5, and 10.
Guides on entering the RAID configuration utility via BIOS by pressing Ctrl+I.
Introduces the main functions for managing RAID volumes: create, delete, reset.
Steps for configuring a new RAID volume, including naming and selecting the RAID level.
Guides on selecting disks and configuring strip size for the RAID array.
Explains how to specify the capacity for the new RAID volume.
Guides on confirming the RAID volume creation and adjusting volume sizes.
Details the process for deleting a RAID volume and important warnings about data loss.
Guides on resetting disks to non-RAID and important warnings regarding data loss and compatibility.
Instructions for installing the RAID driver during a fresh Windows XP/2000 installation.
Steps for installing the RAID driver on an already installed Windows XP/2000 system.
How to confirm the successful installation of the RAID driver in Device Manager.
Guides on installing the Intel Matrix Storage Console from the MSI CD.
Details the steps of the InstallShield Wizard for the Intel Matrix Storage Manager.
Covers reading the license agreement and selecting installation components.
Guides on choosing installation and program folders for the software.
Shows the installation progress and completion window for the setup.
Lists necessary steps before migrating to RAID, including BIOS settings and driver installation.
Guides on creating a new RAID volume from an existing disk.
Details the steps to start the wizard for creating a RAID volume from an existing drive.
Explains how to name the RAID volume and select the desired RAID level (0, 1, 5).
Discusses choosing the appropriate strip size for different RAID configurations.
Guides on selecting the source disk for migrating data to a new RAID volume.
Guides on selecting the target hard drive(s) for the RAID volume creation.
Explains how to specify the size of the new RAID volume.
Guides on the final steps before starting the RAID volume creation and data migration.
Details the RAID migration process, its duration, and how to monitor its status.
Steps to take when a hard drive member is missing from a RAID array.
Procedures for replacing a failed hard drive and rebuilding the RAID array.
Guides on using the utility to rebuild the RAID volume onto a newly installed hard drive.
| Model | MSI MS-7392 |
|---|---|
| Form Factor | ATX |
| CPU Socket | LGA 775 |
| Memory Type | DDR2 |
| Memory Slots | 4 |
| Maximum Memory | 8 GB |
| PCI-E x16 | 1 |
| PCI-E x1 | 2 |
| PCI Slots | 3 |
| SATA | 4 |
| IDE | 1 |
| USB Ports | 8 |
| Audio | Realtek ALC888 |
| LAN | Realtek RTL8111 |