M1.2.HB240-HB240M.NLFREN 21112017
12
NL
3�4 Punten te controleren na de installatie
Te controleren JA NEEN
1 Zijn de kolommen perfect verticaal?
2 Zijn de kolommen perfect parallel?
3 Zijn de olieslangen correct aangesloten?
4 Zijn de staalkabels correct aangesloten?
5 Zijn de hefarmen correct bevestigd?
6 Zijn de elektrische aansluitingen correct uitgevoerd?
7 Zijn alle bouten correct vastgedraaid?
8 Zijn alle onderdelen, die een smering vereisen, goed gesmeerd?
4 Gebruikaanwijzingen
4�1 Voorzorgmaatregelen
• Controleer alle afdichtingen van de olieslangen. De hefbrug mag alleen worden bediend als er geen lekkage is.
• Als een veiligheidsinrichting niet goed werkt, gebruik de hefbrug niet.
• De hefbrug kan het voertuig niet heffen of laten zakken indien zijn zwaartepunt niet correct gecentreerd is op de hefarmen.
Anders aanvaarden wij en onze verdeler geen aansprakelijkheid als problemen ontstaan.
• De bediener en andere personen moeten op een veilige plaats staan tijdens het hef- of daalproces.
• Wanneer de hefarmen op de gewenste hoogte zijn, ontkoppel de hefbrug van de stroomtoevoer, om een verkeerde
handeling door onbevoegde personen te voorkomen.
• Voordat u onder het voertuig begint te werken, maak zeker dat de veiligheidspennen goed ingeschakeld zijn, en laat
niemand onder het voertuig tijdens het hef- of daalproces.
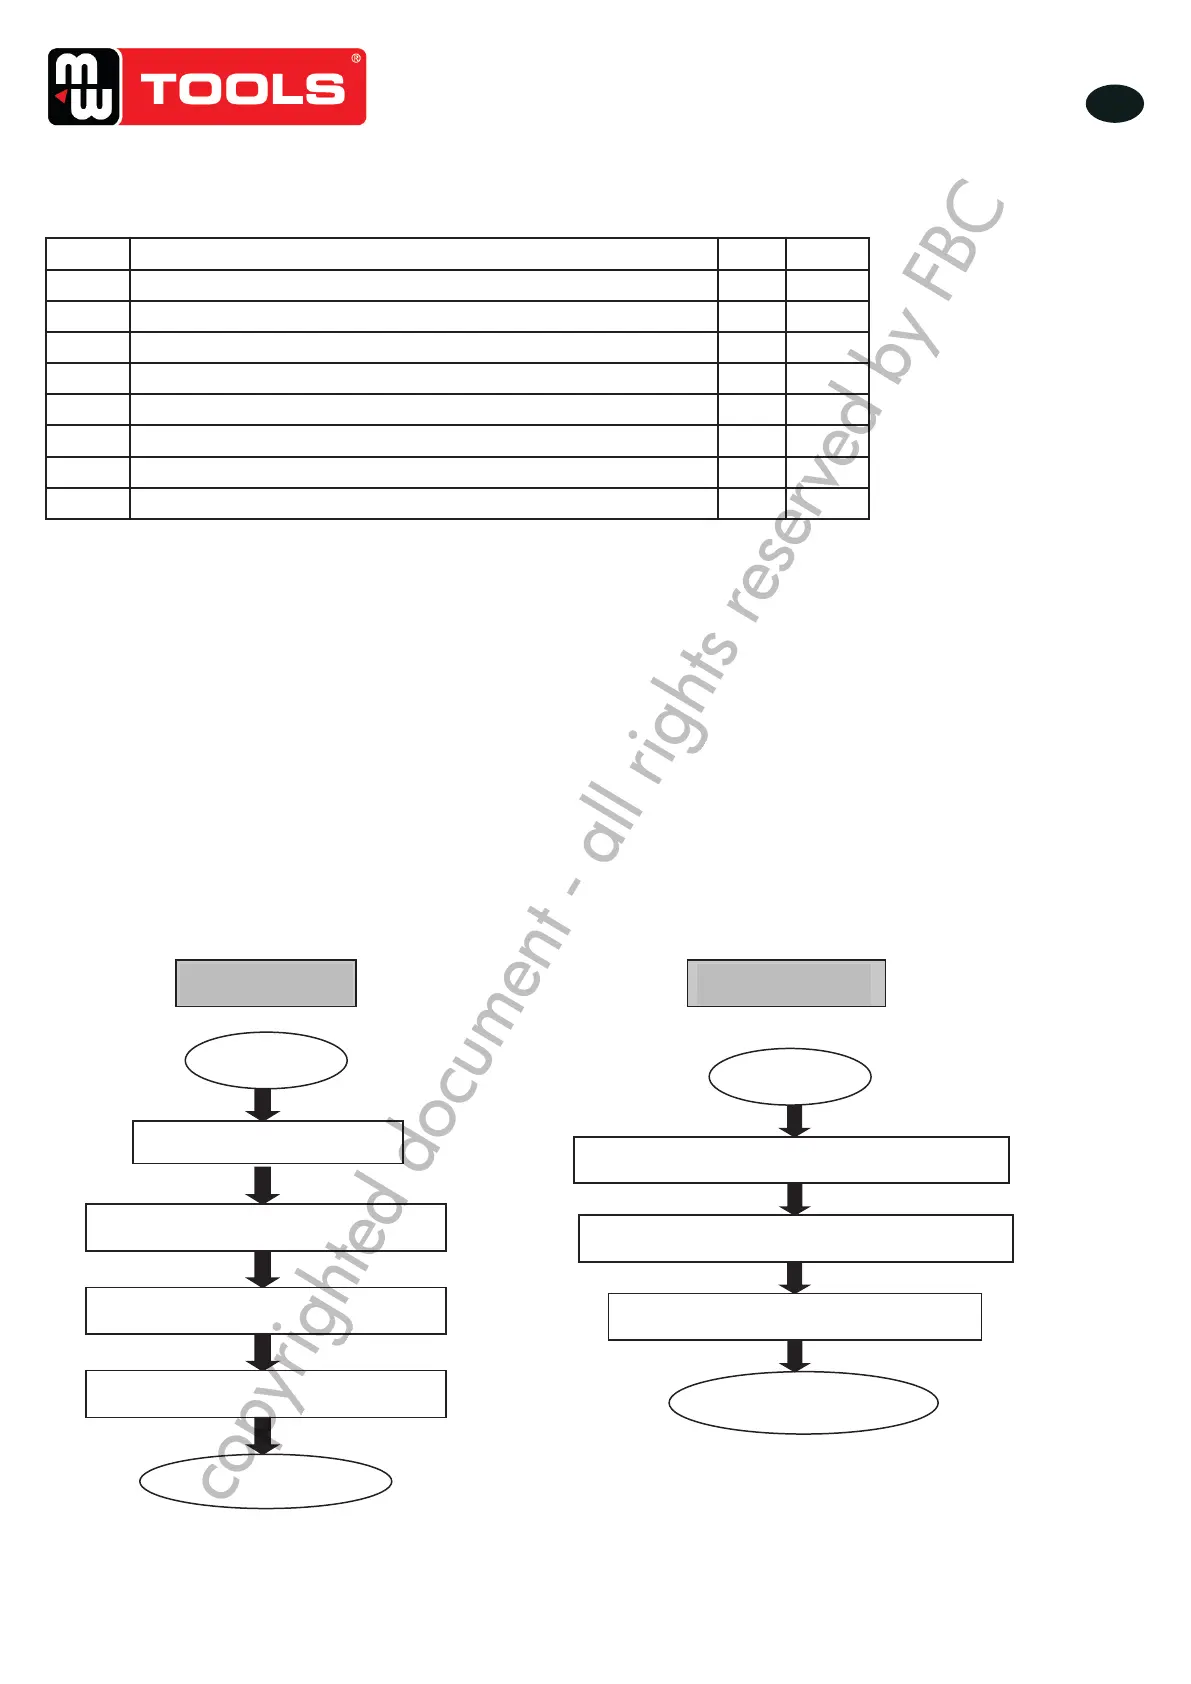
4�2 Werking schema
Motor drives the gear pump work
Cylinder piston drives the chain work
Chain drives the carriage rise
Press UP button to raise the carriage 5cm
Pull the unlocking steel cable at both sides
The lift is lowered
Press the unloading handle
3.4 Items to be checked after installation.
1 Are the posts vertical to the floor?
2 Are the two posts paralleled?
3 Is the oil hose well connected?
4 Is the steel cable well connected?
5 Are all lifting arms well fixed?
6 Are electrical connections right?
7 Are the rest joints firmly screwed?
8 Are all items need lubricating added with grease?
OPERATION INSTRUCTIONS
4.1 Precautions
4.1.1 Check all the joints of oil hose. Only when there is no leakage, the lift can start work.
4.1.2 The lift, if its safety device malfunctions, shall not be used.
4.1.3 The machine shall not lift or lower an automobile if its center of gravity is not positioned midway of the swing arms.
Otherwise, the we as well as our dealers will not bear any responsibility for any consequence resulted thereby.
4.1.4 Operators and other personnel concerned should stand in a safety area during lifting and lowering process.
4.1.5 When lifting arms rise to the desired height, switch off the power at once to prevent any mal-operation done by
unconcerned people.
4.1.6. Make sure the safety lock of the lift is engaged before start working under the vehicle and no people under the vehicle
during lifting and lowering process.
4.2 Flow chart for operation
Raising Lowering
Druk op de knop UP
De motor draait, de pomp werkt
De piston drijft de ketting
De hefbrug daalt
De hefbrug stijgt
Stijgen Dalen
De ketting drijft de drager naar boven
Druk op de knop UP om de drager van 5 cm te heffen
Trek de ontgrendeling staalkabel aan beide zijden
Druk op de ontladingshendel
copyrighted document - all rights reserved by FBC