Chapter 2 Installing the Hardware and Software
© National Instruments Corporation 2-15 FP-2000/2010/2015 User Manual
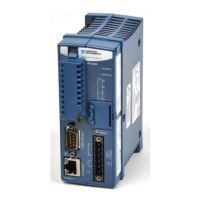
The FP-20xx supplies 9 W of power to the I/O modules. Using certain I/O
modules that consume more than 1 W may reduce the total number of
I/O modules allowed in the bank to less than nine. Refer to the operating
instructions for each I/O module for power consumption information.
Connecting to Field Devices
Use each I/O module’s operating instructions, or the diagram under its
removable label, to help you connect your field devices.
Powering Up the FP-20xx
Plug in each power supply to the FieldPoint bank. At power-up, the
FP-20xx runs a power-on self test (POST) that takes several seconds.
You should see the POWER and STATUS LEDs come on. After about
five seconds, the STATUS LED begins flashing. This indicates that the
FP-20xx is ready to be configured, and you can proceed to installing the
FieldPoint software.
If you have already assigned an IP address to the FP-20xx,theSTATUS
LED turns off, and the A, B, C,andD LEDs come on for about 15 seconds
as LabVIEW RT starts up. Once they turn off, the I/O module READY
LEDs come on, and the FP-20xx is ready for use.
If the STATUS LED does not light up as described here, refer to the
STATUS LED Error Indications sectionofAppendixC,Troubleshooting.
Installing Software on the Host PC
The FP-20xx has the embedded LabVIEW RT Engine and FieldPoint
software pre-installed, but you must install the necessary software on the
host PC. Follow these steps to install the FieldPoint software on the
host PC.
1. Install the software packages you plan to use, such as LabVIEW,
LabVIEW RT, Lookout, Measurement Studio, or LabWindows/CVI,
before you install the FieldPoint software. The FieldPoint software
installation installs the LabVIEW VIs and examples, Lookout driver
class, and LabWindows/CVI instrument driver only if it finds the
corresponding development software installed.
2. Close all other applications.

 Loading...