Caution Do not mate or unmate the power supply connectors while
power is applied.
1. Ensure that your power supply is powered o.
2.
Insert the power connector plug into the power connector receptacle of the NI
sbRIO device until the connector latches into place.
3. Turn on the power supply.
Powering On the NI sbRIO Device
The NI sbRIO device runs a power-on self test (POST) when you apply power to the
device. During the POST, the Power and Status LEDs turn on. When the Status LED
turns o, the POST is complete. If the LEDs do not behave in this way when the
system powers on, refer to the
STATUS LED Indicators section of this document to
help you troubleshoot the issue.
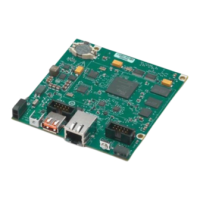
Connecting the sbRIO-9607 to the Host Computer
Complete the following steps to connect the sbRIO-9607 to the host computer using
the RJ-45 Ethernet port.
1. Power on the host computer.
2. Connect the sbRIO-9607 to the host computer using a standard Category 5
(CAT-5) or better shielded, twisted-pair Ethernet cable.
Caution To prevent data loss and to maintain the integrity of your
Ethernet installation, do not use a cable longer than 100 m.
The first time you power up the device, it attempts to initiate a DHCP network
connection. If the device is unable to initiate a DHCP connection, it connects
to the network with a link-local IP address with the form 169.254.x.x. Aer the
device has powered up, you must install soware on the device and configure
the network settings in MAX.
Note Installing soware may change the network behavior of the
device. For information about network behavior by installed
ni.com
8
sbRIO-9607 Getting Started
 Loading...