Security Gateway Manual Netgate-8300
Power Supply Unit (PSU) Bays (1)
The chassis contains two power supply unit bays located on the far left of the front side. The PSUs are hot
swappable and the unit can operate with one or both PSUs connected to line power.
The Netgate 8300 BASE unit ships with one power supply, the Netgate 8300 MAX unit ships with dual power
supplies. Additional power supplies are available. A second PSU can be added to the BASE model later by
removing the blank panel cover.
Each PSU is 500W with 110V/240V AC input. It contains a standard IEC320-C16 (3-pin) power receptacle
which accepts a standard IEC320-C15 power plug.
Serial Console Port (2)
Clients can access the serial console using the RJ45 “Cisco” style console port with a separate cable and USB
serial adapter or client hardware port.
Note: The RJ45 Serial Console port is only for use with the Serial Console. It cannot be used for any other
purpose.
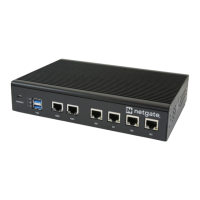
2x USB 3.0 Ports (3)
USB ports on the device can be used for a variety of purposes.
The primary use for the USB ports is to install or reinstall the operating system on the device. Beyond that, there
are numerous USB devices which can expand the base functionality of the hardware, including some supported
by add-on packages. For example, UPS/Battery Backups, Cellular modems, GPS units, and storage devices.
Though the operating system also supports wired and wireless network devices, these are not ideal and should
be avoided.
Reset Button (4)
The Reset Button is used to perform the Factory Reset Procedure.
Pressing and immediately releasing the button has no effect, it does not perform a hardware reset.
See Factory Reset Procedure for details on how to use the button to perform a factory reset.
ACPI Power Button (5)
The large round lighted Power Button behaves the same as a typical ACPI power button.
If the device is powered on and running, pressing the button immediately performs a graceful shutdown and the
system enters a standby state.
If the system is in a powered off or standby state, pressing the power button immediately powers on the device
and starts the boot process.
If the system is unresponsive, holding in the power button for 10 seconds will forcefully power off the device.
Press the power button again to turn it back on.
Status LEDs (6)
The status LEDs, including the backlight on the power button, indicate various status information for the device.
The power button LED and the first two LEDs from top to bottom are for OS status, while the bottom LED is for
the status of the baseboard management controller (BMC).
See Status LEDs for information on interpreting the meaning of different LED states.
10G/1G SFP+ Networking Ports (7)
This group of four ports labeled P0-P3 are 10G/1G SFP+ Networking Ports.
1G SFP+ Networking Ports (8)
This group of four ports labeled P4-P7 are 1G SFP+ Networking Ports.
2.5G RJ45 Networking Ports (9)
This group of three ports labeled P8-P10 are 2.5G RJ45 Networking Ports.
© Copyright 2024 Rubicon Communications LLC 16