Do you have a question about the Nibe S1156 and is the answer not in the manual?
Explains how to use the touchscreen for selecting, scrolling, and browsing through menus and information.
Guides users to view system status and make common settings easily based on the product.
Allows users to set the desired temperature in the installation's zones.
Enables temporary increase or stopping of hot water temperature for user convenience.
Provides product name, serial number, software version, and service details for easy access.
Manual describes installation & service procedures for specialists; must be left with customer.
Details the location of the serial number on the S1156 unit, display, and type plate.
Explains symbols indicating danger, cautions, or tips within the manual.
Explains symbols on product labels, such as warnings for dangerous voltage.
Installation subject to building regulation approval; use manufacturer's parts.
Explains the Benchmark scheme responsibilities for manufacturers and installers.
Details the product guarantee, conditions, and warranty period.
Specifies the required 230V 50Hz supply and adherence to wiring regulations.
Outlines standards for domestic hot water circuits, connections, and fittings.
Refers to best practices for installation covered by relevant BS standards.
Checklist items for inspecting the brine side of the installation.
Checklist items for inspecting the climate system's components and settings.
Checklist items for inspecting electrical connections and components.
Checklist items for miscellaneous aspects like warranty and the Benchmark checklist.
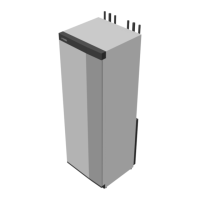
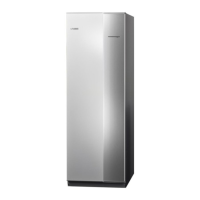
Instructions for transporting and storing the S1156 unit, including caution about weight.
Specifies required free space around the unit for installation and service access.
Instructions on how to separate the heat pump by pulling out the cooling module.
Guidelines for positioning, levelling, and connecting the unit, and handling water.
Lists the items included in the kit of supplied components for the heat pump.
Instructions on how to open the front hatch and remove the front panel.
Step-by-step instructions for reassembling and removing the front/side panels.
Overview of the heat pump's general layout with a diagram and component labels.
Lists and describes the various pipe connection points on the unit.
Lists and describes the main HVAC components of the heat pump.
Lists and describes various sensors and related components used in the system.
Lists and describes the electrical components of the heat pump.
Lists miscellaneous items like rating plates and cable glands.
Details the distribution boxes and their components for 8 kW and 13 kW models.
Illustrates and labels the cooling module components for 8 kW and 13 kW models.
Lists components related to the cooling system, such as evaporators and condensers.
General guidelines for pipe installation, operating temperatures, and required valves.
Notes about potential issues and considerations when installing S1156 in hard water areas.
Procedures for flushing and cleaning the climate system before and after installation.
Provides a key to understand symbols used in system diagrams and technical drawings.
Explains the overall system diagram of the S1156 heat pump and its circuits.
Provides essential dimensions and pipe connection details for the unit.
Details for the brine side, including collector hose considerations and antifreeze.
Instructions on how to angle brine connections for side connection.
Instructions for insulating indoor brine pipes and installing system components.
Explains what a climate system is and how it connects to the S1156.
Steps for connecting expansion vessels, pressure gauges, and shut-off valves.
Information on activating hot water production and required settings.
Instructions for connecting hot water sensors for accurate temperature readings.
Describes controlling hot water circulation and its activation via menus or accessories.
Information about the UKV accumulator tank and its various applications.
Explains when a 2-pipe-connected buffer vessel is used in climate systems.
Mentions different installation ways and where to find more option information.
Details for fixed condensing operation, including required sensors and menu settings.
Information on supplementing the installation with an exhaust air module for ventilation recovery.
Explains the use of an intermediate heat exchanger for groundwater systems.
Describes connecting an accessory for properties with multiple climate systems requiring different temperatures.
Information on connecting passive cooling accessories like fan coils.
Instructions on how to heat a pool using the system and the POOL 40 accessory.
General guidelines for electrical installation, wiring, and essential safety precautions.
Explains the function of the miniature circuit breaker (FC1) and its internal fusing.
Instructions on removing the unit's covers to access electrical connection points.
Explains the function of the temperature limiter (FQ10) and how to reset it.
Describes using a tool to lock and release cables in the unit's terminal blocks.
Illustrates and describes the terminal block connections for wiring.
Details on terminal blocks and power connection for the unit.
Instructions on how to connect the incoming supply electricity to terminal blocks.
Notes on placing the enclosed label on the electrical connection's cover.
How to connect a separate operating cable for external control voltage.
Explains how tariff blocking affects immersion heater and compressor operation.
Connects external sensors and other devices to terminal blocks on the base board.
Details on connecting outdoor temperature sensors and hot water sensors.
Optimal placement and connection of the outdoor temperature sensor (BT1).
Connection of the hot water charging sensor (BT6) for temperature monitoring.
Connection of the hot water top sensor (BT7) for upper tank temperature readings.
Connection of an external supply temperature sensor (BT25) for system monitoring.
Connection of the hot water charging start sensor (BT5) for system control.
Placement and connection of the enclosed room sensor (BT50) for temperature control.
How to connect electricity or energy meters for pulse counting.
Explains the function of the integrated load monitor for managing power steps.
Information on multi-installation and communication between interconnected units.
How to interconnect multiple heat pumps, defining main and subordinate units.
Instructions for connecting accessories that use an accessory board.
Details on software-controlled AUX inputs and outputs for functions and sensors.
Explains selectable inputs on the base board for various system functions.
Describes the selectable output (AA2-X27) as a potential-free switching relay.
Instructions for connecting to myUplink using a network cable.
Lists available options for AUX inputs, including temperature sensors and monitors.
Details different temperature sensors that can be connected to AUX inputs.
Lists monitor functions that can be connected to AUX inputs.
How to connect an external switch to activate various functions.
Explains the SG Ready function for smart grid networks and its requirements.
How to connect an external switch to block functions and the associated risks.
Lists possible selections for AUX outputs, including indications and control functions.
Options for outputting indications like alarms or low electricity price.
Options for controlling external devices like pumps or valves via AUX output.
Tables showing maximum phase current for different immersion heater power steps.
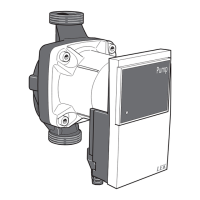
Diagram for connecting an external circulation pump to the AUX output.
Explains the function and activation of emergency mode for system interference or service.
Checks and preparations before commissioning, including circuit breaker and freezing risk.
Detailed steps for filling and venting the climate and brine systems.
Steps to fill the climate system with water and vent it.
How to vent the heat pump and the climate system to remove air.
Instructions for filling the brine system with the correct antifreeze mixture.
Steps for venting the brine system using a level vessel or expansion vessel.
Guide for starting the unit for the first time and performing initial inspections.
Instructions on how to use the start guide for initial setup and basic settings.
Explains the initial startup process and the importance of the start guide.
Explains navigation within the start guide, including scroll bar and option selection.
How to adjust pump speeds for automatic and manual operation for optimal flow.
Automatic control of brine and climate system pumps based on temperature difference.
Manual settings for brine pump speed, including caution for passive cooling.
Manual operation of the heating medium pump and temperature difference considerations.
Explains how the slope of the heating curve affects supply temperature.
Describes how maximum and minimum values flatten the heating curve.
Explains how curve offset changes supply temperature uniformly across outdoor temperatures.
Steps for selecting climate system, curve, offset, and temperature settings.
How to read the heating curve by dragging on the display axes to find values.
Provides map-based values for automatic heating control based on location and system type.
Lists requirements for myUplink communication with the S1156 unit.
Steps to connect the system to myUplink, including connection type and string.
Details the different service levels available through myUplink (Basic, Premium).
Overview of the display unit, including status lamp, USB port, and on/off button.
Explains the meaning of the status lamp's different colors and states.
Describes the USB port's function for software updates and logging.
Details the three functions of the on/off button (SF1): start, switch off, emergency mode.
Explains that instructions, settings, and operational information are shown on the display.
Explains touchscreen navigation using pressing and dragging for selecting, browsing, and scrolling.
How to change settings, including immediate changes for on/off settings.
Describes different menu types like Home Screens and Function Pages.
Explains Smartguide and Function pages for viewing status and making common settings.
Provides product name, serial number, software, and service details for easy access.
Describes how to find all menus and make advanced settings via the menu tree.
Explains climate systems, zones, and how they can contain accessories.
Section detailing settings for indoor climate control, including temperature and ventilation.
How to make temperature settings for the installation's climate system.
Setting the desired heating temperature, with or without room sensors.
Making settings for room sensors and zones, and assigning sensors to zones.
Naming room sensors and setting their control function (on/off).
Adding and naming zones, and assigning them to a climate system.
Information on accessories/functions affecting indoor climate.
How to name the installation's climate system.
Access to advanced settings for users, including sub-menus.
Viewing and setting the heating curve slope to ensure even indoor temperature.
Setting the heating curve offset based on external switch activation.
Setting the minimum permitted supply temperature for the climate system.
Setting the maximum permitted supply temperature for the climate system.
Creating a custom heating curve by setting desired supply temperatures.
Adjusting the heating curve at a specific outdoor temperature.
Section for settings related to hot water production and circulation.
Selecting temporary increases in hot water temperature for specific durations.
Choosing between Small, Medium, Large, or Smart control for hot water demand.
Information on external factors affecting hot water operation.
Setting periodic increases in hot water temperature to prevent bacterial growth.
Scheduling hot water circulation pump operation based on time periods and active days.
Provides access to information about the system's operating status, logs, and product details.
Displays current operating status, temperatures, and information from wireless units.
Shows average indoor temperatures week by week and outdoor temperature.
Displays diagrams of energy supplied and consumed, with options to include temperature data.
Stores installation's operating status at the time of an alarm for troubleshooting.
Shows general system information, including software versions.
Allows viewing licences for open source code.
Section for configuring system settings, operating modes, and advanced functions.
Setting the operating mode to Auto, Manual, or Add. heat only.
Configuring additional installed functions in sub-menus.
Settings for the SG Ready function, affecting temperature based on electricity price signals.
Adjusts consumption based on electricity tariff periods for potential savings.
Adjusts indoor climate based on weather forecast, with a factor for outdoor temperature effect.
Activates/deactivates Away mode, affecting heating, cooling, and hot water settings.
Prioritizes energy sources based on cost or carbon neutrality, requiring external heat.
Enables tariff control for additional heat based on spot price, tariff control, or set price.
Tariff control for electric additional heat, setting lower tariff periods.
Setting time, date, display mode, and time zone.
Selecting the desired display language.
Specifies the country for country-specific settings, with a note about locking.
Access to tools for use, including installer details and sound settings.
Entering installer's name and telephone number.
Option to enable or disable sound feedback for button presses.
Choosing which home screens to display.
Activating collector defrosting, which temporarily blocks the compressor.
Access for advanced users to advanced settings and factory reset options.
Resetting all user-available settings, including advanced menus, to default values.
Lists the sub-menus for connection settings.
Information on installation connection status, users, and managing myUplink connection.
Choosing internet connection type (wifi/Ethernet) and setting TCP/IP configurations.
Connecting and managing settings for wireless units.
Accessing tools for connecting installations via apps or direct connection.
Activating direct connection via Wi-Fi for setting changes on a mobile unit.
Lists the sub-menus for scheduling heating and hot water.
Scheduling longer changes in heating and hot water temperature for holiday periods.
Scheduling repeated changes of heating and hot water, and for accessories.
Configuration of operating settings for the system, including hot water and circulation pumps.
Settings for installed and activated accessories.
Settings for heat pumps connected in a multi-installation.
Specifying external switch functions connected to AUX inputs/outputs.
Accessing functions for maintenance and service work.
Resetting all settings to factory values and performing inverter parametrisation.
Manually starting the initial setup guide.
Quick starting the compressor when specific demands exist.
Collecting information about alarms and changes for troubleshooting.
Advanced settings for hot water operation, including temperature settings.
Setting start and stop temperatures for hot water, including periodic increases.
Settings related to compressor operation, charge method, and output power.
Sub-menus for advanced circulation pump settings.
Setting the operating mode for the heating medium pump (GP1).
Setting pump speeds for the heating medium pump in different operating modes.
Selecting the operating mode for the brine pump (intermittent, continuous).
Setting the speed for the brine pump based on fixed delta, auto, or manual control.
Configuring brine alarm settings for low/high temperature and automatic reset.
Sub-menus for advanced compressor settings.
Setting frequency ranges where the compressor is blocked.
Sub-menus for advanced additional heat settings.
Setting the maximum electrical power for internal electric additional heat.
Sub-menus for advanced heating operation settings.
Setting maximum permitted temperature differences for compressor and additional heat.
Setting the type of heating distribution system and temperature differences at DOT.
Setting the property's required power at design outdoor temperature (DOT).
Settings for safety measures implemented during operational disruptions.
Selecting how the unit alerts to alarms, like reducing room temperature.
Setting immersion heater output for emergency mode control.
Setting fuse size and transformer ratio for the system.
Making various system settings for the installation.
Selecting how long the installation works with each demand when multiple demands exist.
Setting temperatures for stopping heating/additional heat and filtering time.
Settings related to degree minutes (DM) for heating/cooling demand.
Operating settings for installed and activated accessories.
Telling S1156 which accessories are installed, including automatic detection.
Setting up connected electricity or energy meters for pulse counting.
Making settings for heat pumps connected in a multi-installation.
Configuring multi-installation settings, including main unit and system settings.
Selecting settings for each connected heat pump.
Naming the heat pumps connected to S1156.
Setting how the system is docked regarding pipes and accessories.
Specifying external switch functions connected to AUX inputs or outputs.
Accessing functions for maintenance and service work.
Sub-menus intended for testing the heat pump and its functions.
Setting up the underfloor drying function with time periods and temperatures.
Forcing control of components for troubleshooting purposes.
A guide for inverter replacement, visible when inverter communication is lost.
Activating a screen lock for the S1156 display with a code.
Activating Modbus TCP/IP communication.
Resetting all settings to factory values and performing inverter parametrisation.
Reading previous changes made to the control system.
Log intended for troubleshooting, storing extended alarm data.
Exporting logs (Change log, Extended alarm log) to USB.
Manually starting the start guide for initial setup.
Quick starting the compressor when specific demands exist.
Collecting information about alarms and changes for troubleshooting.
Guidelines for maintenance, including who should perform it and using NIBE replacement parts.
Checks for casing condition, electrical connections, pipe connections, and alarm log.
Checks for particle filter, antifreeze, expansion vessel, and system pressure.
Checks for climate system temperatures, heating curve, room sensor, and system pressure.
Notes that service should be performed annually by qualified personnel.
Explains emergency mode, its functions, and activation.
Procedures for draining the climate system, either in the cooling module, heat pump, or entire system.
Steps to drain the climate system within the cooling module.
Steps to drain the climate system within the heat pump.
Steps to drain the entire climate system.
Procedures for draining the brine system in the cooling module or heat pump.
Steps to drain the brine system from the cooling module.
Steps to drain the brine system from the heat pump.
Manual procedure to start the circulation pump if needed.
How to remove the motor from the shuttle valve for servicing.
Instructions for pulling out the cooling module for service and transport.
Detailed steps for removing the cooling module, including disconnecting pipes and connectors.
Overview of the USB service outlet and its functions.
How to update the software using a USB memory stick.
Saving current measurement values to a log file on USB memory.
Saving, backing up, and restoring menu settings to/from a USB memory stick.
Saving energy logs to a USB memory.
Information on Modbus TCP/IP support and settings.
General tips and basic actions for troubleshooting operational interference.
Initial checks for fuses, circuit breakers, and temperature limiters.
Using the info-menu to view measurement values and identify faults.
How alarms are indicated and managed, including resetting and auxiliary operation.
Explains alarm indications and actions when a malfunction occurs.
Troubleshooting steps for low hot water temperature or lack of hot water.
Troubleshooting steps for low room temperature, including thermostat settings and heating curve.
Troubleshooting steps for high room temperature, including thermostat settings and heating curve.
Steps to address uneven room temperatures, such as heating curve and radiator flow.
Troubleshooting steps for low system pressure, usually due to lack of water.
Reasons and troubleshooting for the compressor not starting.
Troubleshooting steps for whining noise in radiators, related to thermostats and pump speed.
Information on ACS 45, HPAC S40, PCS 44 cooling accessories.
Information on PVT 40, SOLAR 40, and SOLAR 42 docking kits.
Details on ELK 5, ELK 8, ELK 15, and ELK 213 external electric additional heaters.
Information on the ECS 40/ECS 41 accessory for multiple heating systems.
Information on the HTS 40 humidity sensor.
Information on the FLM S45 exhaust air module for ventilation recovery.
Information on HRV units for ventilation and heating supply air.
Information on the EF 45 accessory for creating larger areas.
Information on the HR 10 accessory for controlling loads.
Information on the EME 20 module for solar electricity communication.
Information on PCM S40/S42 for passive cooling.
Information on the POOL 40 accessory for pool heating.
Information on the valve kit for filling brine.
Information on the RMU S40 room unit for control and monitoring.
Information on the NIBE PV system for solar electricity production.
Information on the AXC 40 accessory card for connecting additional heat and pumps.
Information on connecting wireless accessories.
Details on VPA and VPB water heaters/accumulator tanks.
Provides detailed diagrams of the unit's physical dimensions.
Tables showing electrical specifications for S1156-8 and S1156-13 models.
Detailed technical specifications based on EN standards, including capacity and noise levels.
Illustrates the working range of the heat pump compressor based on temperature and flow.
Diagrams for dimensioning compressor speed for heating and cooling operations.
Provides energy efficiency information for the package, including heating and water heating classes.
Detailed data on the energy efficiency of the package, including seasonal efficiency.
Specifies the model of the hot water heater used with the system.
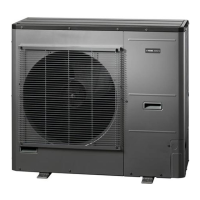
Indicates the type of heat pump (air-water, exhaust-water, brine-water, water-water).
Indicates if it's a low-temperature heat pump.
Notes if an integrated immersion heater is present for additional heat.
Notes if it's a heat pump combination heater.
Specifies the climate type (Average, Cold, Warm).
Specifies the temperature application mode (Medium or Low).
Lists the applied standards for testing and classification.
Specifies the rated heat output of the unit.
Declared capacity for space heating at various outdoor temperatures.
Specifies the bivalent temperature.
Specifies the cycling interval capacity.
Specifies the degradation coefficient.
Lists power consumption in off, standby, and crankcase heater modes.
Lists other items like capacity control, sound power, and airflow.
Details for heat pump combination heaters.
Checklist items for system controls and heat pump settings.
Checklist items related to the overall system, including filling and pressure testing.
Checklist items for bore hole and ground loop installation and testing.
Measurement and record section for central heating mode.
Measurement and record section for domestic hot water mode.
Information on additional heat sources connected.
Checklist for compliance with regulations and manufacturer instructions.