Mercury 310 Automated Gate System
Installation and Programming Manual
4444
8.6 FIRMWARE UPDATE
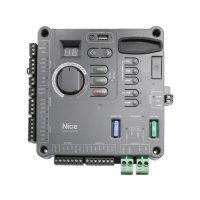
F/W Update
LED
F/W Update
USB Connector
F/W Update
Button
NOTICE
The USB drive being used to update the rmware should have only one le version of the Mercury
3xx series rmware in the root directory.
NOTICE
Nice recommends that all controllers are updated to the latest rmware revision to ensure reliable operation.
Firmware update instructions are as follows:
1. Use a computer to download and save the rmware update from https://support.hysecurity.com/hc/en-
us/categories/360003202873-Software.
2. Copy downloaded le onto a USB drive (FAT32 format). Save/copy to root directory of USB drive (not
in a folder). An empty ash drive is recommended. Nice is not responsible for any data loss.
3. Press and hold the F/W Update button on the Mercury 310 controller for about 5 seconds. The display
will show "
bL" and the F/W Update LED will ash to indicate that the board is ready to be updated.
4. Plug USB drive (with update) into the F/W Update connector (see image above). When the USB is
detected, rmware will automatically be updated, and the board will reset.
5. After reset, the rmware version will show in the display and debug data logging will automatically start.
During the logging of debug data, the F/W Update LED will turn on when data is written to the USB
drive.
6. When the display returns to normal behavior and the LED stops ashing, the update is complete. The
USB drive can be safely removed when the F/W Update LED remains o.
Mercury 310 Firmware Update Features
Firmware updates are sometimes released to upgrade the controller with new features or optimizations. These
rmware updates are announed via technical bulletins and are available for downloading from the Nice website
when they are released.
Equipment needed:
’ USB capable computer (with internet access)
’ USB ash drive (formatted in FAT32)
Mercury 310
www.ApolloGateOpeners.com | (800) 878-7829 | Sales@ApolloGateOpeners.com