How to improve visibility of a Nikon COOLPIX P330 monitor screen?
- KKathy ByrdSep 4, 2025
If the monitor screen on your Nikon Digital Camera is hard to see, try the following: * Clean the monitor screen. * Adjust the monitor screen brightness.

How to improve visibility of a Nikon COOLPIX P330 monitor screen?
If the monitor screen on your Nikon Digital Camera is hard to see, try the following: * Clean the monitor screen. * Adjust the monitor screen brightness.
How to fix 'Unable to update the A-GPS file' on a Nikon COOLPIX P330?
Check the following items to resolve the issue of being unable to update the A-GPS file on your Nikon Digital Camera: * Whether the memory card is inserted * Whether the A-GPS file is stored on the memory card * Whether the A-GPS file saved on the memory card is more recent than the A-GPS file saved in the camera * Whether the A-GPS file is still valid Additionally, the A-GPS file may be corrupted. Download the file from the website once more.
Why is my Nikon COOLPIX P330 Digital Camera unable to identify the location, or why does it take so long?
To improve location identification with your Nikon Digital Camera, use the camera as much as possible in an open-air area. The camera may struggle to identify the location in some shooting environments.
Why are pictures not displayed on television from my Nikon Digital Camera?
Pictures are not displayed on television from your Nikon Digital Camera if the Video mode or HDMI is not correctly set in the TV settings setup menu. HDMI output is disabled when the camera is connected to either a computer or printer with a USB cable. Replace memory card or remove memory card to play back pictures from internal memory if the memory card contains no pictures.
Why can't I play a sequence on my Nikon Digital Camera?
Pictures shot continuously with cameras other than the COOLPIX P330 cannot be played as a sequence. Check the Sequence display options setting.
Why is the image size not available on my Nikon COOLPIX P330?
Image size is not available on your Nikon Digital Camera if another function that is set is restricting Image size, or when the scene mode is set to Easy panorama in Panorama or 3D photography, the image size is fixed.
Why is the digital zoom not available on my Nikon Digital Camera?
The digital zoom is not available on your Nikon Digital Camera if 'Off' is selected for 'Digital zoom' in the setup menu. The digital zoom also cannot be used when certain scene modes are selected or other functions that restrict the use of digital zoom are set.
Why does the time zone and date screen appear every time I turn on my Nikon COOLPIX P330 Digital Camera?
If the screen for setting the time zone and date is displayed every time your Nikon Digital Camera is turned on, the clock battery is exhausted, and all settings have been restored to their default values.
Why is the monitor off and the power-on lamp flashing on my Nikon COOLPIX P330 Digital Camera?
If the monitor is turned off, and the power-on lamp flashes quickly on your Nikon Digital Camera, turn off the camera and allow the battery to cool down before resuming use, as the battery temperature is likely high.
How to fix a Nikon COOLPIX P330 Digital Camera that cannot be turned on?
If your Nikon Digital Camera cannot be turned on, it could be due to the following reasons: * The battery is exhausted. * If you're using a Charging AC Adapter, press and hold the c (playback) button to turn on the camera in playback mode. Note that shooting will not be possible in this mode.
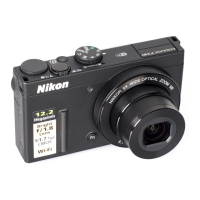
| Resolution | 12.2 megapixels |
|---|---|
| Lens | NIKKOR lens with 5x optical zoom |
| Aperture | f/1.8-5.6 |
| Video Recording | Full HD 1080p at 30 fps |
| Storage | SD/SDHC/SDXC memory cards |
| Battery | EN-EL12 Rechargeable Li-ion Battery |
| Battery Life | Approx. 200 shots per charge |
| Dimensions | 103.0 x 58.3 x 32.0 mm |
| Lens Focal Length | 24-120 mm (35mm equivalent) |
| File Formats | JPEG, RAW (NRW) |
| Image Size | 4000 x 3000 pixels |
| Exposure Metering | Matrix, center-weighted, spot |
| Exposure Control | Programmed auto, shutter-priority auto, aperture-priority auto, manual |
| Sensor | 1/1.7-inch CMOS |
| ISO Range | 80-3200 (expandable to 12800) |
| Display | 3.0-inch LCD (921, 000 dots) |
| Image Stabilization | Lens-shift VR |
| Weight | Approx. 200 g (including battery and memory card) |
| Focus Range | 50 cm to infinity |
| Focus-area Mode | Face priority, manual with 99 focus areas, center, subject tracking |
| Shutter Type | Mechanical and CMOS electronic shutter |
| Aperture Range | f/1.8-5.6 |
| Self-timer | 2 and 10 sec |
| Shooting Mode | Auto, scene, special effects, P, S, A, M |
| Movie Frame Rate | 30 fps (1080p) |
| Flash Range | Approx. 0.5-6.5 m (1 ft 8 in. - 21 ft) (W); 0.5-2.5 m (1 ft 8 in. - 8 ft 2 in.) (T) |
Guides users on inserting the battery and memory card correctly into the camera.
Instructs on setting the camera to Auto mode by rotating the mode dial.
Explains how to check the battery level and remaining exposure count on the display.
Guides the installation of ViewNX 2 software on Windows and Macintosh.
Explains how to use the multi selector to access and adjust various camera functions.
Explains how to enlarge images and move the display during playback zoom.
Critical safety warnings for product use, malfunction, disassembly, and environmental hazards.
Crucial safety instructions to reduce risk of fire or electric shock.
Details on GPS function usage, limitations, and battery drain considerations.
Detailed illustration and list of external camera body parts and their functions.
Explains the main functions of controls relevant to shooting operations.
Illustrates and explains the information displayed on the monitor during shooting.
Illustrates and explains the information displayed on the monitor during playback.
Provides step-by-step instructions for inserting the battery correctly.
Details on removing the battery safely.
Important notes and safety warnings for using the AC adapter.
Instructions on correctly inserting the memory card to prevent damage.
Explains the process and implications of formatting a memory card.
Details on removing memory cards safely.
Warning about handling hot camera, battery, and memory card after use.
Description of the Auto mode for easy shooting without detailed settings.
Explains characteristics and settings for specific scene modes like Night landscape.
Guides on saving and managing custom shooting settings in U mode.
Lists and describes the different flash modes available for shooting.
Explains Macro close-up mode for close-up shots of small objects.
Details image quality settings like Fine, Normal, and RAW (NRW) formats.
Details image quality settings and considerations for RAW/JPEG recording.
Explains how Target Finding AF works to focus on the main subject.
Guides on enlarging images and moving the display during playback zoom.
Details operations for changing image display count and selecting images.
Lists and describes options available in the playback menu.
Instructions for connecting the camera to a TV for image playback via AV or HDMI.
Details on connecting to a computer for image transfer and organization.
Explains direct printing from the camera to a PictBridge-compatible printer.
Guides on turning on the camera, starting movie recording, and viewing movie options.
Lists and describes options within the camera's movie menu.
Covers movie playback controls, fast forward, rewind, and pause.
Guides on turning on GPS functions and starting location data recording.
Lists and describes options within the GPS options menu.
Instructions on erasing temporary log data from the camera or stored data from memory.
Explains how to access and change settings in the camera's setup menu.
Provides detailed information and hints for using the camera for shooting.
Covers browsing, viewing, and managing recorded images.
Details on recording, playing back, and editing movie files.
Explains the camera's menu system for various settings and features.
Step-by-step instructions for capturing panorama pictures.
Lists and describes image editing functions available on the camera.
Details on setting RAW processing parameters and creating JPEG copies.
Guides on connecting the camera to a printer using a USB cable.
Guides on extracting and saving desired portions of a movie.
Covers image quality and size settings, and picture control customization.
Guides on setting image quality and size for recording.
Explains how to adjust picture control settings like Standard, Neutral, Vivid, Monochrome.
Details on changing image recording settings for sharpness, contrast, and saturation.
Step-by-step guide for creating and registering custom picture controls.
Guides on performing fine adjustment of white balance values.
Lists and describes movie recording options like resolution and frame rate.
Explains autofocus modes for normal speed movie recording.
Guides on creating a DPOF print order for memory card printing.
Guides on recording voice memos up to 20 seconds using the camera microphone.
Guides on deleting voice memos from pictures.
Lists and describes GPS options like Record GPS data and Update A-GPS file.
Guides on downloading and updating the A-GPS file from the website.
Instructions for formatting the camera's internal memory.
Explains how to format memory cards inserted into the camera.
Sets picture resolution for HDMI output.
Sets the method to output 3D images to HDMI devices.
Explains the screen for checking blinks detected by face detection.
Lists error messages and their corresponding causes and solutions.
Details on the Wireless Mobile Adapter WU-1a for smart device connectivity.
Precautions for using and storing the camera, lens, and monitor.
General precautions for using and storing the camera device.
Detailed information on battery usage, charging, and temperature considerations.
Details on using the Charging AC Adapter EH-69P with compatible devices.
Precautions for using SD cards, formatting, and data transfer.
Instructions for cleaning the lens, monitor, and body, and storage precautions.
Lists common problems and solutions for power, display, and settings issues.


