A-22 / ENGLISH
A-22 - FORM NO. 56041735 - Advenger
™
OPERATING THE MACHINE (ST)
WARNING!
Be sure you understand the operator controls and their functions.
While on ramps or inclines, avoid sudden stops when loaded. Avoid abrupt sharp turns. Use low speed down hills.
To Scrub...
Follow the instructions in “preparing the machine for use” section of this manual.
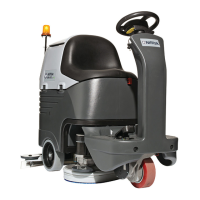
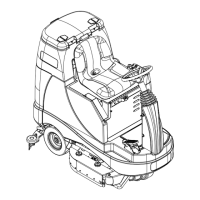
1 See Figure 9. While seated on the machine, adjust the steering wheel to a comfortable position using the Steering Wheel Tilt Adjust Knob (23). The seat can be adjusted if
necessary by loosening the mounting hardware.
2 Turn the Master Key Switch (A) ON (I). This will display the control panel indicator lights. Reference the Battery Indicator (M) before proceeding.
3 To transport the machine to the work area, apply even pressure with your foot on the front of the Drive Pedal (3) to go forward or the rear of the pedal for reverse. Vary the
pressure on the foot pedal to obtain the desired speed.
4 Press and hold the Solution Switch (C) to pre-wet the fl oor, solution will be dispensed while the switch is held. NOTE: This will help prevent scarring of the fl oor surface when
starting to scrub with dry brushes. This must be done prior to lowering the scrub deck using Scrub Deck Raise/Lower Lever (14).
5 Lower the scrub deck using the Scrub Deck Raise/Lower Lever (14), this will activate the solution and scrub systems. Lower the squeegee using the Squeegee Raise/Lower
Lever (22), this will activate the vacuum system. All systems will start when the Drive Pedal (3) is activated.
NOTE: There are two scrub pressure settings. Normal Pressure is achieved by lowering the scrub deck, the pressure on the brushes is caused by the weight of the deck.
Extreme Pressure is achieved by lowering the deck and then pressing down on the Lever (14) and moving it to the notch, this compresses a spring to create additional pressure
on the brushes.
NOTE: The solution fl ow rate can be changed by pressing the Solution Increase Switch (B) or Solution Decrease Switch (D).
6 Begin scrubbing by driving the machine forward in a straight line at a normal walking speed and overlap each path by 2-3 inches (50-75 mm). Adjust the machine speed and
solution fl ow when necessary according to the condition of the fl oor.
CAUTION!
To avoid damaging the fl oor, keep the machine moving while the brushes are turning.
7 When scrubbing, check behind the machine occasionally to see that all of the waste water is being picked up. If there is water trailing the machine, you may be dispensing too
much solution, the recovery tank may be full, or the squeegee tool may require adjustment.
8 For extremely dirty fl oors, a one-pass scrubbing operation may not be satisfactory and a “double-scrub” operation may be required. This operation is the same as a one-pass
scrubbing except on the fi rst pass the squeegee is in the up position (lift the Squeegee Raise/Lower Lever (22)). This allows the cleaning solution to remain on the fl oor to work
longer. The fi nal pass is made over the same area, with the squeegee lowered to pick up the accumulated solution.
9 The recovery tank has a shut-off fl oat (29) that causes ALL systems to turn OFF except the drive system when the recovery tank is full. When this fl oat is activated, the recovery
tank must be emptied. The machine will not pick up water or scrub with the fl oat activated.
10 When the operator wants to stop scrubbing or the recovery tank is full;
Use the Scrub Deck Raise/Lower Lever (14) to manually raise the scrub deck, this will stop the scrub motors and the solution fl ow. Use the Squeegee Raise/Lower Lever (22)
to manually raise the squeegee. The vacuum will stop after a brief delay (this is to allow any remaining water in the squeegee hose to be picked up without turning the vacuum
back on).
11 Drive the machine to a designated waste water “DISPOSAL SITE” and empty the recovery tank. To empty, pull the Drain Hose (31) from its rear storage area, then unscrew the
cap (hold the end of the hose above the water level in the tank to avoid sudden, uncontrolled fl ow of waste water). Refi ll the solution tank and continue scrubbing.
NOTE: Make sure the Recovery Tank Cover (26) and the Recovery Tank Drain Hose (31) cap are properly seated or the machine will not pick-up water correctly.
When the batteries require recharging the Battery Indicator (M) will fl ash red. The scrub brushes and solution fl ow will stop. Raise the scrub deck and squeegee and transport the
machine to a service area and recharge the batteries according to the instructions in the Battery section of this manual.
WET VACUUMING
Steps to follow in fi tting the machine with optional attachments for wet vacuuming.
1 Disconnect the Recovery Hose (37) from the Squeegee (11). Connect the coupler and hose from the wand kit to the recovery hose.
2 Attach suitable wet pick-up tools to the hose. (An optional Wand Kit PN56601087 is available from Advance).
3 Turn the Master Key Switch (A) ON and lower the Squeegee Lever (22). The vacuum motor will run continuously until the squeegee is raised to turn it OFF. The fl oat will stop
the fl ow into the recovery tank when it is full.
revised 2/13
 Loading...