03/2009
8
SOL 3 / SOL 5 W / BDC 3122 / BDC 3140 / E-VAC3000
GB
At the end of a cleaning session
■ Turn off the vacuum cleaner and remove the plug from
the socket.
■ Wind the connection cable around the cable carrier
(Figure 12).
■ Empty the container as described in the “Emptying
the container” paragraph. Clean the vacuum cleaner
as described in the “Maintenance, cleaning and
decontamination” paragraph.
■ Wash the container with clean water if aggressive
substances have been vacuumed.
■ Store the vacuum cleaner in a dry place, out of reach of
unauthorized people.
Maintenance, cleaning and
decontamination
WARNING!
The precautions described below must be taken
during all the maintenance operations, including
cleaningandreplacingofthelter.
■ Toallowtheusertocarryoutthemaintenance
operations, the vacuum cleaner must be
disassembled, cleaned and overhauled as far as
is reasonably possible, without causing hazards
for the maintenance staff or other people. The
suitable precautions include decontamination
before disassembling the vacuum cleaner,
adequatelteredventilationoftheexhaust
air from the room in which it is disassembled,
cleaning of the maintenance area and suitable
personal protection.
Compartments that are not dust-tight must be opened
with suitable tools (screwdrivers, wrenches, etc.) and
thoroughly cleaned.
■ Carryoutatechnicalinspectionatleastoncea
year,e.g.:checktheairltertondoutwhether
the air-tightness of the vacuum cleaner has been
impaired in any way and make sure that the
electric control panel operates correctly.
This inspection must be carried out by the
manufacturer or by a competent person.
WARNING!
Use only genuine spare parts supplied and authorized
by the manufacturer.
Filter disassembly and replacement
WARNING!
When the vacuum cleaner is used to vacuum
hazardoussubstances,theltersbecome
contaminated,thus:
■ Workwithcareandavoidspillingthevacuumed
dust and/or material;
■ Placethedisassembledand/orreplacedlterina
sealed plastic bag;
■ Closethebaghermetically;
■ Disposeofthelterinaccordancewiththelaws
in force.
WARNING!
Filterreplacementisaseriousmatter.Theltermust
bereplacedwithoneofidenticallteringsurface
characteristics.
Otherwise the vacuum cleaner will not operate
correctly.
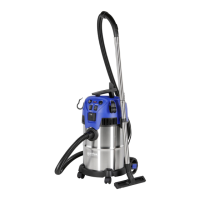
Filter replacement
Figure 13
1 Vacuum hose
2 Lever
3 Cover
Before proceeding with these operations, turn off the vacuum
cleaner and remove the plug from the power socket.
■ Remove the vacuum hose (1).
■ Use the lever (2) to remove the lid (3) together with the
lter.
■ Remove the old lter from the cage.
■ Fit the new lter and secure it in the cage with special
clamps.
■ Install the cover and the lter in the reverse order of
removal.
■ Dispose of the old lter according to the laws in force.