System Overview
18
7750 SR ESA 100G Chassis Installation Guide
Release 20.5
3HE 16094 AAAA TQZZA Issue: 01
2.4 Setting up an ESA in a 7750 SR System
To set up an ESA in a 7750 SR system, the following actions must be completed in
any order:
• install the ESA hardware in a rack, then apply power to the ESA hardware
• connect the ESA hardware to a compatible 7750 SR chassis, MDA, IOM, or
XMA using the appropriate 100G QSFP optics
• from the 7750 SR, configure ESA host and ESA-VM ports
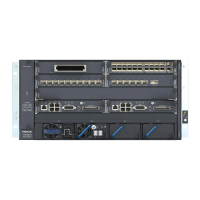
5 Dedicated NIC Dedicated RJ-45 connector for BMC/hardware
management port (not used)
6 VGA connector Maximum display resolution: 1920 x 1200
32bpp@60Hz reduced blanking (not used)
7 COM A port DB9 port (Serial A) for debug or terminal
concentrator and console access (not used)
8 USB 3.0 port USB 1 port (not used)
9 USB 3.0 port USB 0 port (not used)
10 Identification LED ID LED (blue blinking) activation to display server location
11 MicroSD slot Backup BMC SEL (not used)
Table 4 7750 SR ESA 100G Rear Panel Features (Continued)
Key Item Name Description