SERVICE MANUAL
13
www.norcold.com
Fig. 12 - Openings of the burner tube
NOR000683A
Air
Air
Air Air
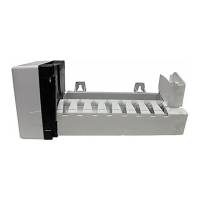
A Gas Train Assembly
B Screws
C Gas Train Support Bracket / Door Assembly
Fig. 11 - Burner tube location
NOR000683A-1
A
B
C
Clean the Burner Tube
Clean the burner tube annually. To clean:
1. Close the valve at the vehicle propane gas tank(s).
2. Touch and hold the ON/OFF button ( ) for one (1) second to
turn the refrigerator off.
3. Open the lower intake vent.
4. Disconnect the two (2) white wires from the gas train assembly
(Fig. 11, A).
To avoid possible propane gas leaks,
always use two (2) wrenches to loosen
and tighten the gas supply line at the gas
train assembly.
5. Disconnect the gas supply line from the gas train assembly.
6. Remove the two (2) screws (Fig. 11, B) that attach the gas
train support bracket/door assembly (Fig. 11, C) to the cooling
unit.
Never attempt to operate the gas train
when it is NOT installed in the cooling unit
because of the risk of electrical shock.
7. Remove the gas train assembly from the cooling unit.
When cleaning, do not try to remove
the burner. Removal may can cause a
propane gas leak. Leaking propane gas
can ignite or explode and result in danger-
ous personal injury or death. Do not try to
clean the burner with anything other than
compressed air.
8. Clean the burner tube with compressed air only. Blow air into
the openings of the burner tube to remove any dirt or obstruc-
tions from the inside of the burner tube.
9. Put the gas train assembly back onto the cooling unit.
10. Attach the gas train support bracket/door assembly to the cool-
ing unit.
11. Connect the gas supply line to the gas train assembly.
■ Hand thread the gas supply line fi tting onto the gas train
assembly until it is fi nger-tight.
■ Apply timing marks to the gas supply line fi tting and the gas
train assembly.
■ Use the double wrench technique to avoid twisting the
frame of the gas train assembly. If the gas train assembly
becomes bent or twisted, it MUST be replaced.
Always use two (2) wrenches to tighten
or loosen propane gas connections.
Damaged connections, piping, and
components create the potential for gas
leaks.
■ Using two (2) wrenches, tighten to 1/8 of a turn more.
12. Connect the two (2) white wires to the gas valve of the gas
train assembly.
13. Open the valve at the vehicle propane gas tank(s).
14. Examine all of the gas connections for leaks.
ATTENTION
!
WARNING
ATTENTION
!
WARNING
ATTENTION
!
WARNING
ATTENTION
!
WARNING
ATTENTION
!
AVERTISSEMENT
ATTENTION
!
ADVERTENCIA
ATTENTION
!
DANGER
Preventative Maintenance, cont’d.
Fig. 13 - Gas train connection
BC
A
BC
A
A Gas Supply Line Fitting
B Gas Train Assembly
C Timing Marks
 Loading...