resistance as described later in this Section;
renew the coil if faulty, but be careful to check
carefully the condition of the LT connections
themselves before doing so, to ensure that
the fault is not due to dirty or poorly-fastened
connectors.
8 If the HT coil is in good condition, the fault
is probably within the control unit or
distributor assembly. Testing of these
components should be entrusted to a
Vauxhall dealer.
Engine misfires
9 An irregular misfire suggests either a loose
connection or intermittent fault on the primary
circuit, or an HT fault on the coil side of the
rotor arm.
10 With the ignition switched off, check
carefully through the system ensuring that all
connections are clean and securely fastened.
If the equipment is available, check the LT
circuit as described above.
11 Check that the HT coil, the distributor cap
and the HT leads are clean and dry. Check the
leads themselves and the spark plugs (by
substitution, if necessary), then check the
distributor cap, carbon brush and rotor arm as
described in Chapter 1.
12 Regular misfiring is almost certainly due to
a fault in the distributor cap, HT leads or spark
plugs. Use a timing light (paragraph 4 above)
to check whether HT voltage is present at all
leads.
13 If HT voltage is not present on any
particular lead, the fault will be in that lead or
in the distributor cap. If HT is present on all
leads, the fault will be in the spark plugs;
check and renew them if there is any doubt
about their condition.
14 If no HT is present, check the HT coil; its
secondary windings may be breaking down
under load.
1.8 litre (18SE engine) models and
all 1.4, 1.6 and 2.0 litre fuel
injection models
15 If a fault appears in the ignition system
first ensure that the fault is not due to a poor
electrical connection or poor maintenance; ie,
check that the air cleaner filter element is
clean, the spark plugs are in good condition
and correctly gapped, that the engine
breather hoses are clear and undamaged,
referring to Chapter 1 for further information.
Also check that the accelerator cable is
correctly adjusted as described in the relevant
part of Chapter 4. If the engine is running very
roughly, check the compression pressures as
described in Chapter 2.
16 If these checks fail to reveal the cause of
the problem the vehicle should be taken to a
suitably equipped Vauxhall dealer for testing
using special diagnostic equipment. The
tester will locate the fault quickly and simply
alleviating the need to test all the system
components individually which is a time
consuming operation that carries a high risk of
damaging the control unit.
17 The only ignition system checks which
can be carried out by the home mechanic are
those described in Chapter 1, relating to the
spark plugs, and the ignition coil test
described in this Chapter. If necessary, the
system wiring and wiring connectors can be
checked as described in Chapter 12 ensuring
that the control unit wiring connector(s) have
first been disconnected.
Removal
1.3 and 1.4 litre carburettor models
1 Remove the spark plugs (Chapter 1).
2 Undo the distributor cap retaining screws,
lift of the cap and place it to one side.
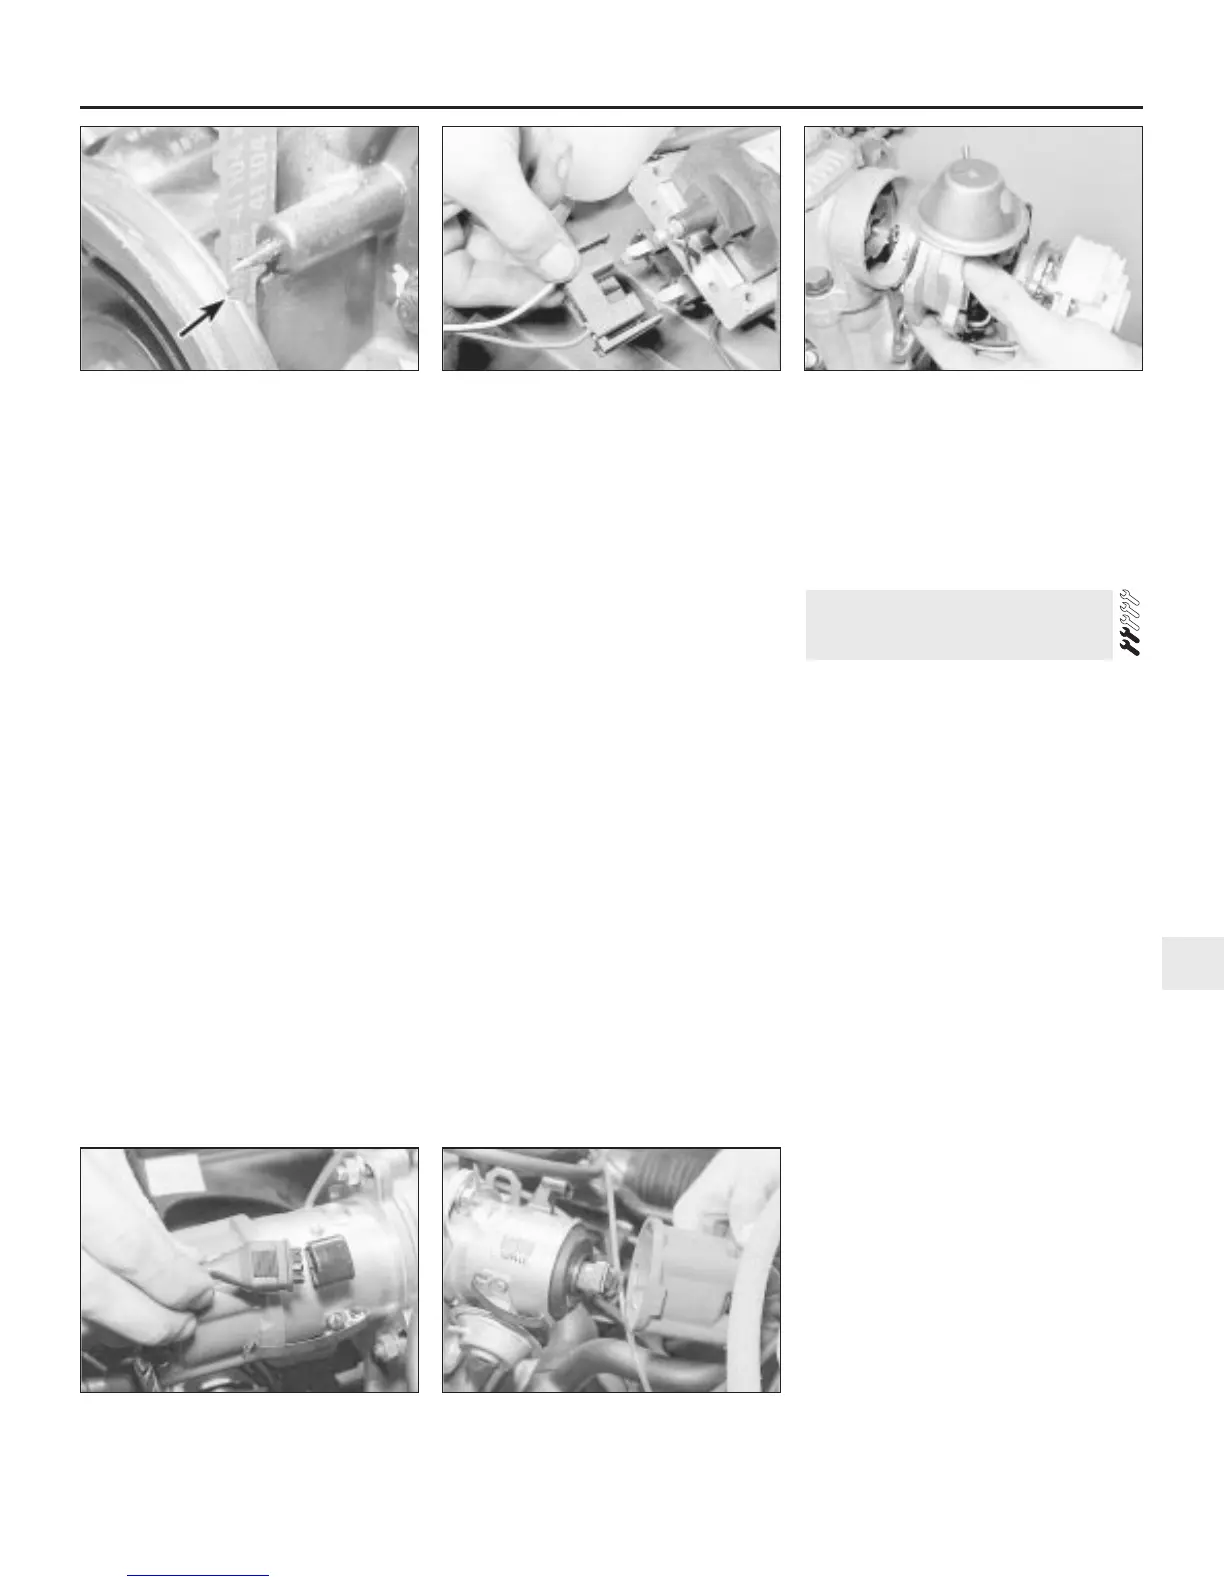
3 With the transmission in gear and the
handbrake released, pull the car forwards,
until, with a finger over the plug hole,
compression can be felt in No 1 cylinder (the
cylinder nearest the crankshaft pulley).
Continue moving the car forwards until the
notch on the crankshaft pulley is aligned with
the timing pointer (see illustration). (On
automatic transmission models, turn the
engine by means of a spanner on the
crankshaft bolt.) If the distributor cap is
temporarily placed in position, the distributor
rotor should be pointing towards the No 1
spark plug lead segment in the cap.
4 Disconnect the distributor wiring connector
at the ignition coil (see illustration), and
detach the vacuum advance pipe from the
distributor vacuum unit.
5 Undo the distributor clamp retaining nut (or
bolt), lift off the clamp plate, and withdraw the
distributor from the camshaft housing (see
illustration).
1.6 litre carburettor models and 1.4,
1.6 and 1.8 litre (18E engine) fuel
injection models
6 The procedure is similar to that just
described in paragraphs 1 to 5, with the
following differences.
a) The wiring connector must be unplugged
from the distributor, not from the coil (see
illustration).
b) The distributor cap is secured by two
spring clips, not by screws (see
illustration).
3 Distributor - removal and
refitting
Electronic (breakerless) ignition systems 5C•3
5C
3.5 Removing the distributor from the
camshaft housing
3.6b Removing the distributor cap (1.6 litre
carburettor model shown)
3.6a Unplugging the distributor LT
connector (1.6 litre carburettor model
shown)
3.4 Disconnecting the distributor wiring
connector at the ignition coil
3.3 Crankshaft pulley timing notch
(arrowed) aligned with pointer (1.3 litre
model shown, others similar)

 Loading...