along the line of the crack in the plastic using
a rotary burr in a power drill. The damaged
part is then welded back together by using a
hot air gun to heat up and fuse a plastic filler
rod into the groove. Any excess plastic is then
removed and the area rubbed down to a
smooth finish. It is important that a filler rod of
the correct plastic is used, as body
components can be made of a variety of
different types (eg. polycarbonate, ABS,
polypropylene).
25 Damage of a less serious nature
(abrasions, minor cracks etc) can be repaired
by the DIY owner using a two-part epoxy filler
repair material, or a no-mix filler which can be
used directly from the tube. Once mixed in
equal proportions (or applied directly from the
tube in the case of a no-mix filler), this is used
in similar fashion to the bodywork filler used
on metal panels. The filler is usually cured in
twenty to thirty minutes, ready for sanding
and painting.
26 If the owner is renewing a complete
component himself, or if he has repaired it
with epoxy filler, he will be left with the
problem of finding a suitable paint for finishing
which is compatible with the type of plastic
used. At one time the use of a universal paint
was not possible owing to the complex range
of plastics encountered in body component
applications. Standard paints, generally
speaking, will not bond to plastic or rubber
satisfactorily, but a professional spraymatch
paints to match any plastic or rubber finish
can be obtained from dealers. However, it is
now possible to obtain a plastic body parts
finishing kit which consists of a pre-primer
treatment, a primer and coloured top coat.
Full instructions are normally supplied with a
kit, but basically the method of use is to first
apply the pre-primer to the component
concerned and allow it to dry for up to 30
minutes. Then the primer is applied and left to
dry for about an hour before finally applying
the special coloured top coat. The result is a
correctly coloured component where the paint
will flex with the plastic or rubber, a property
that standard paint does not normally posses.
Where serious damage has occurred, or
large areas need renewal due to neglect, it
means that complete new panels will need
welding in, and this is best left to
professionals. If the damage is due to impact,
it will also be necessary to check completely
the alignment of the bodyshell, and this can
only be carried out accurately by a
Vauxhall/Opel dealer using special jigs. If the
body is left misaligned, it is primarily
dangerous as the car will not handle properly,
and secondly, uneven stresses will be
imposed on the steering, suspension and
possibly transmission, causing abnormal
wear, or complete failure, particularly to such
items as the tyres.
Removal
1 Open and prop the bonnet.
2 When an under-bonnet light is fitted,
disconnect its electrical lead.
3 Mark around the hinge bolts with a soft lead
pencil as a guide for refitting. Have an
assistant support the bonnet, then remove the
hinge bolts from each side (see illustration).
4 Lift away the bonnet. If it is to be re-used,
rest it carefully on rags or cardboard. If a new
bonnet is to be fitted, transfer serviceable
items (rubber buffers, lock striker etc) to it.
Refitting
5 Refit in the reverse order to removal, using
the hinge bolt alignment marks for guidance
when applicable.
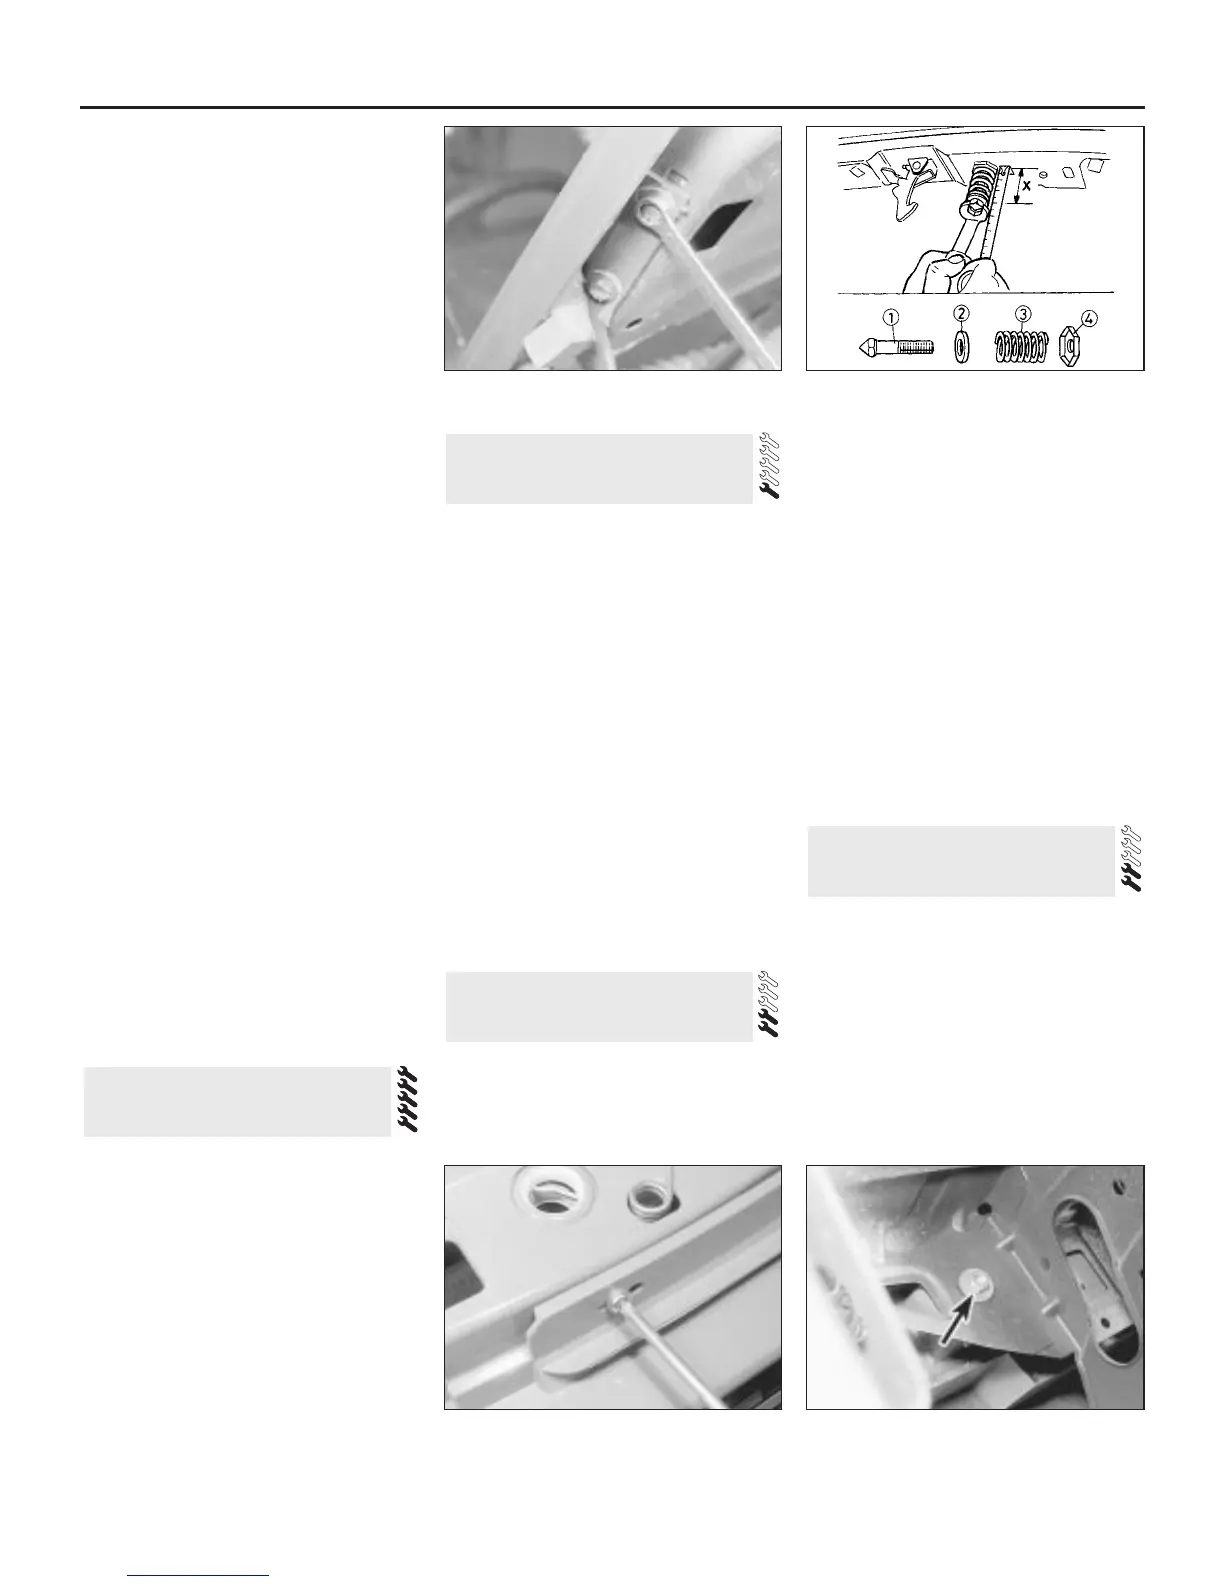
6 If the lock striker was disturbed, adjust it to
the dimension shown before tightening its
locknut (see illustration).
7 Adjust the hinge bolts and front buffers until
a good fit is obtained with the bonnet closed.
Removal
1 Open up the bonnet and unbolt the cable
clip from the rear of the bonnet lock platform.
2 Prise the cable and fitting out of the release
slide, using a screwdriver against the spring
tension.
3 Inside the car, free the cable from the
release lever and bracket.
4 Release the grommet from the bulkhead
and withdraw the cable from under the
bonnet.
Refitting
5 Fit the new cable in the reverse order to
removal. Adjust the position of the cable
under the front panel clip so that, with the
release lever at rest, the inner cable is just
slack. Check that the release slide moves
when an assistant operates the release lever,
then close the bonnet and check for correct
operation.
Removal
1 The front trim panel incorporates the
radiator grille and the front bumper.
2 Remove the three screws which secure the
panel to the bonnet lock platform (see
illustration).
3 From under the vehicle remove the two
nuts which secure the lower part of the panel
(see illustration).
4 Pull the panel forwards so that it slides off
the side mountings. If front foglights are fitted,
8 Front trim panel - removal and
refitting
7 Bonnet release cable - removal
and refitting
6 Bonnet - removal and refitting
5 Major body damage - repair
11•4 Bodywork and fittings
6.6 Bonnet lock striker adjustment
1 Striker
2 Washer
3 Coil spring
4 Locknut
X = 40 to 45 mm
8.3 Front trim panel securing nut (arrowed)8.2 Undoing a front trim panel screw
6.3 Removing a bonnet hinge bolt

 Loading...