OSAKA – F 1 – User’s Manual – v1 – PAG. 2
3– “UP /DEFROST” Key: Pressing it for 5 seconds initiates / stops
a cycle of manual defrosting.
In the parameters menu it is used to find the desired parameter and
after pressing the selection of the parameter with “SET” you
increase or select the new value of the parameter.
Having the keyboard locked, if you press “SET” + “UP” during 5
seconds the keyboard will be unlocked automatically.
4 - Key: By pressing and releasing quickly, you’ll be allowed to
visualize the controller’s variables (measured temperature, etc.).
In the programming function it is used to exit the parameters and
go back to the normal functioning.
If the parameter “t.UF” is programmed it allows you, pressing
during 1 second (in the normal functioning mode), to turn-on / turn-
off (Stand-by).
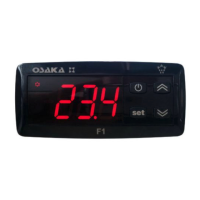
5 - Led SET: In the normal functioning mode it turns on when any
key is pressed, as an indication that it has been pressed.
In the programming mode it is used to indicate the programming
level of the parameters.
6 - Led OUT COOL: It indicates the state of the regulation output
(compressor or device of temperature control, solenoid, actuator,
etc.). This output is active (lit) and off (off) and disabled signal
(flashing)
7 - Led OUT HEAT: Identical to 6, but for the heating function.
8 - Led DEF: It indicates the current state of the defrosting. If the
pilot is flashing it indicates that the defrosting is being done.
9 - Led ALARM: It indicates the state of the alarm. ON (lit) OFF
(stopped) or ongoing (flashing).
10 - Led Stand-By: It indicates that the controller i son Stand-By
mode.
2.1 – QUICK SELECTION OF THE SETPOINT
In the normal programming mode, the Set Point is changed as
follows:
By quickly pressing and releasing the SET key the display will show
“SP” (or “SPE”) alternating with the programmed value. To modify
the desired temperature the “UP” key must be pressed in order to
increase the value or “DOWN” to lower it.
However, through the parameter “t.Ed” it is possible to establish
that the Set might be changed with the quick procedure of the SET
key.
The parameter can undertake a value between oF and 4, which
means that:
oF= oF = No Set may be programmed with the quick procedure of
the SET key (thus the SET key will not do anything if it is pressed
and released)
1=Only the SP can be programmed (“Normal” Set).
2=Only the SPE can be programmed (“Economic” Set).
3=Only the SP can be programmed (if it’s active) or the SPE (if it’s
active)
4=Only the Active Set can be programmed (SP or SPE)
For example, in the case of the parameter “t.Ed” = 1, the controller
will do as follows:
By pressing the SET key and releasing, the display will show “SP”
alternating the programmed value.
To modify it, the “UP” key must be pressed to increase the value or
the “DOWN” key to lower it.
If only the “SP” (t.Ed = 1) is selected once the desired value is
programmed, by pressing the SET key it remains programmed and
it exits the quick Set Point change mode.
If the Economic Set Point (“t.Ed”=3) is programmed, by pressing
and releasing the SET key the display will show “SPE” alternating
the programmed value.
To modify it the “UP” and “DOWN key must be pressed as well as
“SP” to change the Set Point.
Once the desired value is programmed, by pressing the SET key it
remains programmed and it exits the quick Set Point change mode.
To exit the Set quick programming, the SET key must always be
pressed. Otherwise, if no key is pressed for 10 seconds it will
automatically go back to the normal operating mode.
2.2 – STANDARD PROGRAMMING OF THE PARAMETERS
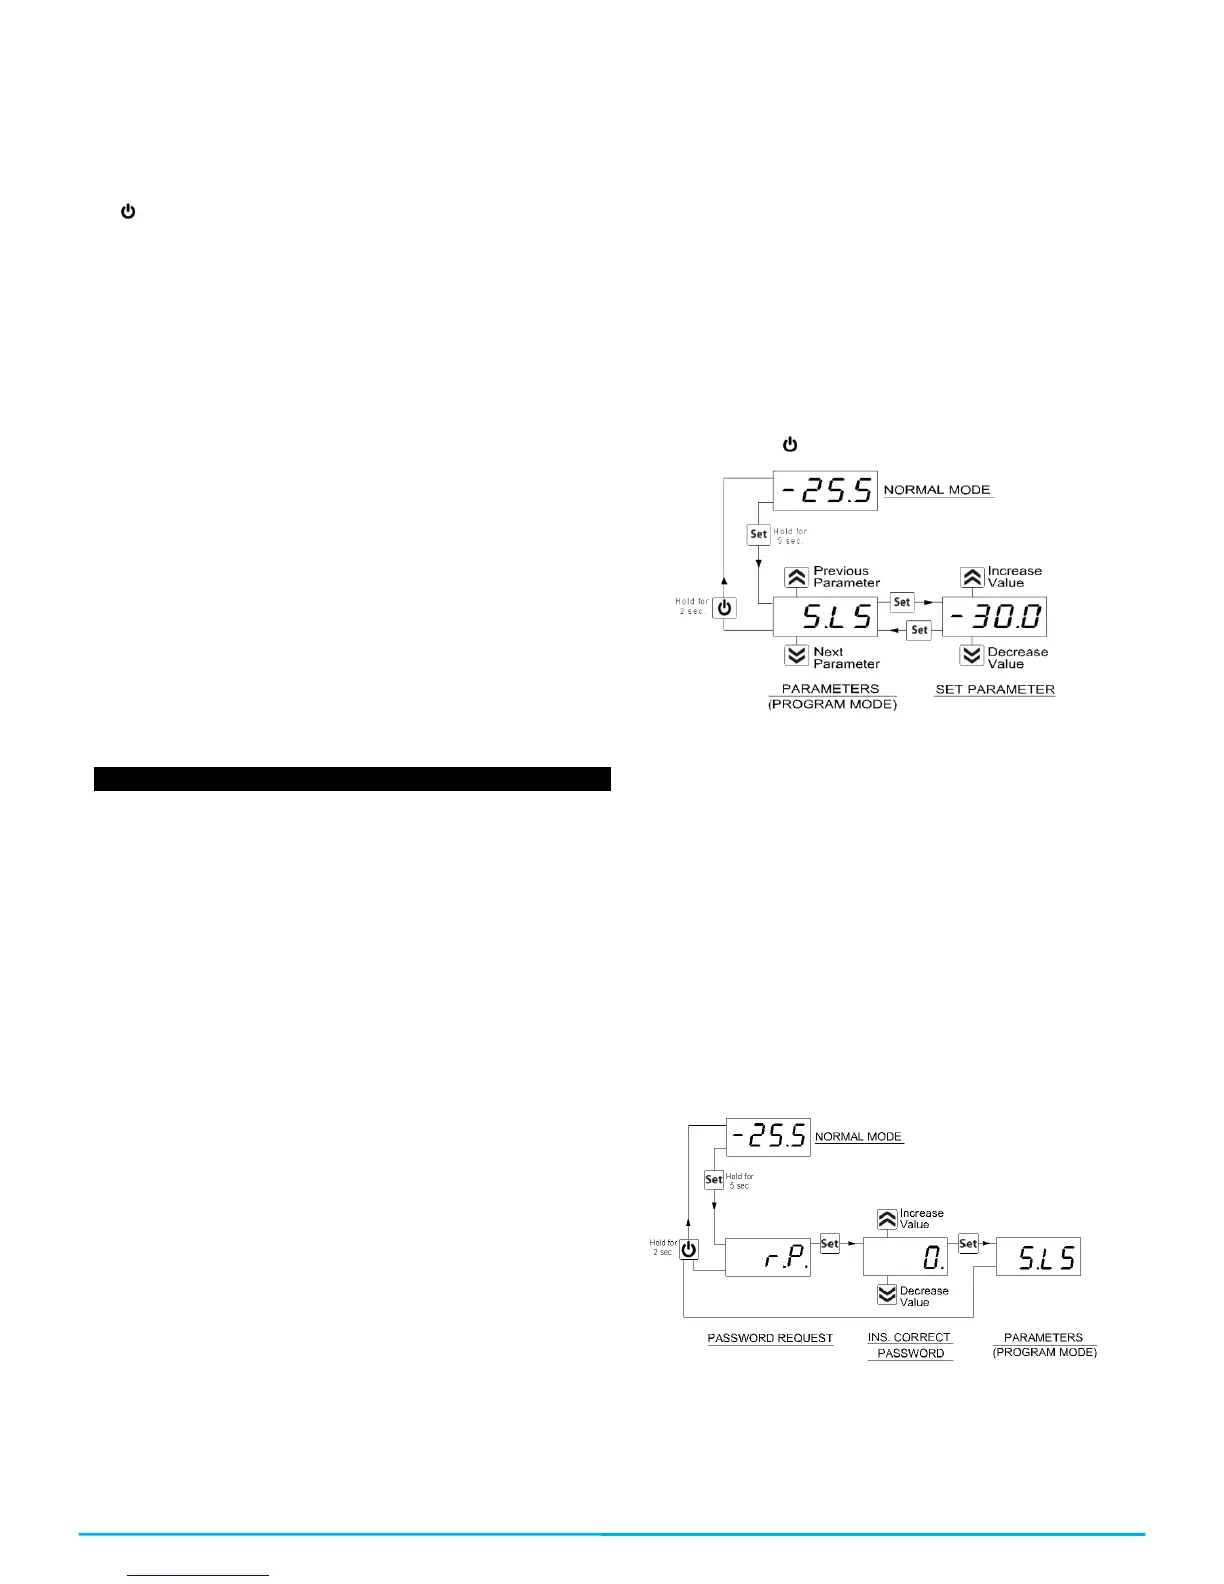
If the password to access the parameters is not activated (default
programming), press “SET” for 5 seconds, the display then will
show the code that identifies the first parameter and with the “UP
and “DOWN” key it will be possible to select the desired parameter.
Once the desired parameter is selected, press the “SET” key and
the programmed value in the parameter will show. This
programming will be able to be changed by pressing “UP” or
“DOWN” until you reach the desired value. Press “SET” to confirm
and memorize the value.
By once again going back to the “UP” or “DOWN” keys, it will be
possible to select another parameter and modify it successively.
To exit the programming mode: do not touch any key for 10
seconds or press the key for 5 seconds
2.3 - PARAMETERS PROTECTION THROUGH PASSWORD
The controller has a parameters protection function through a
password code which is configurable in the “t.PP” parameter.
In some instances this password is very useful so that there are no
erratic manipulations in the controller, if it is desired to activate the
password, you only need to put the desired number as the
password in the “t.PP” parameter, validate it with the SET key and
exit the programming.
When the password is programmed, press “Set” for 5 seconds to
enter the parameters menu, the controller will show the letters:
“r.P” and by pressing “Set” it will show “0”, then we must select
with the “UP” and “DOWN” keys the value of the correct password
and press “SET” to have access to the programming parameters.
If the password is correct the display will show the code of the first
parameter. The password protection can be deactivated with the
parameter “t.PP” = oF
Note: If the password were to be lost, in order to access the
parameters use the following procedure:
Turn off the electrical current of the controller and supply it again
while pressing the “SET” key until the first parameter appears. You
will the have access to the parameters and will be able to modify
the “t.PP” parameter.
 Loading...