OSAKA – F 1 – User’s Manual – v1 – PAG. 4
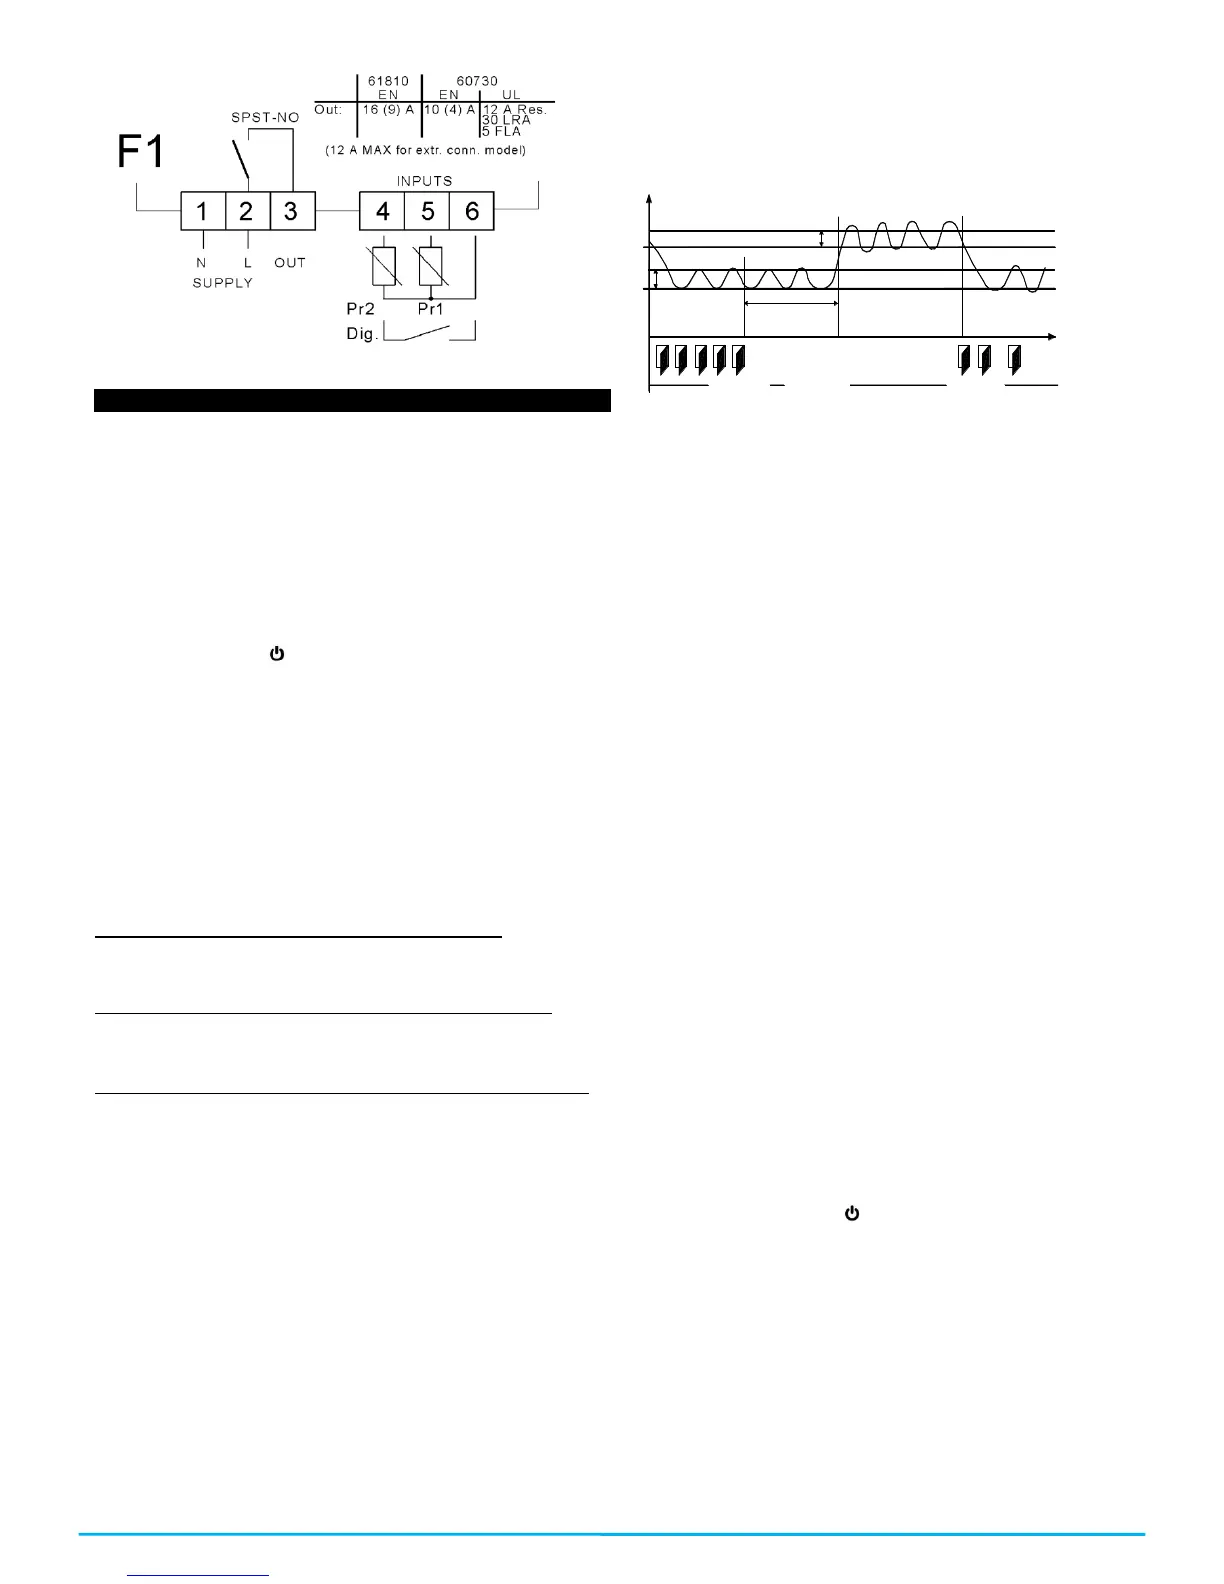
3.4 – ELECTRICAL WIRING DIAGRAM
4.1 –ON / OFF (STAND-BY) FUNCTION
Once the thermostat is supplied it can make 2 states:
-ON: it means that the controller is running and acting over the
foreseen control function.
-STAND-BY: it means that the controller is not acting, it’s stopped.
(The display lights the Stand-by led).
To go from the STAND-BY state to the ON state it corresponds
exactly to when the controller is connected to the power. If there
was a power failure, when the power comes back the system will
always be as it was right before the interruption.
The ON/STAN-BY mode can be selected as follows:
-Through pressing the key for 3 seconds. It allows the change
from being stopped to be running.
-Through pressing the DOWN key for 3 seconds. If the parameter
“t.Fb”=4.
4.2 – “NORMAL” AND “ECONOMIC” MODE OF OPERATION.
The controller allows you to program two Set Points of regulation,
one Normal – “SP” and another one Economic – “SPE”.
Associated to each one of these Set Points, they have a specific
(hysteresis) differential, normal – “r.d”, Economic – “r.Ed”.
The commutation between the various modalities can be automatic
or manual.
OPERATION OF THE “NORMAL-ECONOMIC” MODE
It can be used in those cases in which it is necessary by
commuting to two different operation temperatures (e.g. day/night
or work days/holidays).
The NORMAL / ECONOMIC mode can be selected manually
-Through the ON/OFF key if the parameter “t.UF” =2.
-Through the DOWN/AUX key is the parameter “t.Fb” =2
-Through the digital input if the parameter “i.Fi” =6
The NORMAL / ECONOMIC mode can be selected automatically.
-After the delay time “i.Et” close the door (commutation from
Normal to economic).
-When the door opens, if the SPE Set Point is active through the
parameter “i.Et” (commutation from Normal to economic).
-When the door closes the SPE Set Point is activated after “i.Et”
parameter’s time has passed. Having the “i.tt” time passed keep
the door closed, it will change its mode (commutation from Normal
to economic).
For this function you must use the digital input configured as “i.Fi”
=1, 2 or 3.
If “i.Et” = oF the selection of the Eco/Norm mode through digital
input as a door will be deactivated.
If “i.tt” = oF, the change from Eco mode to Normal mode according
to the time a door is closed will be deactivated.
The change to the economic mode will be signaled with the
message “Eco”.
If “i.dS” = Ec the controller in economic mode will always show
“Eco”, otherwise it will show the message “Eco every 10 seconds.
Always alternating the normal visualization mode programmed in
the parameter “i.dS”.
It will be possible to program the normal SP Set Point with a value
in between the value programmed in the parameter “S.LS” and the
value programmed in the parameter “S.HS” as long as the “SPE”
Set Point (being an Economic Set Point) will be possible to
program it with a value in between the value programmed in the
parameter “SP” and the value programmed in the parameter
“S.HS”.
r.E d
SPE
SP
r.d
P r1
T em p .
"E C O "
i.E t
"N o rm ."
tim e
D O O R
"N o rm ."
D A Y (s ho p o pen ) N IG H T (s ho p c lo se ) D A Y (s ho p o pen )
Note: In the following examples the Set Point is generally
indicated as “SP” and the differential as “r.d”, however the
controller will usually go according to the Set point and the
differential selected as active.
4.3 – INPUTS AND DISPLAY CONFIGURATION
Through the “i.uO” parameter you might choose whether you want
to measure the temperature in Celsius (Standard) or Fahrenheit
(USA) [C0=ºC / 1º (no decimal); C1=ºC / 0.1º (with decimal); F0= ºF
/ 1º; F1= ºF / 0.1º],
The controller allows you to calibrate probes that can be used to
recalibrate, according to the needs of the application, through the
parameter “i.C1” (Pr1 input), “i.C2” (Pr2 input).
The “i.P2” parameter allows you to select the use that you want to
give to the Pr2 input, in the following way:
= EP – Evaporator Probe
= Au – Auxiliary Probe (Au)
=dG – Digital input (dG)
If the Pr2 input is not being used, program it as “i.P2” = oF. If the
Pr2 probe is not configured as EP, the functions referring to the
evaporator probe will not be able to be used.
Through the “i.Ft” parameter it is possible to put a relative software
filter to the measurement of the input’s value, so that we can
diminish the sensitivity and quick temperature variation (by
increasing the time).
Through the “i.dS” parameter it is possible to establish the normal
visualization of the display which can be the measurement of the
Pr1 probe (P1), the measurement of the Pr2 probe (P2), the active
regulation Set Point (SP), the measurement of the Pr1 probe if the
controller is in the normal mode with the message “Eco”, if the
controller is in Economic (Ec) mode, or even if it is wanted for the
numeric display to be turned off (oF).
If it appears one of the measurements (“i.dS” = P1, P2, Ec) the
parameter “i.CU” allows you to put an offset that is applied to show
only the variable (all the controls of regulation will always be
done according to the correct measurement of the calibration
parameter.)
Regardless of the value imposed in the “i.dS” parameter it is
possible to visualize all the measurement’s and operation’s values
by pressing and releasing the key
The display will show the code which identifies the variable (read
below) alternating it with its value.
The variable shown are as follows:
“Pr1” – Pr1 probe measurement
“Pr2” – Pr2 probe measurement
“Lt” – Memorized Pr1 minimum temperature
“Ht” - Memorized Pr1 maximum temperature
4.4 – DIGITAL INPUT CONFIGURATION
The function for the digital input will be programmed in the “i.Fi”
parameter and the possible delay will be programmed in the “i.ti”
parameter. The “i.Fi” or digital input can be programmed for:
 Loading...