25
RQTV0136
Even when the unit is turned off, you can display the timer recording list by
pressing [PROG/CHECK].
It is also possible to edit the Timer Recording screen while timer recording
is performing. However you cannot edit the programme that is currently
being recorded.
[1] Press [PROG/CHECK].
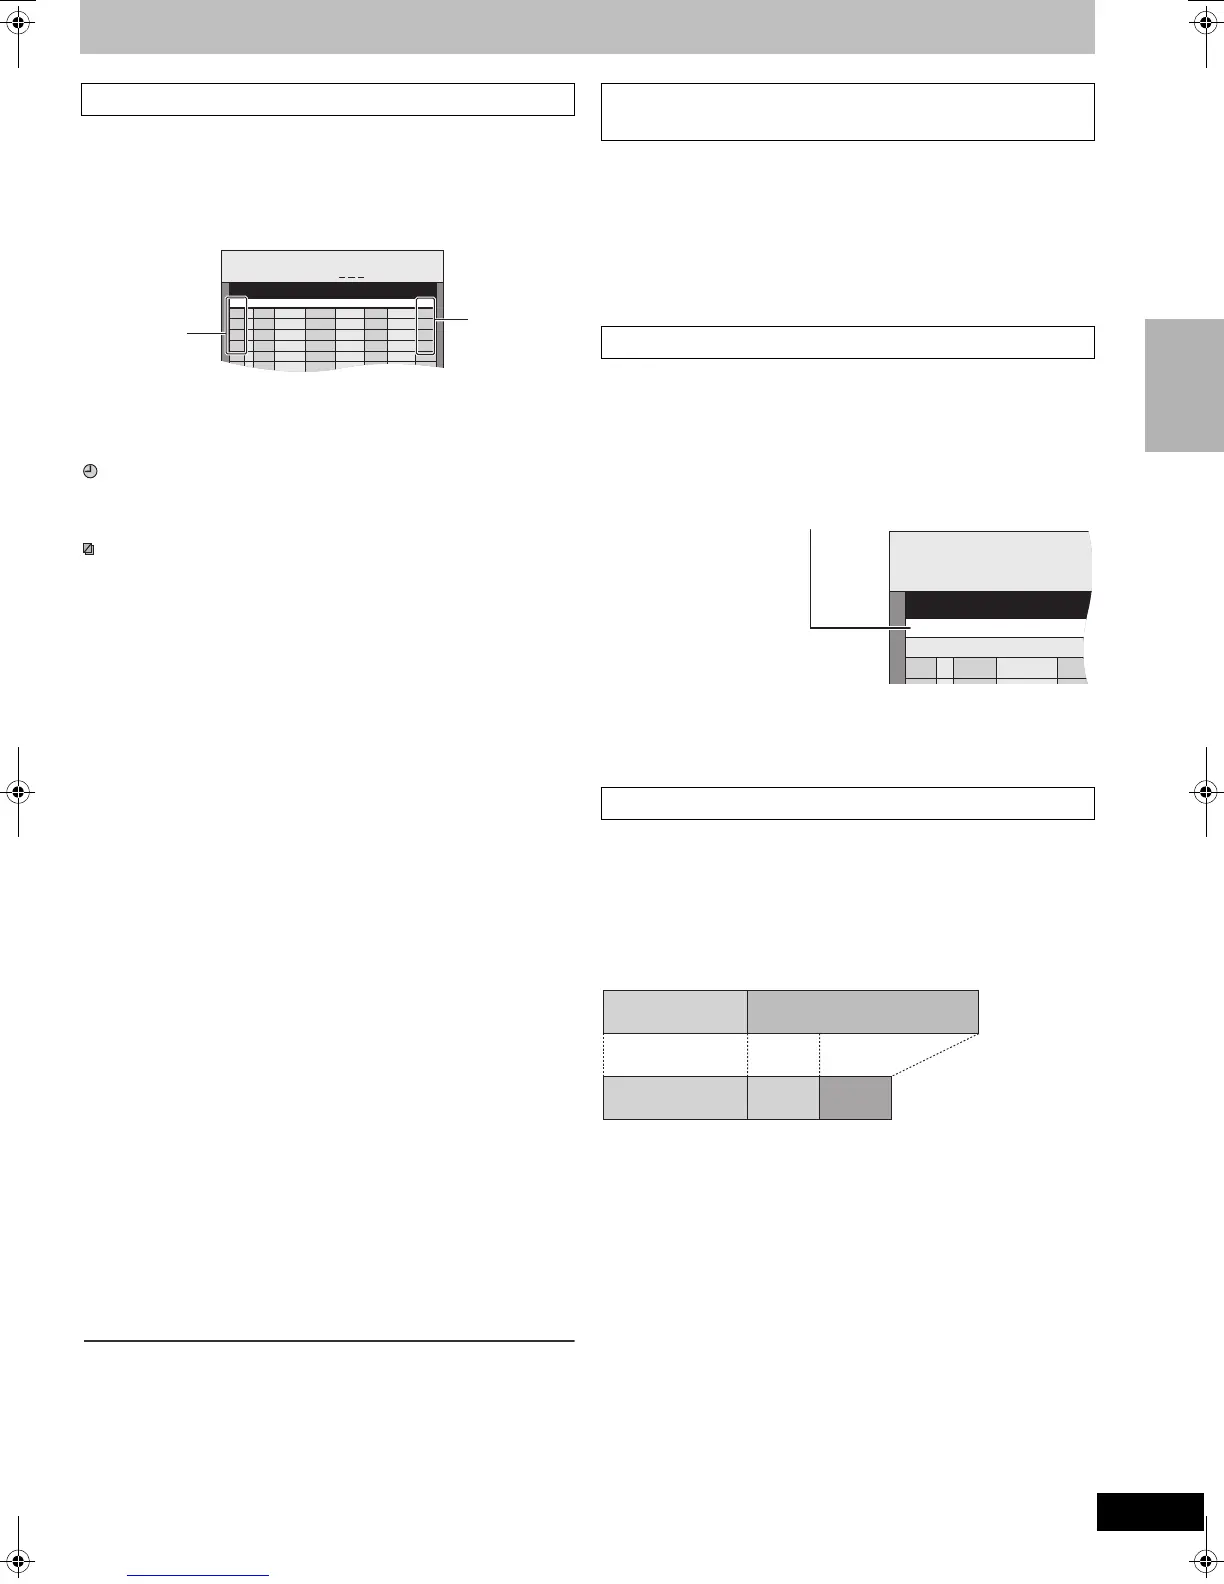
Icon explanations (A)
¥: Currently recording
W: Programmes are overlapped. Recording of the programme with the
later start time starts when the earlier programme finishes recording.
: Timer recording standby is on. The recording will start at the set time.
n: You stopped a weekly or daily timer recording. The icon disappears
when the next timer recording starts.
F: The disc was full (not enough space).
: The TV programme may not be recorded due to copy-protect. [DVD]
X: Recording stopped. (Dirty disc or video cassette, etc.)
Check (B)
OK: Recordable
.
[DVD]
# (Date): The last day of daily or weekly recording. [DVD]
!: It may not be possible to record because:
≥The disc is write-protected. [DVD]
≥There is no more space left. [DVD]
≥
The number of possible titles has reached its maximum.
[DVD]
≥The new timer recording will completely or partially record
over this timer recording.
The timer recording was not performed or completed for the
following reasons:
≥
A disc or a video cassette was not inserted.
≥A disc or a video cassette without a secure accidental
erasure prevention tab was inserted.
≥The remaining recording time on the video cassette was
insufficient. [VHS]
–: All other recordable cases. [VHS]
[2] Press [3, 4] to select the programme.
≥You can also select the programme by inputting a 2-digit number
using the numbered buttons.
e.g., “5”: [0] )[5]
“15”: [1] )[5]
≥Press [2, 1] to move to the preceding or following page.
[3] Press [¢] to delete or press [ENTER] to change.
≥You cannot delete or change the programme that is currently being
recorded.
[4] If you pressed [ENTER] in step 3,
Press [3, 4, 2, 1] to change the settings and then
press [ENTER].
To continue changing the programmes repeat steps 2 to 4.
[5] Press [RETURN].
The timer recording standby mode is activated.
However, the unit will not be turned off automatically.
≥If a timer recording starts while the unit is turned on, the unit will not
automatically turn off after the timer recording is complete.
To save
power turn the unit off by pressing
[Í, DVD/VHS].
You can turn the unit off during timer recording. This will not affect
the recording.
For your reference
≥Programmes that failed to record are deleted from the timer recording list
at 4 a.m. 2 days later.
[1] Press [DRIVE SELECT] to select the drive currently
recording and then press [∫, STOP].
≥A confirmation screen appears.
[2] Press [2] to select “Stop Recording” and then
press [ENTER].
≥The recording stops and the timer recording programme is deleted
from the Timer Recording screen. (Daily and weekly timer recordings
are not deleted and timer recording will start as set.)
Each programme in the Timer Recording screen can be released from
recording standby.
[1] Press [PROG/CHECK].
[2] Press [3, 4] to select the programme.
[3] Press [SUB MENU], press [3, 4] to select “Timer
Off” and then press [ENTER].
≥It is also possible to press [A] to release recording standby.
The Timer Recording icon disappears.
≥Be sure to repeat these steps and select “Timer On” in step 3 or
press [A] in step 3 before the set recording time to put the
programme on recording standby. The timer recording will only work
if the programme is in recording standby and the timer icon is
displayed.
[VHS]
If, at the beginning of a timer recording, there is not enough tape remaining
to complete the recording, the Auto SP/LP function will automatically run
the tape at LP speed for recording. This ensures that the entire
programme will be recorded. If LP mode is not enough to stretch the
remaining tape to fit the whole programme you will not be able to record
the whole TV programme.
o
≥It is not possible to automatically activate EP mode.
≥The tape length must be set correctly. (l 59)
≥This may not work correctly with some video cassettes.
≥It may not work correctly when NTSC is set as the “TV System”. (l 59)
≥If the recording mode changes from SP to LP during a timer recording,
some picture distortion occurs at that point.
∫ Check, change or delete programmes
Timer
Recording
DVD
VHS 17:50:32 5. 4. Wed
Remain 1:00 XP
:
New Timer Programme
Name
No. Date
Start
Drive
space
Stop Drive
Mode
B
A
∫ Cancel a timer recording that has already
begun
∫ Release programme from standby
∫ Auto SP/LP mode
Name
No. Date
Sta
Timer
Recording
DVD
VHS
Remain
New Time
01 8. 4. Sat 18:1
¢¢¢04
2nd programme
(45 min.)
1st programme
(30 min.)
30 min. in SP
15 min.
in SP
30 min.
in LP
Timer recording
Video cassette (e.g., 60-minute cassette)
Timer Recording
RQTV0136.book 25 ページ 2006年4月19日 水曜日 午後1時28分
 Loading...