12 • EVERPURE
®
PRO-Reverse Osmosis Water Filtration System Installation and Operating Instructions
TESTING YOUR REVERSE OSMOSIS SYSTEM
Dissolved Solids (TDS) Test
NOTE: Under NSF/ANSI Standard 58, it is highly
recommended that you (the consumer) have your
water tested at least every 6 months to verify that
your system is performing satisfactorily.
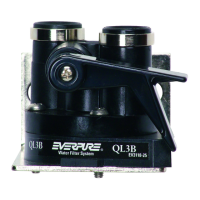
PRO Monitored Reverse Osmosis System
Light Indicator Readings on the PRO
The PRO is equipped with a monitor (Figure 26) that checks the
Total Dissolved Solids (TDS) that the system is reducing. This
allows the user to see the quality of the water that the system
is producing. Test the unit monthly. When the blue test button
is pushed, the light system will read one of the following colors:
Green light: Good Water
Amber light: If this is a new installation, call Technical
Support. Otherwise, draw 1 gallon of water
from the unit. After 10 minutes, push the
button to test. If the light is still amber,
change the prefilter and empty the tank. If
the light is still amber after 1 hour, you may
need to replace the membrane. Determine
when you last changed the membrane and
call Technical Support at 1-800-863-9392.
No light: The battery needs to be changed.
Figure 26
Nitrate Test Kit
A Nitrate Test Kit is included with this unit and is designed
to indicate nitrate levels in the drinking water. Test the water
monthly. The current EPA Maximum Contaminant Level
(MCL) for Nitrate as Nitrogen (N) is 10 mg/L or 10 ppm. The
current EPA maximum contaminant level (MCL)for Nitrite as
Nitrogen (N) is 1 mg/L or 1 ppm. Results showing any nitrate
breakthrough should be followed up with a laboratory analysis
of the water.
Consult with your doctor to see if you should
drink water with the nitrate/nitrite levels
found in your water.
Figure 27
Testing Instructions:
Testing instructions are included with the Nitrate Test Kit
(Figure 27). If the Nitrate Test Kit is missing, please call
1-800-279-9404 for replacement.
MAINTENANCE
Use only the replacement elements and parts referred to in
this manual. Failing to do so will void your warranty.
NOTE: Use a different sink or set aside water to wash and
rinse housings. Read appropriate instructions to
determine amount of water required.
Replacing the Prefilter and Post-polishing Filter
Cartridges
Replacement Filter Cartridges
The Gray/Black Prefilter Cartridge (D-15) should be replaced
every 3 months, or earlier if your water is highly turbid, and
when changing the membrane.
The White Post-polishing Filter Cartridge (D-20) should be
replaced at least every 12 months and when changing the
membrane.
Materials Required
• PRO Replacement
Cartridge Kit
• FDA-Grade silicone grease
• Clean washcloth
• Non-abrasive brush or sponge
• Clean rubber gloves (optional)
• Dishwashing soap
Replacing the Filter Cartridges
1. Close cold water supply and place a tray under the system
to catch any water that spills during removal of the filter
housings. If an icemaker is attached to the unit, turn it off and
also the shut-off valve found at the 1/4-inch supply adapter.
2. Lift the faucet handle to lock it in the open position.
3. After water flow from the faucet stops, unscrew the filter
housing from the left and/or right side of the manifold. Do
not remove the membrane (center) housing. Discard
used cartridges.
NOTE: Use clean rubber gloves or wash hands
thoroughly for this procedure to avoid
contaminating the cleaning solution or any of the
components of the system. It is recommended
that clean rubber gloves be worn when cleaning
and/or sanitizing the system and its components
or handling new filter cartridges.
4. Locate and remove o-ring from grooves in the sump. Wipe
grooves and o-ring clean of old lubricant and set aside.
Rinse out bottom of sump and fill 1/3 full with water. Add
1 tablespoon of bleach and scrub cap and bottom of sump
with non-abrasive sponge or cloth. Rinse thoroughly.
5. Inspect the o-ring for damage (i.e. nicks, scratches) and
replace damaged o-rings. See REPLACEMENT PARTS for
reorder information and part numbers
NOTE: Do not get any of the electronic circuits or wiring
wet when cleaning the unit.
6. Lightly lubricate the o-ring with a coating of clean silicone
grease. With two fingers, press o-ring securely into groove
below the threads of the housing.
The housing o-ring provides the water-tight seal
between the cap and the bottom of the housing. It
is important that the o-ring be properly seated in
the groove below the threads of the housing or a
water leak could occur.
Nitrate Test Kit
 Loading...