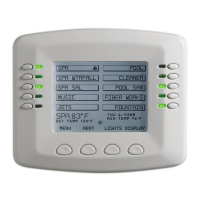
SPACOMMAND
®
Spa-Side Remote Installation and User’s Guide
13
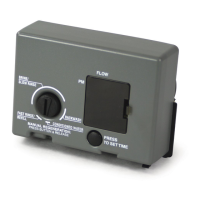
Step 2: Mount the SpaCommand
®
Spa-Side Remote
(surface mount)
To mount the SpaCommand spa-side remote (surface deck mount - without mud-
box):
1. Tape the existing cable that is in the mud-box conduit to the new remote
cable. Disconnect the cable connected to the COM port in the load center.
Pull the wire connected to the new remote through the conduit into the load
center conduit. Leave enough slack to connect the new cable connector to the
rear socket of the remote. Note: If necessary, use a “Fish Tape” or similar
method to pull the wire through long conduit runs with multiple bends.
2. Plastic anchors: If necessary, remove the existing plastic anchors and insert
the new plastic wall anchors provided in the kit.
3. Position the bracket: Insert the remote wire connector through the bracket
opening. Use the vertical screw hole slots to position the bracket so that the
top edge of the remote is level with the spa wall coping (see diagram on next
page). Align the bracket screw holes with the two plastic anchors and secure
the bracket in place with the two screws.
4. Connect the remote: Place the O-RING over the round socket on the rear of
the remote. Insert the connector into the socket. The connector is keyed for the
correct pin alignment. Be sure the connector fits flush against the back of the
remote front panel. Secure the connector to the rear of the remote with the two
screws. Be sure that the wire in the mud-box is not pinched.
4. Place the remote onto the bracket. Press down evenly to secure in place (see
diagram on next page).
Proceed to next page...
 Loading...