32BDL4050D
46
6.2.7. Advanced option menu
Advanced option
Conguration 2
Input resolution
SettheresolutionoftheVGAinput.Thisisonlyrequiredwhenthe
displayisunabletodetecttheVGAinputresolutioncorrectly.
NOTE: ThisitemisfunctionalforVGAinputonly.
Theoptionsare:
• {1024x768/1280x768/1360x768 / 1366x768}
• {1400x1050/1680x1050}
• {1600x1200/1920x1200}
• {Auto}:Determinestheresolutionautomatically.
Theselectedsettingswillbecomeeffectiveafterturningoffthepower
andturningitonagain.
IR control
Selecttheoperationmodeoftheremotecontrolwhenmultipledisplays
areconnectedviaanRS232Cconnection.
• {Normal} -Alldisplayscanbeoperatednormallybytheremote
controlunit.
• {Primary}-Designatethisdisplayastheprimarydisplayfor
remotecontroloperation.Onlythisdisplaycanbeoperatedbythe
remotecontrol.(Inprimarymode,IRkeywillalwaysbeprocessed
regardlessthemonitorid/groupsettings).
• {Secondary}-Designatethisdisplayasthesecondarydisplay.This
displaycannotbeoperatedbytheremotecontrol,andwillonly
receivethecontrolsignalfromtheprimarydisplayviatheRS232C
connection.
• {Lock All}/{Lock all but Volume}/{Lock all but Power}/{Lock
all except PWR & VOL}-Locktheremotecontrolfunctionofthis
display.Tounlock,pressandholdthe[ ]INFObuttononthe
remotecontrolfor6(six)seconds.
Keyboard control
Choosetoenableordisablethedisplaykeyboard(controlbuttons)
function.
• {Unlock}-Enablethekeyboardfunction.
• {Lock All}/{Lock all but Volume}/{Lock all but Power}/{Lock all
except PWR & VOL}-Disablethekeyboardfunction.
NOTE: “KeyboardControlLockMode”Thisfunctioncompletely
disablestheaccesstoallKeyboardControlfunctions.To
enableordisablethekeyboardcontrollock,pressboth[ ]
and[ ]buttonsandholddowncontinuouslyformorethan3
seconds.
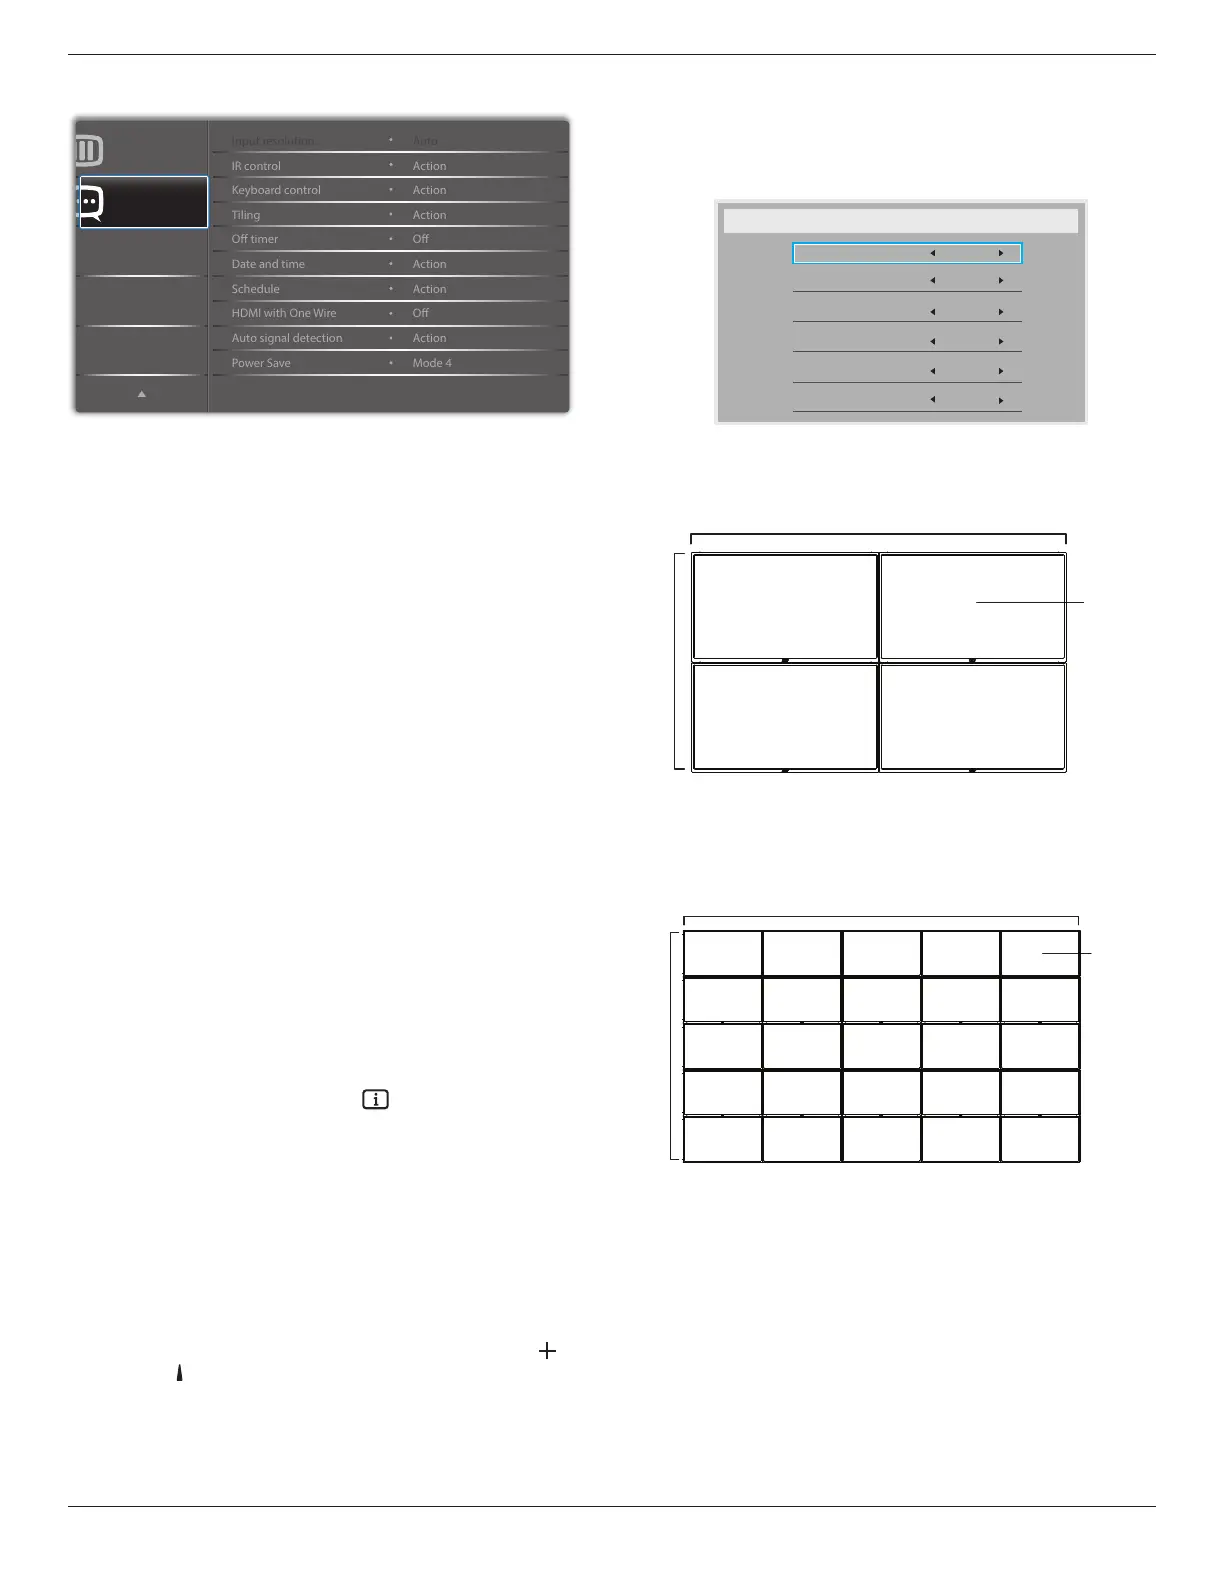
Tiling
Withthisfunctionyoucancreateasinglelarge-screenmatrix(video
wall)thatconsistsofupto225setsofthisdisplay(up to 15-sets on the
vertical and 15-sets on the horizontal sides).Thisfunctionrequiresa
daisy-chainconnection.
Tiling
H monitors
V monitors
Position
Frame comp.
Enable
Switch on delay
1
1
1
No
No
Off
Example: 2 x 2 screen matrix (4 displays)
Hmonitors=2displays
Vmonitors=2displays
1 2
3 4
H monitors
V monitors
Position
Example: 5 x 5 screen matrix (25 displays)
Hmonitors=5displays
Vmonitors=5displays
1 2
6 7
3 4
8 9
5
10
11 12 13 14 15
16 17 18 19 20
21 22 23 24 25
H monitors
V monitors
Position
• {H monitors}-Selectthenumberofdisplaysonthehorizontalside.
• {V monitors}-Selectthenumberofdisplaysontheverticalside.
• {Position}-Selectthepositionofthisdisplayinthescreenmatrix.
• {Frame comp.}-Choosetoturntheframecompensation
functiononoroff.Ifselected{Ye s },thedisplaywilladjusttheimage
tocompensateforthewidthofthedisplaybezelsinorderto
accuratelydisplaytheimag