Disassembly Procedures (A1)
Chapter 6 - Disassembly Guide 67
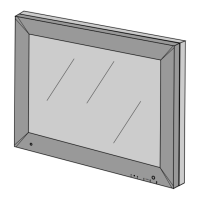
During reassembly, align the ridge in the front case assembly with the
groove in rear case assembly. The gasket snake break should be placed at
the bottom of the unit. Line up the connector panel with the slots in the
rear case, making sure speaker wire is out of the way. Power up the
monitor prior to installing the final four screws. If the monitor boots
properly, insert the four screws and proceed to the performance tests.
5. Disconnect the ribbon cable and its connector from the PCB assembly.
6. Disconnect the battery cable spade terminals from the main PCB
assembly. If the battery cable is to be removed, the cable must also be
disconnected from the battery.
Front case
assembly
Rear case
assembly
Ribbon cable
and
connector