16
PHONO GAIN ADJUSTMENT
This section only applies if your M16 was purchased with optional
This section only applies if your M16 was purchased with optional This section only applies if your M16 was purchased with optional
This section only applies if your M16 was purchased with optional phono stage fitted.
phono stage fitted.phono stage fitted.
phono stage fitted. The phono stage
can also be set to high or low gain to suit your phono turntable specifications (high gain is the factory
setting).
Disconnect the lead from the IEC socket on your Plinius M16. Carefully remove the lid by undoing the
three cap screws. Locate the small black phono jumpers to the centre-front of the smaller phono circuit
board (right side rear). The gain can now be adjusted (remember to do both channels) noting that high
gain is set with jumpers to the front position, and low gain is set with the jumpers towards the rear of the
preamplifier. Now reassemble your Plinius M16.
TAPE LOCKOUT PROTECTION
On most tape decks, any signal recorded is sent to the tape outputs so that the signal level of the
recording can be monitored. Should the user accidentally try to record the tape decks own output,
feedback howl usually results. To prevent this the Plinius M16 Tape Lockout feature will short the outputs
of tape 1 when tape 1 is selected as a record source. The same occurs with tape 2 also.
LED BRIGHTNESS CONTROL
Your Plinius M16 has an internal LED brightness control that will adjust the front panel LED’s. A small flat
bladed screwdriver can be used to adjust the brightness. The LED brightness control is a small multi turn
potentiometer and is located on the front of the main circuit board within the top cavity of the amplifier,
and is labelled VR3. Make sure you adjust the correct potentiometer, and remember to remove the mains
supply from the amplifier before making any adjustments.
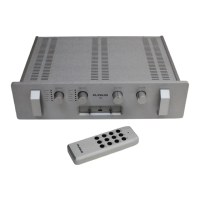
REMOTE CONTROL
Your Plinius M16 preamplifier is supplied with an extruded aluminium 12-button remote control. Use of
this remote is described in the ‘Preamplifier Features – Remote’ section. Two AAA batteries power the
remote, and these are replaced by removing the four button head screws holding the base in position.
Replace the two batteries, taking care to refit the new ones with correct polarity.
MAINS/LINE FUSE
A Mains/Line fuse is fitted within the IEC socket on the rear of the preamplifier. A small drawer at the
bottom of this socket may be removed (after the IEC plug is removed) by levering it out with a flat blade
screwdriver. The fuse fitted should be rated at no greater than 5 amp normal blow.