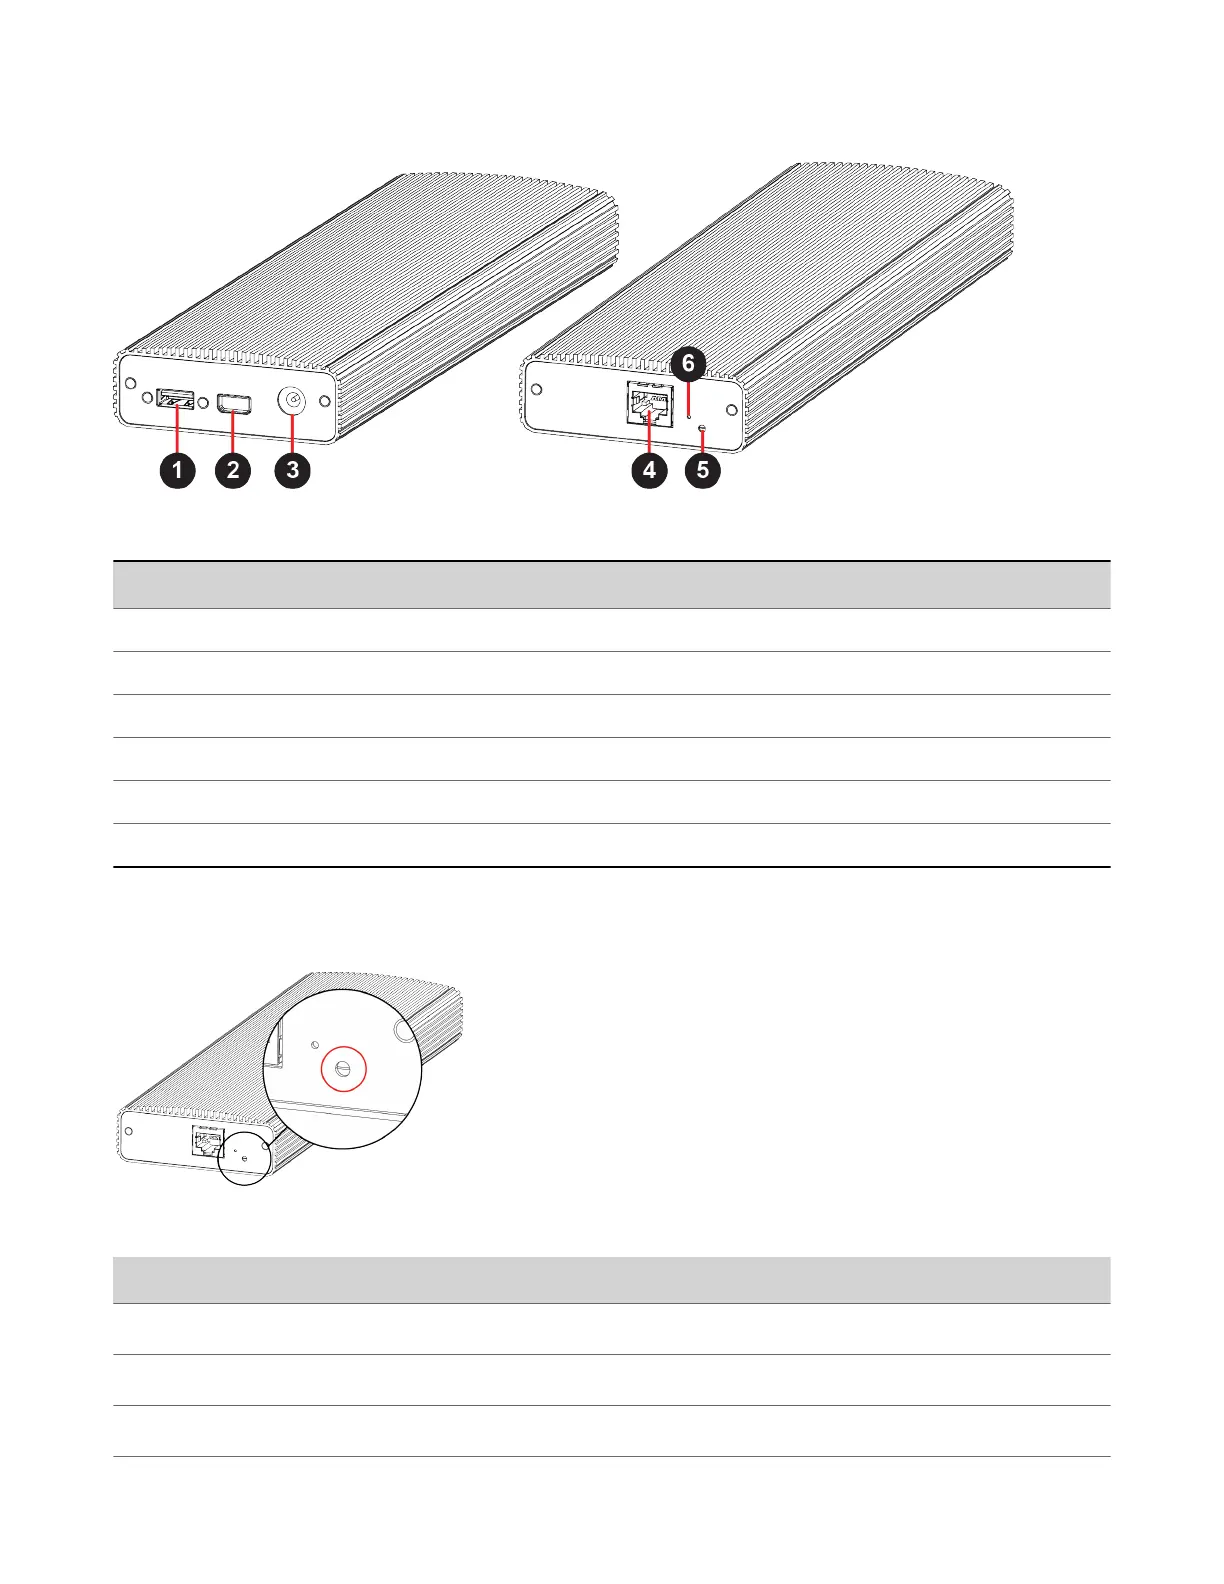
Home
Poly
Conference System
TC8
Poly TC8 Administrator's Guide
5
of 1
of 1 rating
137 pages
Give review
Manual
Specs
To Next Page
To Next Page
To Previous Page
To Previous Page
Loading...
Microp
hone
Adapte
r Port
Desc
riptio
ns
Ref.
Number
Port
Descri
ption
1
USB 2.
0 debu
gging
port
2
Polyco
m micr
ophone
Walta
-Walta
conne
ctor
3
Power
4
Link-l
ocal n
etwork
(LLN)
conne
ction
5
LED st
atus i
ndicat
or
6
Factor
y rest
ore pi
nhole
LED Status Indicators for the Microphone Adapter
Use th
e LED
to get
infor
mation
on th
e stat
e of y
our mi
cropho
ne ada
pter.
Microp
hone
Adapte
r LED
Statu
s Indi
cators
Indica
tor
Statu
s
Blinki
ng whi
te
Poweri
ng on
Solid
white
On
Blinki
ng blu
e
Ready
to pai
r
26
25
27
Table of Contents
Table of Contents
2
Before You Begin
7
Audience, Purpose, and Required Skills
7
Related Poly and Partner Resources
7
Getting Started
8
Product Overview of Poly Video Systems
8
Poly G7500 System Features and Capabilities
8
Poly Studio X70 Features and Capabilities
8
Poly Studio X50 Features and Capabilities
8
Poly Studio X30 Features and Capabilities
9
Poly Studio E70 Camera Features and Capabilities
9
Administrator Features and Capabilities
10
Powering the System on and off
10
Navigating the System
10
Access the System Web Interface
10
Setting up the System
11
Overview of System Hardware
11
Poly G7500 System Ports
11
Poly Studio X70 System Hardware Ports
11
Poly Studio X50 System Ports
12
Poly Studio X30 System Ports
13
Poly Studio X50 and Studio X30 Privacy Cover
14
Poly Studio E70 Ports
14
LED Status Indicators
15
LED Status Indicators for the G7500 System
15
LED Status Indicators for the Studio X70 System
15
LED Status Indicators for Studio X50 and Studio X30 Systems
16
LED Status Indicators for the Studio E70 Camera
17
Completing Initial System Setup
17
Registering the System with Poly Lens
18
Complete Setup with the System Web Interface
18
Complete Setup with Provisioning
18
Managing Peripheral Devices
19
Pairing IP Devices on the Link-Local Network (LLN)
19
Pairing IP Devices on the Local Area Network (LAN)
20
Unpair an IP Device
21
Connect a USB Device
21
Poly Bluetooth Remote Control
21
IP Microphones
23
Poly Microphone IP Adapter
25
Configuring General Settings
28
Name the System and Room
28
Provide Contact Information
28
Set the Date and Time
28
Set the System Location
29
Set the Local Interface Language
29
Configure Sleep Settings
29
Configure out of Office Settings
30
Change Studio X50 and Studio X30 LED Bar Brightness
30
Change the Conferencing Partner Application
30
Set the Conferencing Provider to Device Mode
31
Set the Device Mode Idle Timeout
31
Disable Poly Device Mode
31
System Usage Data Collected by Poly
31
Send Usage Data to Poly
31
Using a Provisioning Service
32
Register the System with Poly Clariti Manager Provisioning Service
32
Download a Provisioning Template Configuration File
33
Register the System with the Poly Lens Provisioning Service
33
Register the System Using DHCP Auto Discovery
33
Configuring Network Settings
35
Configuring Wired LAN Settings
35
Automatically Obtain Ipv4 Address Settings
35
Manually Configure Ipv4 Address Settings
35
Automatically Obtain Ipv6 Address Settings
35
Manually Configure Ipv6 Address Settings
36
Manually Assign a Host Name and Domain Name
36
Manually Configure DNS Settings
36
Configure System VLAN Settings
37
Configure System 802.1X Settings
37
Configure Wired LAN Options
38
LLDP and LLDP-MED Support
39
LLMP-MED Information Discovery
39
Behavior When LLDP Is Enabled
39
Enable LLDP
39
Configure Wi-Fi Settings
39
Configure Network Quality Settings
40
Configure H.323 Settings
42
Configure SIP Settings
43
AS-SIP Settings
45
Enable AS-SIP Settings
45
Add a Network Domain for Outbound Calls
45
Delete a Network Domain for Outbound Calls
45
Select the Default Network Domain for Outbound Calls
46
Enable Point-To-Point Call Escalation to a Clariti Core Conference Call
46
Wireless Devices
46
Specify the Wireless Operating Channel for Miracast-Certified Devices
46
Enable Miracast over Infrastructure
47
Securing the System
48
Managing System Access
48
Local Accounts
48
Enable External Authentication
50
Configure System Access Settings
51
Command-Line API Access for G7500
52
Configure the System Web Interface Port Lock
54
Disable USB Ports
55
Detecting Intrusions
55
PKI Certificates
55
Create a Certificate Signing Request
56
Create a TC8 Certificate Signing Request
57
Configure Certificate Validation Options
58
Install a Certificate
58
View a Certificate
59
View a TC8 Certificate
59
Delete a Certificate
59
Certificate Revocation
59
Disable the Polycom Content App Port
60
Disable the Security Code
60
Enable or Disable Content Saving
61
System Allow List
61
Add IP Addresses to the Allow List
61
Delete IP Addresses from the Allow List
61
Ipv4 Address Formats
61
Ipv6 Address Formats
61
Call Encryption
62
Configure Call Encryption
62
H.460 Firewall/Nat Traversal
62
Configure the System for H.460 Firewall/Nat Traversal
62
Set up a Security Banner
64
Web Proxies
64
Sample PAC File
66
View Connections to the System
67
System Port Usage
67
Wireless Port Usage with Miracast-Certified Devices
70
Configuring Call Settings
71
Configure Call Settings
71
Configure Dialing Options
72
Set Call Answering Mode
73
Set Preferred Call Speeds
73
Configure the Recent Calls List
73
Clear Recent Calls
74
Configuring Audio Settings
75
Configure General Audio Settings
75
Audio Input
76
Configure IP Microphones
76
Configuring the Microphone Adapter
76
Polycom Acoustic Fence
77
Live Microphone Switching on Studio X70 and Studio X50
78
Configure HDMI Audio Input
78
Configure 3.5 MM Audio Input
79
Using Poly Trio Microphones
79
Configuring the Microphone Adapter
80
Audio Output
80
Configure Audio Output Settings
80
Using Poly Trio Speakers
81
Configure 3.5 MM Audio Output
81
USB Audio
81
Using USB and Bluetooth Headsets
81
Using the Shure Intellimix P300
82
Support for QSC Core Series and Biamp Audio Processors
82
Using the Eagleeye Cube USB Camera Microphone
82
Enable USB Audio
82
Audio I/O Specifications
82
Configuring Video and Camera Settings
84
Hdmi I/O
84
Supported HDCI Input Resolutions
85
Configure Monitor Settings
85
Configure a Touch Monitor
86
Monitors with CEC
86
Disable CEC
87
Enable CEC
87
Configure General Camera Settings
87
Reset Camera Settings to Defaults
88
Calibrate Eagleeye Producer Group Framing
88
Use MJPEG Video Format on Eagleeye Cube Cameras
89
Supported USB Cameras
89
Selecting the Primary Camera
89
Camera Priority
89
Maximum Number of Supported Camera Connections
90
Configuring Video Input Settings
90
Configure General Video Input Settings
90
Configure HDMI Input Settings
91
Adjust the White Balance
92
Adjust Studio X50 or Studio X30 Camera Lighting Based on Workspace
92
Configure Camera Tracking Settings for Studio X Family Systems
93
Configure Camera Tracking Settings for G7500
93
Presenter Mode
94
Video Codec Capabilities
94
H.265 High Efficiency Video Coding
94
H.264 Advanced Video Coding
96
Setting up a Directory
98
Register with the Polycom Global Directory Server
98
Register with an LDAP Directory Server
98
Managing Contacts and Favorites
99
Unfavorite a Contact
100
Calendaring Service
101
Configure a Calendaring Service
101
Sharing Content
103
Customizing the Local Interface
104
Change the Home Screen Background Image
104
Restore the Default Background Image
104
Hide the Self-View Picture-In-Picture Display on the System Monitor
104
Hide the Task Buttons on the System Monitor
104
Customize the Address Bar
104
Display Meetings or Favorites on the Home Screen
105
Configure Dual Monitor Display Settings
105
Digital Signage
105
Configure Digital Signage
106
Configuring System Applications
107
Poly Control App
107
Enable Poly Control App
107
Poly Control App Best Practices
107
Extron Environment Controls
107
Enable Environment Controls
108
Set up to the Extron Control App on the TC8 Device
108
Controlling the System Remotely
109
Control the Camera Remotely
109
Wake the System Remotely
109
Place a Call from the System Web Interface
109
End a Session
109
System Maintenance
110
Unlock System Settings
110
Updating Software
110
Updating Paired Devices
110
Updating Software in the System Web Interface
111
Update Software Using a USB Flash Drive
113
Update the Poly Bluetooth Remote Control Firmware
114
Update Poly HDCI Cameras
115
Downgrading Software
115
Manually Downgrade Software in the System Web Interface
115
Downgrade Software with a USB Flash Drive
115
Restart the System
115
Reset System Settings
116
Factory Restore the System
116
Factory Restore the Studio E70 Camera
117
Factory Restore a Table Microphone
118
Factory Restore a Ceiling Microphone
118
Factory Restore a Microphone Adapter
119
Troubleshooting
120
Logs
120
Consolidated System and Peripheral Device Logs
120
Configure Log Preferences
120
Configure Log Level
121
Retrieve Log Files
122
Transfer Logs to a USB Flash Drive
122
Configure Remote Logging
122
Configure Logging to System Internal Storage
123
Sample Log File
123
SNMP Reporting
124
Configure SNMP
125
Download Mibs
126
Checking System Status
127
View Call Statistics
128
Check Provisioning Results
128
Paired IP Devices
129
IP Device Can't Pair to the Video System
129
IP Device Doesn't Display on the Available Devices List
129
Paired IP Device Is Disconnected
129
IP Device Paired to Inaccessible Video System
130
IP Audio Device Is Disconnected from G7500
130
Paired IP Device Doesn't Complete Software Update
130
Audio Tests
130
Can't Wake the System by Touching the Monitor
132
LED Status Indicators for the System LAN Ports
132
Fix Polycom Acoustic Fence Issues with G7500
132
Test the Call Experience
132
Test Connection with Another System
133
Run a Trace Route
133
LDAP Directory Server Ignores the Minimum TLS Version Setting
133
Checking the Web Proxy Configuration
133
Zero Touch Onboarding Connection Fails During Initial Setup or after Reset
134
Verify Poly Lens Registration Status
134
Poly Clariti Manager Provisioning Fails after Downgrading Software
134
Lighting Conditions Impact Picture Quality
135
Issues When the System Is Sleeping or Waking
135
Poly Trio Audio Meter Not Displaying in System Web Interface
135
A Portion of the Eagleeye Cube USB Camera Name Is Cut off
135
Contacts with the same Name Don't Display in the Contact List
135
Monitor Loses Signal after Monitor Swap
136
System Web Interface Is Displaying Invalid or Disabled Camera Settings
136
Can't Connect to Secondary Network after Changing Country Code
136
Can't Use Airplay to Share Full Screen Video from a Website or App
136
Contacting Technical Support
136
Locate the System Serial Number
136
Before You Begin
137
Other manuals for Poly TC8
User Guide
37 pages
5
Based on 1 rating
Ask a question
Give review
Questions and Answers:
Need help?
Do you have a question about the Poly TC8 and is the answer not in the manual?
Ask a question
Poly TC8 Specifications
General
Display
8-inch touch screen
Resolution
1280 x 800
Connectivity
Wi-Fi
Ports
1 x USB-C, 1 x 3.5mm Audio Jack
Power
IEEE 802.3af PoE
Operating System
Android
Related product manuals
Poly TC10
31 pages
Poly G85-T
6 pages
Poly Trio 8300
83 pages
Poly RealPresence Trio 8800
48 pages
Poly G7500
39 pages
Poly Studio
34 pages
Poly Studio X50
39 pages
Poly Studio X70
39 pages
Poly Studio R30
16 pages
Poly Studio X30
39 pages
Poly Large Room Kit
3 pages
Polycom RealPresence Group Series
41 pages