Do you have a question about the Precision Power ATOM Series and is the answer not in the manual?
Expresses gratitude to the customer for purchasing the amplifier and congratulates them.
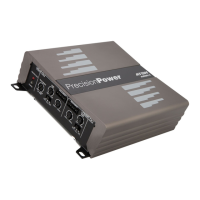
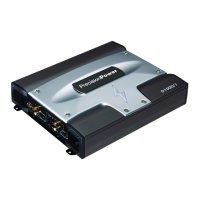
Describes the ATOM Series amplifiers as high quality MOSFET units for full range or subwoofer use.
Warns about potential permanent hearing damage from high sound pressure levels and prolonged listening.
Advises against using the amplifier with the car engine off and specifies usage for DC12V vehicles only.
Provides guidance on selecting optimal locations for amplifier mounting and avoiding obstacles.
Recommends careful planning for installation, ensuring adequate airflow and avoiding upside-down mounting.
Advises checking for hidden lines before drilling and recommends using a fiber board for isolation.
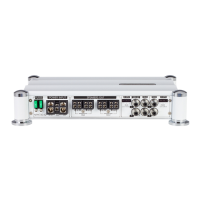
Explains RCA LINE IN, High Level Input, Phase Shift, and Thru-Out functions for signal connection and management.
Details how to set up the amplifier for bridged mode using MASTER/SLAVE switch settings for single speaker loads.
Describes amplifier controls like gain, filters, bass boost, and the power indicator LED.
Explains speaker terminals, fuses, power input (+BATT), remote turn-on, and ground connections.
Covers the protection indicator, high pass filter, and selector switches for signal path management.
Explains the function of the remote control for adjusting subwoofer output level from the dashboard.
Provides instructions on how to mount the remote subwoofer level control unit under the dashboard.
Shows wiring diagrams for connecting speakers and power in low input mode for the MPA700.4D amplifier.
Shows wiring diagrams for connecting speakers and power in high input mode for the MPA700.4D amplifier.
Illustrates speaker and power connections for low input and bridged modes of the MPA1000.5D amplifier.
Illustrates speaker and power connections for high input and bridged modes of the MPA1000.5D amplifier.
Shows wiring diagrams for low input and high input modes of the MPA1200.1D mono channel amplifier.
Details the 90-day warranty for units installed by non-authorized dealers, covering repair or replacement.
Covers the two-year warranty for units installed by authorized dealers, including repair or replacement.
The Precision Power ATOM Series mobile amplifier is a sophisticated audio device designed for high-quality sound reproduction in mobile environments. These amplifiers are the result of extensive engineering, testing, and robust construction, ensuring reliability and performance. They are versatile, compatible with various optional signal and audio processors, and feature high-quality MOSFETs, allowing for flexible configuration to suit different speaker systems.
The ATOM Series amplifiers are digital Class D full-range amplifiers, meaning they can power a complete audio system or be dedicated solely to subwoofers. Their design emphasizes optimal Class D performance, reliability, and a compact footprint, building upon the original Atom and Ion platforms. Key improvements include the relocation of signal inputs, power/ground, and speaker connections to the leading edge of the chassis for easier and more aesthetically pleasing installation. All pre-amp and crossover options are conveniently located on the back side of the unit.
Internally, the circuit board has been enhanced with increased power supply and output stage components, and monoblock bridging capability. The unique mounting pedestals at each corner elevate the heatsink, which significantly improves airflow around and under the chassis, contributing to better thermal management. Additionally, rubber grommets under and inside each pedestal electrically isolate the amplifier chassis from the vehicle chassis, effectively reducing the potential for ground loop noise, a common issue in car audio systems.
The amplifiers feature RCA-style input jacks for source units with line-level outputs, requiring a minimum of 250mV for proper operation but capable of accepting levels up to 6Vrms. For installations using high-level inputs, a remote connection is not necessary, but connecting the high-level ground wire to the head unit ground is recommended for better sound quality.
A phase shift switch (0 or 180 degrees) allows users to adjust the subwoofer's phase to compensate for timing differences between drivers, ensuring coherent sound. The "Thru-Out" RCA jacks enable the creation of multiple amplifier systems without the need for splitter cords, simplifying signal distribution from one amplifier to the next.
For bridging into a single speaker load, the MASTER/SLAVE switch settings are utilized. In Master Mode, the amplifier routes the signal through RCA to a Slave amplifier. In Slave Mode, all crossovers on the slave amplifier should be turned off. Speaker connections involve connecting the positive (+) speaker lead to the positive (+) speaker terminal of the master amplifier. The negative (-) speaker terminal of the master amplifier connects directly to the negative (-) speaker terminal of the slave amplifier. The remaining positive (+) speaker terminal of the slave amplifier connects to the negative (-) speaker lead from the speaker. It's crucial that the speaker impedance does not exceed 2Ω. For optimal results, both negative speaker terminals on the master amp should be connected to both negative terminals on the slave amp using at least 12 AWG cable.
The ATOM Series amplifiers offer several controls for fine-tuning audio output. A remote bass boost control adjusts the bass boost gain for the amplifier's speaker output from 0 to +12dB. Speaker terminals are designed to accommodate up to 10 gauge speaker wire, and proper polarity must be observed throughout the system.
The input level can be adjusted using the gain adjustment control. Turning it clockwise increases the output level when the car audio unit's output seems low. A variable subsonic filter (20Hz ~50Hz) rolls off unwanted frequencies below 20Hz-50Hz, allowing the amplifier to allocate power more efficiently to the audible bandwidth. An internal variable low pass filter can be set from 50Hz to 500Hz. The bass boost level control allows boosting frequencies around 45Hz up to a maximum of 12dB.
For multi-channel amplifiers, a high pass filter can be set from 50Hz to 500Hz, and in some models, up to 5KHz. A high pass/full/low pass selector switch allows users to choose the desired crossover mode. A channel SUM selector switch offers two positions: OFF for 4-channel stereo input mode, allowing front and rear channels to receive signals from only the front and rear RCA inputs, and ON for input without a 5-channel (SUB) input.
A remote subwoofer level control can be added to adjust the subwoofer output from the dashboard. This control adapts the amplifier to various signal sources with different levels and should not be used as a volume control. It's recommended to start with a "12 o'clock" setting and set the head unit volume to 75% of maximum for distortion-free sound. The control should then be slightly reduced from the point where distortion becomes discernible.
For continued protection, all ATOM Series amplifiers utilize common automotive ATC type fuses. In the event of a fuse blowing, it must be replaced only with a fuse of the same value.
The amplifier's power input terminal (+BATT) must be connected directly to the positive (+) terminal of the car battery. A remote input connection allows the amplifier to be turned on by applying 12 volts, typically from the source unit's electric antenna output or a dedicated remote output. If these are unavailable, wiring to the ACC position on the key is an option, with an 18 gauge wire being sufficient for the remote connection.
A good quality ground connection is essential for peak performance. A short cable of the same gauge as the power cable should be used to attach the ground terminal directly to the vehicle's chassis. A power indicator (PPI Logo Badge) illuminates green when the power is on. A protection indicator lights up in red when the PROTECTOR is activated, signaling a fault condition that requires consulting the Troubleshooting Guide.
The device is designed to operate within a 10 to 16.8 volt DC range. Before any wires are connected, the vehicle's electrical system should be checked for correct voltage supply with the help of a voltmeter. The voltage should be read not less than 12V with the ignition in the OFF position. If the vehicle's electrical system is not up to specifications, an auto electrician should be consulted. A large gauge cable should be used for the power wire, with the correct power wire size determined by a Power Cable Selection Chart.
The amplifier should be wired directly to the vehicle battery using appropriate size cable. The power cable should be run through the amplifier, avoiding engine components and near heater cores. An online fuse or circuit breaker must be used to prevent the risk of a potential fire caused by a short in the power cable. The fuse holder or circuit breaker should be as close to the battery's positive (+) terminal as possible (no farther than 18" from the battery). The fuse or circuit breaker should be no greater than the sum of the fuses found on the chassis of the amplifier.
When grounding the amplifier, a metal area close to the amplifier that is a good source of ground should be located. The area should be clean, free of wires, vacuum lines, and brake or fuel lines. A wire brush or sandpaper should be used to eliminate unwanted paint for better contact. The ground cable should be secured to the body using a bolt, star washer, and nut. Silicone should be spread over the screw and bare metal to prevent rust and possible water leaks.
To connect the power and ground cable to the amplifier, both cables should be cut to length. Strip off 1/2 inch (1.2mm) of the insulation so that the bare wire will go all the way into the terminal block on the side panel of the amplifier. A Philips (cross) type screwdriver should be used to loosen the +BATT and the GND connections on the amplifier. The ground first, then the +12V should be inserted, ensuring they are placed into the correctly marked terminals. The screws should then be securely tightened.
A remote terminal must be connected to a switched +12V source, typically a remote turn-on lead from the source unit. This will turn on and off the amplifier in correspondence with the source. If the source unit does not have a remote turn-on lead, a switched +12V supply, such as the ACC, +12V, must be used.
| Series | ATOM |
|---|---|
| Minimum Impedance Unbridged | 2 Ohms |
| Signal to Noise Ratio | >100dB |
| Bass Boost | 0-12dB |
| Amplifier Class | Class D |
| Crossover Type | Variable Low-Pass |
| Frequency Response | 20Hz |
| Input Sensitivity | 0.2 - 6V |