2
adjust the gauge tolerances (“tL”), set the display option to invert the digital display (do), and set the
function of the AUX input (“AU”).
To initiate calibration, simply press the appropriate pushbutton and release it within 3 seconds.
To view the current value of a parameter, press the pushbutton and hold it for more than 3 seconds
until the appropriate parameter identifier (“tr”, “tL”, “do”, or “AU”) appears on the digital display. After
the parameter identifier appears, release the pushbutton and the current value of the parameter
displays for 5 seconds. To retain the current value of the parameter, simply allow the 5 second display
interval to elapse. The display reverts to displaying the gauge signal.
To change the value of a parameter, press the pushbutton and hold it for more than 3 seconds until the
appropriate parameter identifier appears on the digital display. After the parameter identifier appears,
release the pushbutton and the current value of the parameter displays. Press the pushbutton while the
parameter is displaying and the value increments, first slowly then more rapidly. For more precise
control of the value adjustment, simply tap the pushbutton repeatedly until the desired value is
displayed. All parameters roll back to their minimum values after reaching the maximum value. To retain
the adjusted value of the parameter, simply allow the 5 second display interval to elapse. The display
reverts to displaying signal strength.
Probes
The SD220/SD230 controllers may be used with any P15 or P70 series two wire probes or with older
model three wire probes including AV, AY, AZ, AZA, and CB probes. When used with older three wire
probes, the white wire in the probe cable is not used and must remain disconnected.
OPERATION
Operation of the SD220/SD230 Double Shell/Missing Tab Detector involves only two processes,
calibration and fault message interpretation. These processes are described below.
Calibration
Calibration requires the following steps:
1. Stop the press in the dwell portion of the cycle with a single end between the infeed probes and
a good tabbed end between the discharge probes.
2. Observe that no error conditions are being reported on either display of the SD220/SD230
control module.
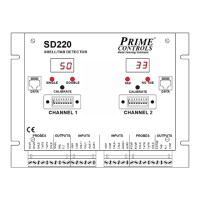
3. Press and release the CALIBRATE pushbutton on channel 1 of the SD220/SD230 control module
and observe the SINGLE and DOUBLE LEDs flashing alternately and “CAL” on the digital display. If
the calibration is successful, the LED flashing stops in less than three seconds and the digital
display shows a number between 48 and 52.