Do you have a question about the ProForm 585 Cse Elliptical and is the answer not in the manual?
Locate and record the product model and serial numbers for reference and support.
Contact customer care for questions, damaged, or missing parts. Provides contact details.
Read all precautions and instructions before using the equipment.
Shows the location of warning decals and how to obtain replacements if missing or illegible.
Consult physician before starting exercise; ensure all users are informed of precautions.
Use indoors, on a level surface, ensure clearance, and inspect/tighten parts regularly.
Keep children and pets away; do not exceed weight limit of 275 lbs.
Wear appropriate clothing, use handgrips, maintain posture, stop if feeling pain.
Familiarize yourself with parts and register your exerciser online to avoid fees.
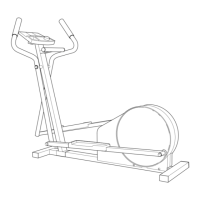
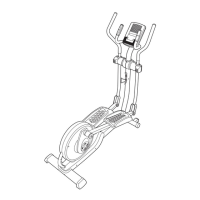
Diagram identifying key components like Console, Handlebar, Pedals, and Wheels.
Assembly requires two persons and specific tools like a Phillips screwdriver and wrenches.
Visual guide to identify all hardware parts (screws, washers, nuts) with key numbers and quantities.
Instructions for attaching wheels to the frame and inserting the pivot axle with washers.
Guide for attaching the Right and Left Upper Body Arms, including wire management.
Steps to attach handlebars, connect controller wires, and secure wire covers.
Instructions for positioning and securing the water bottle holder with screws.
Procedure for attaching the upright assembly and installing batteries in the console.
Details on operating the console with batteries or an optional power supply.
Connecting console wires to the wire harness and extension wires, avoiding pinching.
Instructions for installing the track and securing the track cover with screws.
Securing the track to the frame using patch screws and washers.
Guide to attaching pedal legs and link arms with grease, screws, and axle covers.
Attaching pedal legs and link arms to the upper body arm and crank arm with grease.
Ensure all parts are tightened and place a mat to protect the floor.
Instructions for safely moving the elliptical exerciser with two people.
Guide on how to safely mount, start pedaling, and dismount the exerciser.
Procedure to adjust leveling feet to ensure stability and eliminate rocking.
Diagram and explanation of console display areas and buttons.
Description of Manual, Cross Trainer, Smart, and Heart Rate programs, plus games and sound.
How to turn on the console and select the manual mode for exercise.
Using quick resistance buttons and understanding console display feedback.
Instructions for selecting console backlight modes (On, Auto, Off).
How to select a cross trainer program and begin pedaling to start.
Explanation of program segments, resistance changes, and personal trainer voice prompts.
How to measure heart rate and control the fan speed during workouts.
Following pace prompts, adjusting resistance, and understanding automatic segment changes.
Instructions for performing strength exercises prompted by the program.
How to continue the program, stop it, or restart it, and console auto-off.
How to select one of the three smart programs and begin pedaling.
Explanation of program segments, resistance changes, and pace prompts.
Following progress, measuring heart rate, fan control, and console auto-off.
How to select a heart rate program and enter a target heart rate setting.
How the console adjusts resistance to maintain target heart rate and pace guidance.
Monitoring progress, heart rate measurement, fan control, and console auto-off.
How to select and start the Fat Blocker game using console and controller buttons.
Rules for moving, rotating, and dropping blocks to form rows and earn points.
Monitoring game progress, score, level, and how to pause or resume the game.
How to select and start the Calorie Destroyer game using console and controller buttons.
Rules for firing the blaster, moving, and protecting shields from drones.
Monitoring game progress, score, level, and how to pause or resume the game.
Instructions for connecting an MP3 player or CD player to the console's sound system.
How to adjust the volume level using the player's controls.
Inspect and tighten parts regularly; clean console with a damp cloth, avoid liquids.
Procedures for adjusting the drive belt for slippage and the reed switch for console feedback.
Troubleshooting dim console display, heart rate issues, and squeaking rollers.
Using heart rate to determine intensity for fat burning and aerobic exercise.
Recommended structure for workouts, including warm-up, training zone, and cool-down phases.
Guidelines for workout frequency to maintain condition and achieve results.
Detailed list of all parts with key numbers, quantities, and descriptions for identification.
List of screws, washers, nuts, and other hardware used in assembly and maintenance.
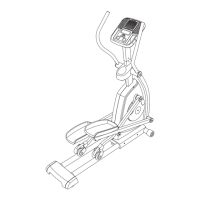
Visual representation of assembled parts, corresponding to the parts list for identification.
Visual breakdown of major components and their connections for assembly reference.
Detailed illustration of parts and their relationships for assembly and repair.
Details needed when contacting for replacement parts: model, serial, part key number, and description.
Details frame (7 years) and parts/labor (90 days) warranty coverage.
Exclusions for freight damage, abuse, misuse, commercial use, and limitations on consequential damages.
Information on specific legal rights and how warranty may vary by state.
| Brand | ProForm |
|---|---|
| Model | 585 Cse Elliptical |
| Category | Elliptical Trainer |
| Language | English |