8 Orange pilot lamp (mod. CLUB PU/S).
When on indicates a lack of water in the tank and
consequent stop of machine.
.
Press down to ll the boiler.
(models with gas hea-
ting).
Open: vertical position;
Closed: turn 90° in clockwise direction.
(models with gas heating).
Firing button: press down rmly to give off the
spark to light the gas for the burner.
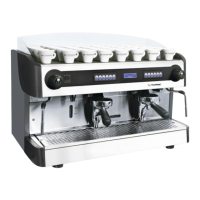
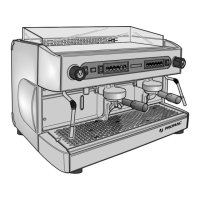
(Fig.7)
12 Gauge with mobile needle on a xed dial with
a single scale and colour indicator areas (mod.
CLUB).
Visual control of boiler pressure.
13 Gauge with mobile needle on a xed dial with a
double scale and colour indicator areas ( (exclu-
ding mod. CLUB).
Visual control of the pump and of the boiler pres-
sure.
14 Minimum and maximum water level indicator
(excluding mod. CLUB - mod.COMPACT).
Visual control of water level in boiler.
(models with gas heating).
Visual control of lighting and functioning of the
ame of the gas burner.
(optional).
(Fig.8)
● Open the lid on the water-tank and check that the
softener 1 has been inserted in the dip pipe 2;
● Ensure that the air trap 3 has been inserted in the
appropriate housing;
If the air trap is not properly positioned, the
machine may not heat or properly indicate
the lack of water in the tank.
● Fill the tank with 2 litres of water and close the
lid;
● Switch on the main switch 1A (Fig. 7) in order to
ll the boiler up. Once the boiler is full, activate
the boiler resistance element switch 1B (Fig. 7)
to start the heating cycle, then activate the group
until water starts running out of it.
● Wait for the machine to reach its working pressure,
gauge needle 12 (Fig.7) on green area, and to
reach the correct thermal balance.
● Turn on the water supply tap (Fig.5);
● Turn the main switch 1 (Fig.7) in an anticlockwise
direction to position 1; the pump is activated, lling
the boiler;
● When the correct level is reached, the pump stops.
Turn the main switch 1 (Fig.7) in a clockwise di-
rection to position 2 to begin heating the water in
the boiler;
● Wait for the machine to reach its working pressure,
gauge needle 13 (Fig.7) on green area, and to
reach the correct heat level.
Filling time is preset to a maximum of 2
minutes so it is possible that this is not long
enough for some models (ME 3-4 units) to
reach the required level. In this case, turn
the main switch off and on again to complete
lling by starting another lling cycle.
Lack of water is indicated on models ME by
leds blinking on the button panel.
Models with automatic water level automati-
cally control the water level.
Fig.3
● Turn on the water supply tap (Fig.5);
● Switch on the main switch 1A (Fig. 7) in order to
ll the boiler up. Once the boiler is full, activate
the boiler resistance element switch 1B (Fig. 7)
to start the heating cycle, then activate the group
until water starts running out of it.
● Wait for the machine to reach its working pressure,
gauge needle 12 (Fig.7) on green area, and to
reach the correct heat level.
79