3.2Pre-installationtest
T
estingthetransducer
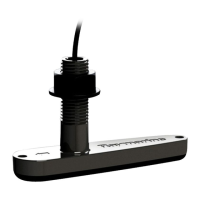
Transduceroperationshouldbecheckedbeforeinstallation.
1.ConnectthetransducertothetransducerconnectionofaRealVision™3Dsonar-capabledevice
(e.g.AxiomRVmultifunctiondisplay).
2.Fullysubmergethetransducerinwater.
3.PoweruptheRealVision™3Dsonar-capabledevice,and/ormultifunctiondisplay.
4.OpenaFishfinder(Sonar)applicationonyourmultifunctiondisplay.
5.Ifrequired,selecttherelevanttransducer/channelfromtheChannelselectionpage(
Menu>
Channel).
6.Checkthataccuratedepthandtemperaturereadingsaredisplayed.
7
.IfyouexperiencedifficultiesobtainingreadingsthencontactRaymarineTechnicalSupport.
Warning:Transduceroperation
Onlytestandoperatethetransducerinthewater.DoNOToperateoutofwater
asoverheatingmayoccur.
Caution:Transducercable
•DoNOTusethetransducercabletoliftorsuspendthetransducer;always
supportthetransducerbodydirectlyduringinstallation.
•DoNOTcut,shorten,orsplicethetransducercable.
•DoNOTremovetheconnector.
Ifthecableiscut,itcannotberepaired.Cuttingthecablewillalsovoidthe
warranty.
Multipletransducers
Note:Ifyouareinstallingasplit-pairoftransducers(fore xample,anRV-212PunitwithanRV-212S
unit,oranRV-320PunitwithanRV-320Sunit),ensurethatyoutestbothtransducerstogetherby
connectingthemtotheRealVision™3Dsonar-capabledevice(e.g.multifunctiondisplay)usinga
Y-cableandextensioncable.
Refertothecolored“Port”and“Starboard”labelsonthecablestoensurethatyouconnectthe
transducercablestothecorrectY-cabletails.
Installation
21

 Loading...