RFCoaxial cable
White
Audio video cables are
usually color-coded red,
white, and yellow.
Ch p er C@ nect ÷ns
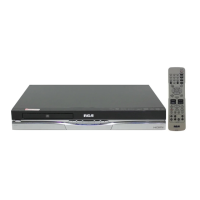
Connection: DVD recorder + TV + Satellite Receiver
Tbe following instructions enaNe you to retold tile plograms from your satellite receiver. Because the jack
configuration and labels vary on different satellite receivers and televisions, the steps provided are general
gtfiddines. Constllt your satellite leceiver and/or television user's gtfides for additional blformation.
3,
1. Satellite signah Leave the cable ill place that comes born tile satellite dish and goes to the satellite
receiver.
2, Connect the satellite receiver to the DV]D recorder
2a. Connect a coaxial cable to the satellite receiver's OUT TO TV jack, and to the ANTENNA!
CABLE INPUT jack on the
DVD recoider.
2b. Connect audio cables (red and white) to the satellite _eceiver's otltp_lt jacks [sometbnes hbeled
Audio I eft (white) and Audio Right (red)]. Connect the other ends of tbese cables to the
co_responding AV1 INPU-[ AUDIO L and AUDIO R jacks oil tbe back of the DVI) recordel:
2c. Connect the vide() cable (ydlow) to the Video Output jack on the satellite receiver (sometimes
labeled VIDEO) to the INPUT VIDt!O jack on the back of the DVD recoider.
2d.If)<)ur satellite receiver, has an S-VIDEO OU'I jack, connect an S Video cable to that jack and to
the S VIDEO IN jack on the DVD recoider for improved pictule qualit>
Connect tile DV]Drecorder to tile TV
_lu need to connect cables from the DVD recol&'r's OUTP[ r-[ jacks to the'IY's INPUt[ jacks
in orde_ to see the content flora the DVD lecorder (wbethm it's a satellite proglam or a disc you'Je
playing).
3a. Connect an RF coaxial cable to the DVD lecorder's ANTENNA/CABLE OU-[ PU-[ jack and to
tile TV's Antenna Input jack (sometbnes labded CABLFJAN-[ ENNA). It is important to make
tbis connection so you can watcb satellite programs wben tile DVI) recorder is o_.
3b. Connect tile audio cables.
A set of audio/video canes was packed with your DVD recoide_: Connect the audio cables to the
AUDIO OUTPUT L (left white) and R (right red) jacks on tbe back ofyotlr DVD recorder,
and to the coiiesponding Audio Input jacks on your TV (sometimes labeled AUDIO IN L and R).
3c. Connect the video cable. The canes you rise foJ the vi&.o detelmine the qtmlity of die pictme
you;ll see on your TV wben youre playing DVDs. FoJ more infimnation al)out cables and signal
quality, go to page 5.
Colmect the video cable (ydlow) to the VIDEO OUTPUT jack on the back of your DVD
lecorder, and to tile Video Input jack oil your TV (sometimes labeled VIDEO IN).
S-VIDEO (not shown) If your TV has an S VIDEO input jack, connect one end of an optional S
Video cable to the S&qDEO input jack oil tile back of the TV and the other end to the S-VIDEO
OUT jack on the back of the DVD recorder.
COMPONENTVIDEO E Pb, Pr (not shown) If your TV has Component Input Jacks (Y, Pb,
Pl), you can achieve exen gleatel pictule quality (DVD playback only) by connectblg the DVD
recorder to theTV using tbese jacks (COMPONEN-[ VIDEO OU-[; ]] Pb, Pr on the DVD
recoMer). FoJ more e_planation, go to page 5. Component Video cables not supplied with the
DVD recorder.
HDMI (not shown) If you TV has an HDMI Inptlt Jack, you can achieve optbnum picture
quality. Connect one end of the HDMI cable to the HDMI jack on the back oftbe TV and the
othel end to the HDMI jack on the bad( oftbe DVD i;'corder. Press the HDMI button on tbe
remote to toggle the available progressive scan and interlace modes.
Notes:
If your TV is capable of progressive scan, connect the DVD recorder to the TV using the
COMPONENT VIDEO OUT jacks, and press the HDMI button on the remote to toggle
between progressive scan and interlace. Please note that the component video output
mode will remain at 480p even though the HDMt video output mode is 480p/720p/10801,
which is displayed on the front of the unit.
4. Phlg the power cord into an AC outlet.
Go to page 17
Graphics contained within this publication are for representation only 13