Do you have a question about the Roadmaster Sterling and is the answer not in the manual?
Details on how to register for warranty and receive a free one-year extension by mailing the card within 30 days.
Instructions on contacting ROADMASTER for product issues and warranty repairs or replacements.
Guidance on locating the tow bar serial number on a label for warranty information.
Ensures the tow bar remains level with the motorhome, not exceeding 6 inches off level.
Requires steering to be unlocked and prohibits backing up the motorhome with the towed vehicle attached.
Emphasizes securing the tow bar with pins/padlocks and keeping it clean and lubricated.
Stresses the importance of filling out and mailing the warranty registration card promptly.
Covers checking manufacturer instructions, vehicle compatibility, safety cables, and turning radius.
Highlights critical warnings like never backing up and potential consequences of non-compliance.
Installer must demonstrate tow bar operation and ensure the owner understands instructions.
Installer must caution owner to use a hitch rated higher than the towed vehicle's weight.
Installer must ensure owner understands the need for designated pins and/or padlocks.
Installer must bolt the QD base to a bracket attached to the vehicle's frame or unibody.
Installer must advise owner on safety cable use and stress warranty card submission.
Installer must ensure proper tow bar mounting and vehicle suitability for towing.
Caution to avoid getting hands or body parts caught between moving components during operation.
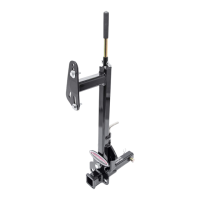
Step-by-step guide for mounting the STERLING Quick Disconnect Base as per installation instructions.
Instruction to insert the folded tow bar into the motorhome's receiver and secure it.
How to hold and rotate tow bar arms to a vertical position, with a warning about potential injury.
Procedure to bring arms to horizontal, align with base, and secure with base pin and linch pin.
Connect the other arm and verify steering, transmission, brakes, and safety cables are ready.
Pull away slowly to engage AUTOWLOK system and visually verify locks are engaged.
Crucial reminder that base pins must be installed and locked to prevent loss of towed vehicle.
Steps for disconnecting: set brake, disconnect cables/wiring, release handles, remove base pins.
Tips for releasing the locking mechanism, including turning the steering wheel or running the engine.
Warning not to use leverage tools on release handles to avoid damage and warranty voiding.
Instructions for wiring the plug, including routing through safety channels and applying sealant.
Guidance on finding a location, preparing, and running wires for the electrical sockets.
How to connect wires to sockets, tighten set screws, and weather-proof the connections.
Steps for connecting the 4-wire cord and testing lights for proper operation.
Warning to use only 6,000 lb. or higher rated safety cables for towing.
Instructions on how to route the safety cables through the safety channels.
Guidance on how to properly store the safety cables and wiring when not in use.
Procedure for connecting cables to the anchor bracket and attaching to baseplates with short cables.
Instructions to always cross cables under the hitch for added support in case of failure.
Advice on ensuring sufficient slack for turns and handling cables that are too short or too long.
Requirement to use short safety cables with ROADMASTER brackets that have removable arms.
Reiteration that safety cables are rated at 6000 lbs. per pair and vehicle weight should not exceed this.
Do not tow with components rated less than vehicle weight; safety cables must connect frame to frame.
Ensure tow bar is secure with all pins/locks; never heat, bend, or weld the tow bar.
Towed vehicle must have emergency brake set and be in Park during hooking or un-hooking.
Use caution to avoid pinching, crushing, or cutting body parts between moving components.
Do not tow if the STERLING tow bar is over 3 inches out of level in either direction.
Procedure to measure ground-to-receiver and ground-to-base pin heights to check level.
If using receiver extensions, the tow bar must not be more than 3 inches out of level.
Discusses problems like strain, wear, and sway, and warranty voiding from out-of-level towing with extensions.
Guidelines for cleaning the tow bar using a cleaner, working it into moving parts, and draining.
Apply silicone lubricant to the tow bar, but avoid spraying directly into the lock housing.
Proper cleaning and lubrication prevent corrosion and ensure smooth operation of the tow bar.
Keeping base pins clean and lubricated eases the disconnect process.
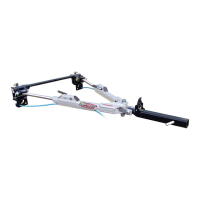
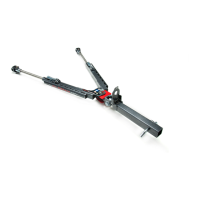
Diagram and list identifying the various parts and components of the tow bar system.
List of optional accessories available for the tow bar system, not shown in the main diagram.
Details the one-year warranty for defects in workmanship and materials under normal use.
Lists conditions not covered, including shipment damage, misuse, improper installation, and wear.
Excludes liability for incidental or consequential damages, with state variations noted.
Roadmaster's responsibility is limited to repair or replacement of defective products.
Purchaser must complete and mail the warranty registration card within 30 days of purchase.
| Brand | Roadmaster |
|---|---|
| Model | Sterling |
| Category | Automobile Accessories |
| Language | English |