20 SawStop 10” Contractor Saw
Assembling Your Saw
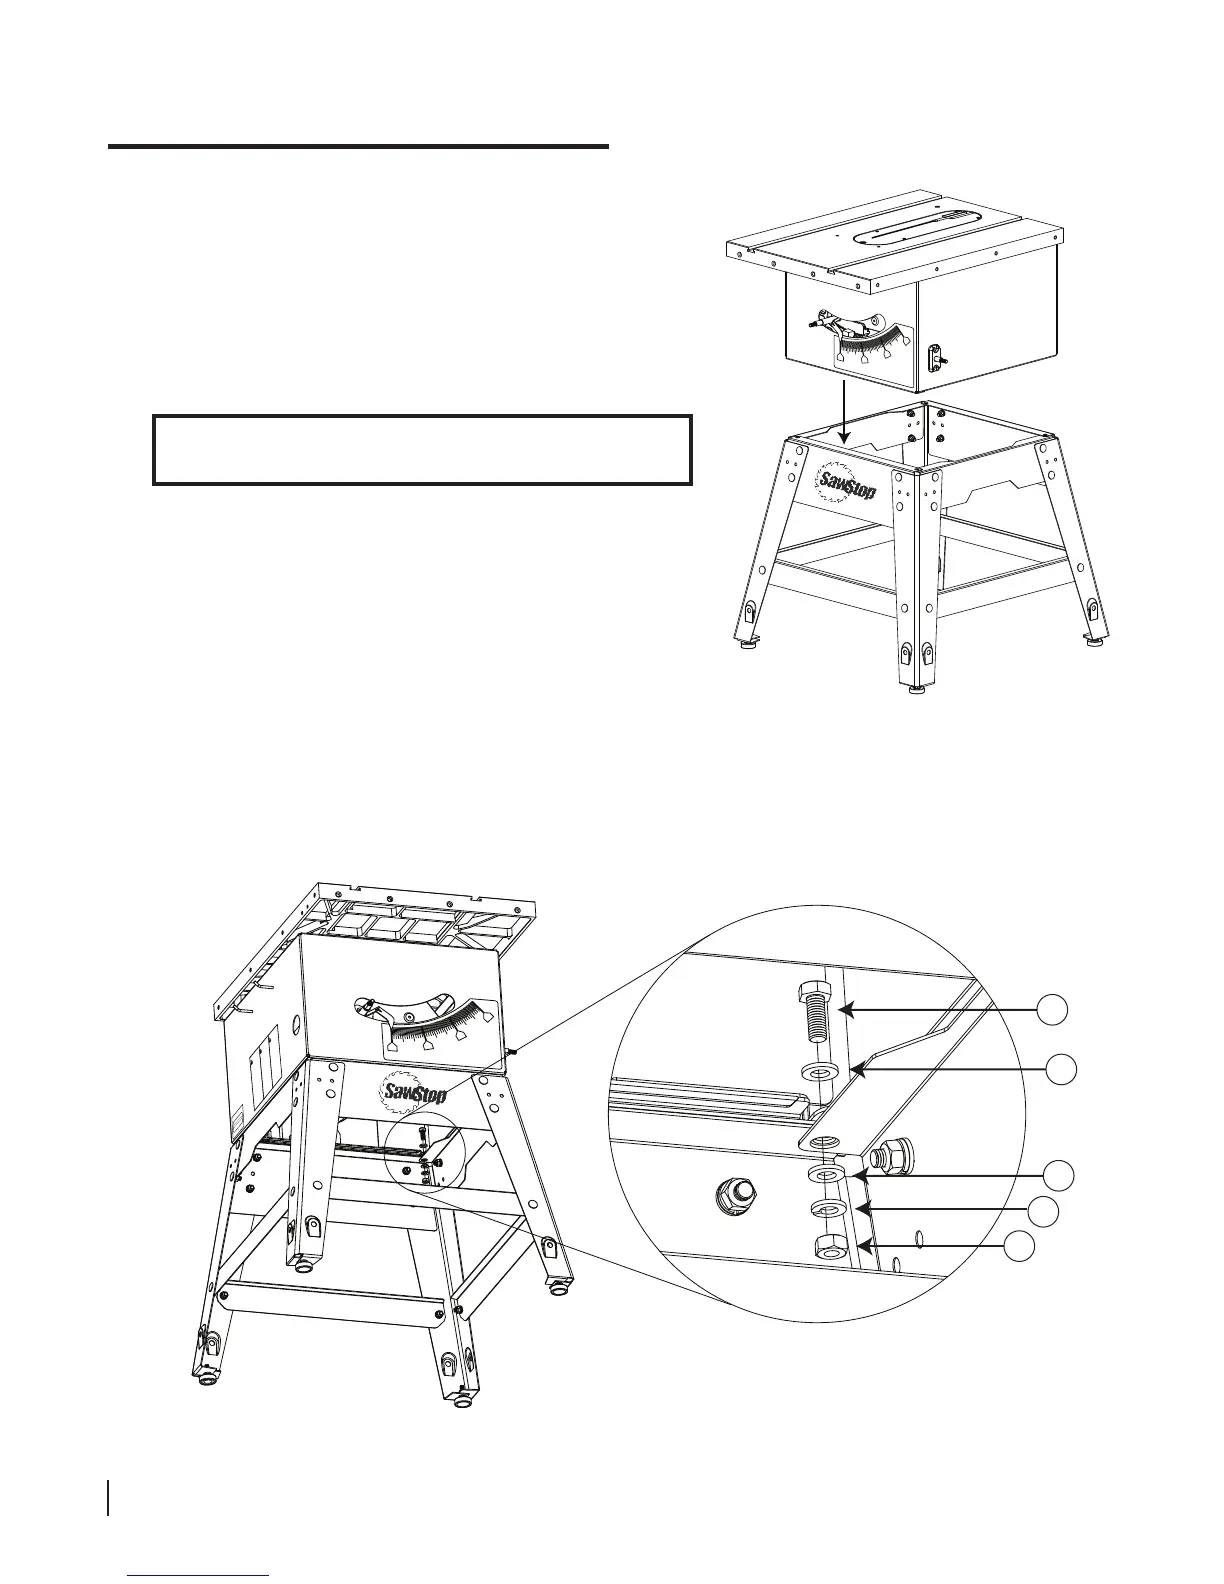
12. Mount the cabinet to the stand using four M8 x 20 hex screws, eight M8 washers, four M8 lock washers, and
four M8 hex nuts. Insert the hex screws down through the mounting holes in the bottom corners of the saw and
the top corners of the stand, and thread the hex nuts on from the bottom (see Fig. 12). Make sure to place a
washer between the screw head and the saw and to place a washer and lock washer above each nut with the
lock washer next to the nut, as shown. Fully tighten all of the nuts using two 13 mm wrenches.
6
7
7
8
9
0
15
30
45
SawStop
10” Contractor Saw
!
WARNING
!
ADVERTENCIA
!
AVERTISSEMENT
gabinete mientras la cuchilla gira.
15. No ponga las manos dentro de ni debajo del
húmedas.
14.
cuando está
13. Utilice el interruptor del bypass solamente
abastecimiento.
12. No conecte el motor directamente con un
mantenerla.
la cuchilla, el cartucho del freno, o de
11. Siempre desenchufe la sierra antes de cambiar
10. No trate de desconectar el sistema de frenos.
mientras que la cuchilla está girando.
9. Nunca ajuste la posición del cartucho del freno
frenos.
8. Nunca trate de experimentar con el sistema de
cuchilla.
7. No ponga la mano alrededor o detrás de la
6. No realice ninguna operación a mano alzada.
5. Sepa reducir el riesgo del retroceso.
necesario.
4. Utilice una vara de empujar cuando está
la cuchilla de la sierra.
3. Mantenga las manos fuera de la trayectoria de
operaciones de serrar completo o a través.
peuda ser utilizada incluyendo todas las
separador para cualquier operación para la cual
2. Use el dispositivo de seguridad de la cuchilla y
1. Use las gafas de seguridad.
instrucción antes de usar la sierra.
Para su propia seguridad, lea el manual de
au-dessous de cabinet lorsque la lame tourne.
15. Ne mettez pas les mains à l’intérieur on
les emplacements humides.
nécessité.
13. N'utilisez l’interrupteur de by-pass qu'en cas de
prise de courant.
12. Ne branchez pas directement le moteur à une
cartouche de frein, ou d’en faire l’entretien.
11. Débranchez la scie avant de changer la lame, la
freinage.
10. N’essayez pas de neutraliser le circuit de
frein lorsque la lame tourne.
9. N’ajustez jamais la position de la cartouche de
de freinage.
8. N’essayez jamais d'effectuer un essai du circuit
de la lame.
7. Ne passez pas votre bras
par-dessus ou autour
6. Ne travaillez pas à la volée.
5. Limitez au maximum le risque de rejet.
nécessaire.
4. Utilisez un poussoir de fin de passe si
tourne.
3. Gardez les mains à l’écart de la lame lorsqu’elle
type d'opération.
2. Utilisez le protecteur de lame quel que soit le
1. Portez des lunettes de sécurité.
d’instruction avant d’utiliser la scie.
Pour votre propre sécurité, lisez le manuel
cabinet while the blade is spinning.
15. Do not put your hands inside or underneath the
14. Do not expose to rain or use in damp locations.
13. Use the bypass switch only when necessary.
supply.
12. Do not connect the motor directly to a power
changing the brake cartridge or servicing.
11. Unplug the saw before changing the blade,
10. Do not try to disable the brake system.
while the blade is spinning.
9. Never adjust the position of the brake cartridge
8. Never try to test fire the brake system.
7. Never reach around or over the saw blade.
6. Do not perform any operation freehand.
5. Know how to reduce the risk of kickback.
4. Use a push-stick when required.
3. Keep hands out of the line of the saw blade.
through sawing.
operation for which it can be used, including all
2. Use the blade guard and spreader for every
1. Wear eye protection.
manual before operating this saw.
For your own safety, read the instruction
N
o
o
nga
a la
lluvi
a
Made in TaiwanSawStop, LLC
TCP
10¨ Contractor Saw
SawStop
®
Model No. CNS 175
Serial No. C074012345
Electrical / Electricidad / Électricité
115/230 Volts, 60 Hz
15/7.5 Amps
1 Phase
1.75 HP
3500 RPM
®
c
US
175370
11. With the help of an assistant, pick up the saw and carefully set
it on the assembled stand with the front of the saw above the
front panel of the stand (see Fig. 11). Align the mounting holes
in the bottom corners of the saw with the mounting holes in
the top corners of the stand. While moving the saw do not set
it down in the upright position on a solid surface because the
dust shroud can be damaged.
WARNING! The saw weighs approximately 140 pounds.
Be careful and use proper lifting technique to avoid injury.
Fig. 11
Fig. 12
0
15
30
45
SawStop
10” Contractor Saw



 To Next Page