Section 6 – Accessories for your CCD Camera
Page 59
6. Accessories for your CCD Camera
This section briefly describes the different accessories available for your CCD camera.
6.1. Water Cooling
Your camera is equipped with a new heat exchanger design that is ready to accept water
circulation for additional cooling efficiency, if needed in warm climates.
The camera can be used either with or without flowing water. Water-cooling is
probably not necessary for most users when the air temperature is below 10 degrees C (50
degrees F), since the dark current is fairly low already. Think of it as a summertime accessory!
We do not recommend use of water cooling below freezing temperatures, where antifreeze
must be added to the water. It is simply not necessary then.
There is no problem using the camera at any time without water circulation. Adding
water circulation simply improves the cooling performance. With water circulation the
improvement in cooling is about 10 degrees C better than with air only.
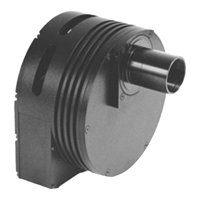
You may supply your own pump and tubing or use the optional pump and tubing
available from SBIG. To operate the camera with water circulation using the optional pump
available from SBIG, start with the camera at the same level as the water reservoir. Connect all
the hoses, and make sure the water return goes back into the reservoir. Push the ¼ inch internal
diameter (ID) hoses onto the nipples on the back of the camera so they seal. Attach one hose to
the nipple onto the reducing connector that adapts the ¼ inch ID hose to the ½ inch diameter
hose from the pump.
Turn on the pump, and let the flow establish itself through the hoses. Next, mount the
camera to the telescope. If you always keep the return hose outlet near the reservoir level the
pump will have no problem raising the water 2 meters (6 feet) off the floor. The limited
pressure capacity of the pump is only a problem when you let the water fall back into the
reservoir from a significant height above it, such a 0.3 meter (12 inches). Lastly, check for leaks!
Once you have established water circulation, turn on the TE cooler to 100% by giving it a
target temperature of –50 degrees. Wait for about 10 to 20 minutes for the system to stabilize at
the lowest temperature it can achieve. Examine the camera temperature, and reset the set point
to 3 degrees C above the current temperature. This 3 degree temperature margin will enable
the camera to regulate the temperature accurately.
When using water cooling, avoid the temptation to put ice in the water to get the camera
even colder. If colder water is used, the head may fog or frost up, depending on the dew point.
At the end of the evening, stop the pump, and raise the outlet hose above the camera to let all
the water drain out of the system. Blowing it out with gently pressure helps clear the water.
You can leave the hoses full of water, but if a leak occurs while you’re not there you may have a
problem.
When packing the camera for a long time, or at the end of summer, disconnect the hoses
and blow out the heat sink to allow the enclosed spaces to dry out and minimize long term
corrosion.