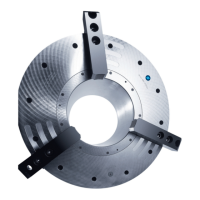
TBS, TBS-LH stationary power chucks
56 02.00|0889073_ROTA TB-TBS-EP |en
air passage openings do not overlap with the pneumatic
connections on the distributor ring.
9 Mounting the distributor ring (see chapter “ Mounting with a
2-piece clamping ring" ( 7.2, Page 36)
).
All parts of the SCHUNK power chuck move easily. As such, hard
hammer blows should never be used during assembly.
All TB/ TB-LH up to size 1000 (until year of construction
2009) and all EP/EP-LH
Disassembly
1 The chuck is still entirely on the machine spindle.
2 Remove the T-nuts (9) from the base jaw.
3 Carefully unscrew the locking screw (15) and remove the pilot-
controlled non-return valve system and O-ring (37).
The valve system (13) must be removed before proceeding with
4 Check all the O-rings in the valve system for wear and replace
them if necessary.
5 Unscrew the screws (24) in the chuck and extract the bushing
(4) from the chuck body using the extraction threads.
Disassemble the bushing completely.
6 Use the supplied eye bolt (thread on circumference) to secure
the chuck body (part 1) to a cargo crane.
7 First, undo the screws (21). Remove the locking screws (31)
(TB sizes 1000 and larger only). The chuck bodies can now be
extracted from the chuck through the cylinder through-hole
using three screws. Place the detached part (chuck body with
accessories) on the crane with the front face pointing down.
8 Unscrew both the pneumatic quick coupling pieces from the
distributor ring, then detach the distributor ring (8) from the
spindle nose together with the bracket.