Home
Sharp
All in One Printer
MX-2300N Guide
Sharp MX-2300N Guide User Manual
5
of 1
of 1 rating
132 pages
Give review
Manual
Specs
To Next Page
To Next Page
To Previous Page
To Previous Page
Loading...
127
[At your computer]
3
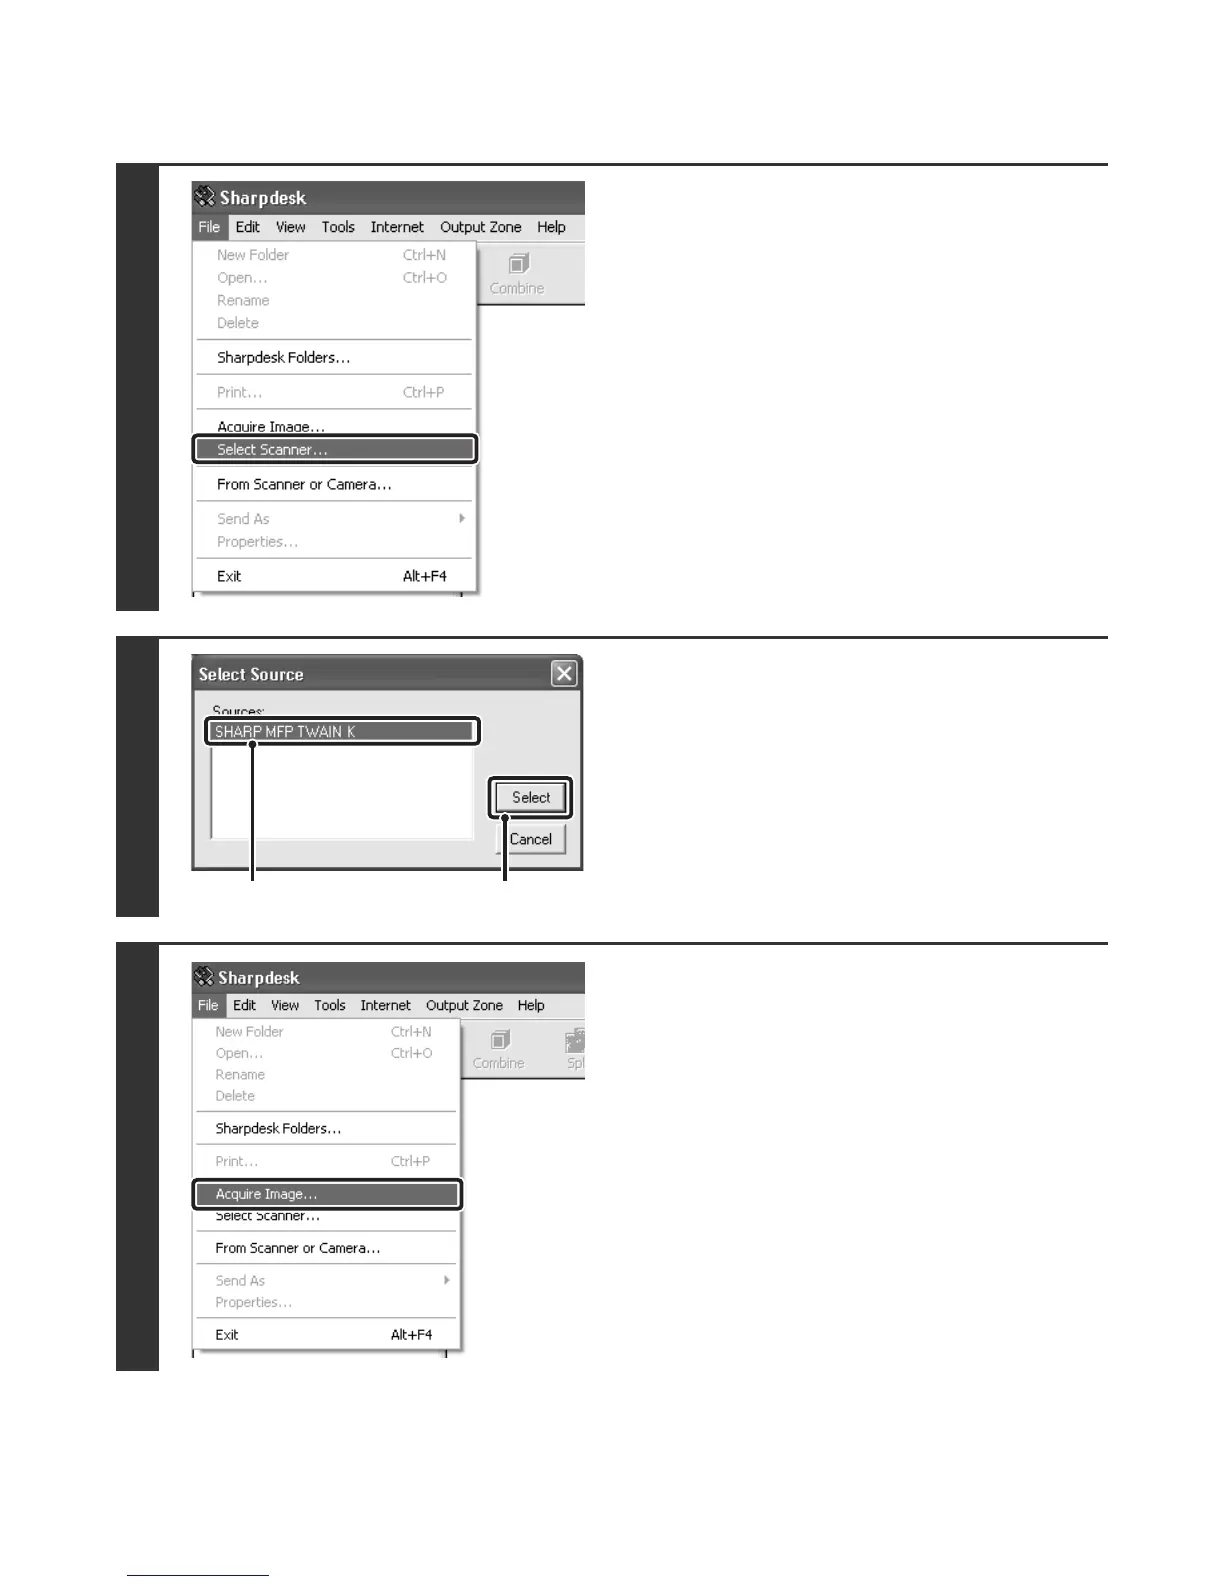
Start the TWAIN-compliant application
on your computer and select [Select
Scanner] from the [File] menu.
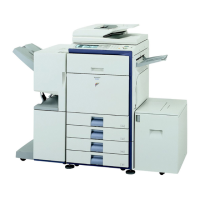
4
Select the scanner driver of the
machine.
(1)
Select [SHARP MFP TWAIN K].
(2)
Click the [Select] button.
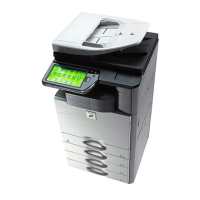
5
Select [Acquire Imag
e] from the [File]
menu.
The scanner driver opens.
(1)
(2)
127
129
Table of Contents
Default Chapter
2
Table of Contents
2
About this Manual
4
Manuals Provided with the Machine
5
1 Before Using the Machine as Anetwork Scanner
6
Network Scanner Function
6
Preparations for Use as a Network
7
Scanner
7
Make Sure the Main Power Switch Is in the "On" Position
7
Checking the Date and Time
7
Storing Sender Information
8
Settings Required in the Web Page
8
Storing Destination Addresses for each Scan Mode in the Address Book
9
Storing a Destination for Scan to
9
Desktop
10
Base Screen
11
Base Screens
12
Address Book Screen
15
Changing the Display of One-Touch Keys in the Address Book Screen
16
Scanning and Transmission Sequence
17
Original Sizes
19
Original Sizes that Can be Transmitted
19
The Size of the Placed Original
19
2 Entering Destinations
20
Book
20
Calling up a Destination
21
Checking and Deleting the Selected Destinations
22
Specifying Destinations in the Address
20
Destination
23
Using a Search Number to Specify a
23
Enter the Address Manually
24
Calling up a Destination from Aglobal Address Book
25
Using the Resend Function
27
3 Basic Procedure for Transmission in Scan Mode
28
Scanning to E-Mail, Ftp, Desktop, and Network Folder
28
Changing the Exposure and Exposure
29
Mode
32
Changing the Resolution
34
AUTOMATICALLY SCANNING both SIDES of an ORIGINAL (2-Sided Original)
35
SPECIFYING the ORIGINAL SCAN SIZE and SEND SIZE (Enlarge/Reduce)
36
Specifying the Scan Size of the Original
37
Specifying the Send Size of the Original
39
Changing the Colour Mode
40
Changing the File Format
41
Changing the Subject, File Name, Reply-To, and Message
43
4 Basic Procedure for Scanning in Usb Memory Mode
46
Scanning to Usb Memory
46
Mode
51
Changing the Resolution
53
AUTOMATICALLY SCANNING both SIDES of an ORIGINAL (2-Sided Original)
54
SPECIFYING the ORIGINAL SCAN SIZE and SEND SIZE (Enlarge/Reduce)
55
Specifying the Scan Size of the Original
56
Original
58
Changing the Colour Mode
59
Changing the File Format
60
Entering the File Name
62
5 Transmission in Internet Fax Mode
63
Basic Procedure for Transmission in Internet Fax Mode
63
Sending a Fax in Internet Fax Mode
63
Changing the Exposure
66
Changing the Resolution
67
AUTOMATICALLY SCANNING both SIDES of an ORIGINAL (2-Sided Original)
68
SEND SIZE (Enlarge/Reduce)
69
Original
70
Original
72
SPECIFYING the ORIGINAL SCAN SIZE and SEND SIZE (Enlarge/Reduce)
69
Changing the File Format
73
Changing the Subject, File Name, and Message
74
Message
74
6 Checking the Status of Transmission/Reception Jobs
76
Job Status Screen
76
Job Queue Screen and Completed Job Screen
77
Operation When a Job in the Job Queue Is Completed
80
Checking Completed Jobs
81
Stopping a Scan Job Being Transmitted or Waiting to be Transmitted
82
Giving Priority to a Scan Transmission
83
Job
83
7 Convenient Functions
84
SENDING the same IMAGE to MULTIPLE DESTINATIONS (Broadcast Transmission)
84
Broadcast Transmissions that Include Internet Fax Destinations
87
ERASING PERIPHERAL SHADOWS on the IMAGE (Erase)
89
SCANNING an ORIGINAL as TWO SEPARATE PAGES (Dual
92
SENDING an IMAGE at a SPECIFIED TIME (Timer Transmission)
95
WHITENING FAINT COLOURS in the IMAGE (Suppress Background)
98
SCANNING both SIDES of a CARD ONTO ASINGLE PAGE (Card Shot)
101
Build)
104
Scanning Many Originals at Once
104
(Mixed Size Original)
107
SCANNING THIN ORIGINALS (Slow Scan Mode)
110
STORING SCAN OPERATIONS (Programs)
112
Forwarding a Received Internet Fax to
115
Settings)
115
8 Internet Fax Functions
116
Receiving an Internet Fax
116
Manually Receiving Internet Faxes
117
Printing Faxes Received to Memory
118
(2In1)
119
Sending Two Pages as a Single Page
119
CHANGING the PRINT SETTINGS for the TRANSACTION REPORT (Transaction Report)
122
CHECKING the ACTIVITY LOG (Image Sending Activity Report)
125
Information Appearing in the Result
125
Column
125
SENDING an INTERNET FAX from ACOMPUTER (PC-I-Fax)
126
9 Scanning from a Computer (Pc Scan Mode)
127
Basic Scanning Procedure
127
Preview the Image
129
5
Based on 1 rating
Ask a question
Give review
Questions and Answers:
Need help?
Do you have a question about the Sharp MX-2300N Guide and is the answer not in the manual?
Ask a question
Sharp MX-2300N Guide Specifications
General
Brand
Sharp
Model
MX-2300N Guide
Category
All in One Printer
Language
English
Related product manuals
Sharp MX-2300N
843 pages
Sharp MX-2300G
69 pages
Sharp MX-2314N
836 pages
Sharp MX-2310U
832 pages
Sharp MX-2651
24 pages
Sharp MX-2610N
28 pages
Sharp MX-2640N
28 pages
Sharp MX-2600N
799 pages
Sharp MX-2630N
944 pages
Sharp MX-2010U
12 pages
Sharp MX-2614N
67 pages
Sharp Gemini II Plus MX-2614N
41 pages