COD.642400 Rev. 1
10
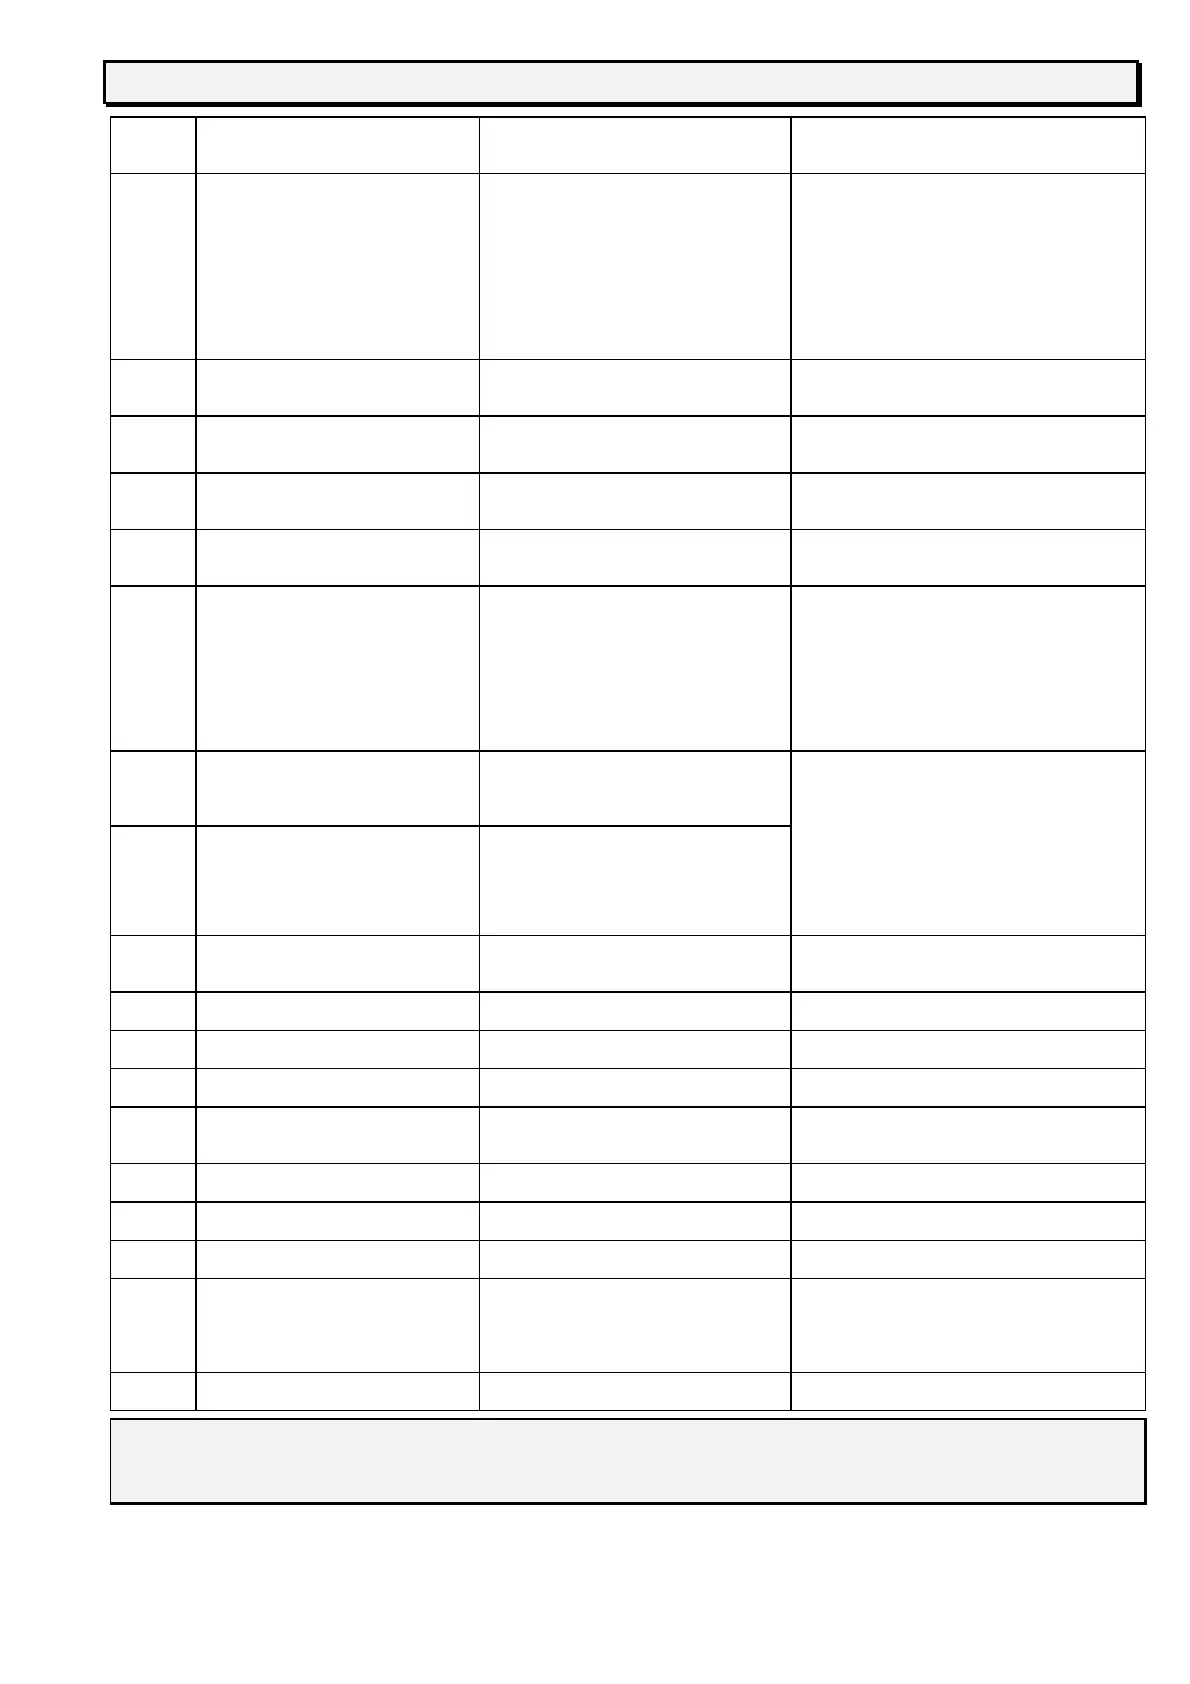
MALFUNCTIONS: CAUSES AND POSSIBLE REMEDIES
display malfunctions causes possible remedies
The
display
does not
light up
The panel has no power. 1. Lack of external supply or lack of one
phase.
2. Fuses F1 - F2 blown in the electrical
box. (See electrical circuit diagrams:
ref. 931801A - 931701A on pgs. 22-
25).
3. Fuses blown on the panel. (See
panel lay-out).
1. Check that all three phases (in the case of
three phase supply), or the single phase
and neutral, are connected to the balancing
machine.
2. Replace fuses F1 and F2. (The re-blowing
of the fuses suggests that there is a fault in
the electrical system).
3. Replace fuses F3 - F4 - F5. (The re-
blowing of the fuses suggests that there is
a fault in the electrical system).
E 00 Function non-existent error. 1. Wrong function code entered. 1. Establish the correct function code in the
present Instructions Manual or using help,
and enter it.
E 01 The message "E 01" appears when
switched on.
1. The electronic panel has lost the
settings pre-set during manufacture.
1. Repeat all the stages for setting the
balancing machine.
E 02 The message "E 02" appears when
switched on.
1. The electronic panel working
memory is faulty.
1. Replace the electronic panel.
E 03 The motor turns in the reverse
direction.
1. The motor supply is inverted 1. After switching off the main switch,
reverse 2 of the supply phases on the
balancing machine.
E 04
The motor does not turn (when
START is pressed), or the message
"E 04" appears after about 20
seconds.
1. Lack of one phase, if the motor is
three phase.
2. Relay malfunction in the electrical
box.
(See electrical circuit diagrams on
pgs.22-25).
3. Electronic panel malfunction.
the motor is not able to achieve the
necessary rotation for good
balancing.
1. Check that all 3 phases are correctly
connected.
2. Replace the electrical component.
3. Replace the electronic panel.
4. Check the mains tension, which may be
low.
E 05 After the second setting run "E 05"
appears on the display.
1. The sample weight was not screwed
on.
1. Re-start the setting cycle from the
beginning, or at the end of the first run
screw on the sample weight before
starting the second.
E 06 The message "E 06" appears when
START is pressed.
1. The guard casing has not been
lowered.
2. The guard casing micro-switch is
broken (see electrical circuit
diagram: ref.
931801A - 931701A on
pgs. 22-25).
1. Lower the mounted wheel guard casing.
2. Replace the micro-switch.
E 07 At the end of the first run "E 07"
appears on the display.
1. The difference of phase between the
two pick-ups is too great.
1. Replace the pick-ups. If after the
substitution the problem is not resolved,
replace the electrical panel.
E 08 At the end of the first run "E 08"
appears on the display.
1. The left pick-up is defective. 1. Substitute the left pick-up.
E 09 At the end of the first run "E 09"
appears on the display.
1. The right pick-up is defective. 1. Substitute the right pick-up.
E 10 At the end of the first run "E10"
appears on the display.
1. Position gauge fault. Optical-
electrical problem.
1. Replace the optical-electronics.
E 11 At the end of the first run "E11"
appears on the display.
1. Movement gauge fault. Problem with
the optical-electrical zero point.
1. Replace the optical-electronics.
E 14 "E14" appears on the display. 1. +5V supply incorrect. 1. Replace the electrical panel.
E 15 "E15" appears on the display. 1. +8V supply incorrect. 1. Replace the electrical panel.
E 16 "E16" appears on the display. 1. -12V supply incorrect. 1. Replace the electrical panel.
E 17 At the end of the first run "E 17"
appears on the display.
1. Weight outside the range of
adjustment (the weight necessary to
balance the wheel is greater than
250 grams).
1. a) check that the wheel is correctly fitted
to the flange.
b) look for (equally) the external position,
fit a 100 gram weight and run the
balancer.
E 18 At the end of the first run "E18"
appears on the display.
1. Wheel data not entered. 1. Enter the wheel data on the keyboard.
Other possible malfunctions are largely technical
in nature and must be checked and resolved by
PROFESSIONALLY QUALIFIED TECHNICIANS.