Do you have a question about the SICK FLX3-CPUC100 and is the answer not in the manual?
Explains the goal of the operating instructions for the safety controller.
Defines the applicability of the operating instructions to the Flexi Compact safety controller.
Identifies intended users and organizes content by device lifecycle phases.
Provides links to additional resources and information available via the internet.
Explains symbols and conventions used throughout the document for clarity.
Covers essential safety information applicable to the safety controller.
Describes the Flexi Compact safety controller's purpose for safety applications.
Lists applications for which the safety controller is not suitable.
Outlines the necessary qualifications for personnel involved in safety controller tasks.
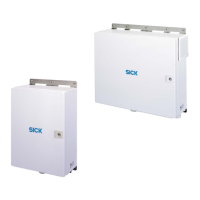
Details the components and configuration of the Flexi Compact safety controller system.
Provides a visual overview and identification of key components for the safety controller modules.
Explains the module's interfaces, configuration options, and overall function.
Describes the LEDs and their meanings for indicating the status of the device.
Details the available interfaces for the safety controller, including SmartPlug and network connections.
Addresses obligations and hazards related to the machine manufacturer's role.
Covers obligations and hazards for the operating entity of the machine.
Outlines design considerations including mounting, IP ratings, and air circulation.
Details safety notes and general descriptions for implementing muting functions.
Covers internal circuitry, fault detection using test outputs, and safety outputs.
Explains network topologies and integration via fieldbus interfaces.
Defines requirements for thorough checks during commissioning and regular maintenance.
Provides critical safety warnings regarding electrical voltage and unintended machine start.
Details prerequisites and steps for mounting the main and expansion modules.
Describes the procedure for installing the SmartPlug into the main module.
Explains the steps required to disassemble the safety controller modules.
Outlines the procedure for replacing a defective module with a new one.
Provides critical safety warnings before commencing electrical installation.
Details prerequisites for electrical connection and network cable requirements.
Explains the overview and options for coding front connectors and modules to prevent mix-ups.
Introduces the Safety Designer software for configuring the safety controller.
Describes different configuration types: offline, online, and security settings.
Mentions that the Overview menu contains configuration information.
Guides through combining modules and elements, using the catalog, and navigation pane.
Details how to configure Modbus and SLMP connections for network communication.
Introduces the graphic logic editor for programming function logic.
Lists available input elements for creating logic programs in the Safety Designer.
Explains that logic is programmed using function blocks, which contain inputs, outputs, and logic.
Describes function blocks for evaluating inputs, including two-hand control and dual-channel monitors.
Details the Dual Channel Monitor V1 function block for evaluating dual-channel switches.
Explains the Edge Detection V1 function block for detecting rising and falling signal edges.
Covers function blocks used for controlling outputs, such as external device monitoring.
Describes monitoring a switching amplifier with a feedback channel.
Explains the Fast Shut Off V1 function block for minimizing switch-off time.
Introduces function blocks designed for specific application logic, like reset and restart.
Details the Reset V1 function block for acknowledging safety stops and restarting applications.
Explains the Restart V1 function block for implementing restart functionality.
Describes the Multi Operator V1 function block for operating multiple two-hand controls.
Explains the Operating Mode Switch V1 function block for selecting outputs based on input values.
Details the Multi Enable V1 function block for enabling outputs based on input and release signals.
Explains the Multi Latch V1 function block for saving input statuses to outputs.
Introduces function blocks specifically for implementing muting sequences.
Describes the Parallel Muting V1 function block for muting with sensor pairs in parallel.
Details the Sequential Muting V1 function block for muting with sensor pairs in sequence.
Explains the Cross Muting V1 function block for muting with sensor pairs arranged crosswise.
Describes the Input Override function for managing transported objects during muting.
Details the Input Band signal for controlling muting timers based on conveyor status.
Explains the Muting error output and how errors are reset for muting function blocks.
Allows tightening muting conditions based on material transport direction.
Filters out brief faults in muting sensors without interrupting muting.
Checks if muting sensors are activated simultaneously and if values match.
Limits the maximum duration of the muting sequence.
Provides extra muting time when the ESPE input switches back to 1.
Determines when a valid muting status is over based on sensor or ESPE status.
Defines the start conditions for the next valid muting sequence.
Lists the available output elements for logic programs.
Explains how to use process data status bits as input elements for logic diagnostics.
Describes CPU markers used as input/output elements for creating reverse paths and connecting logic.
Explains jump addresses for creating reverse paths and connecting logic across pages.
Covers considerations for safety logic, edge detection, and function block execution sequence.
Highlights crucial safety considerations when implementing logic in the editor.
Guides on adding elements from the CPU logic catalog to the worksheet.
Explains how to connect inputs and outputs of elements and function blocks.
Details the process of configuring parameters for function blocks.
Describes how to test the logic program using simulation mode.
Explains the time required to execute one logic cycle and its dependencies.
Describes the I/O matrix for checking input-output relationships in the logic program.
Provides an overview of all logic pages, summarizing inputs, blocks, and outputs.
Covers preventing unauthorized access to logic pages through protection levels.
Details how to enable password protection for logic pages and assign access levels.
Explains the procedure for logging into or out of different logic access levels.
Describes how to set up access protection for individual logic pages.
Explains how to remove existing access protection from logic pages.
Details how to apply visibility protection to logic pages to control content viewing.
Explains how to remove visibility protection from logic pages.
Mentions that the report summarizes controller configuration and can be exported.
Lists service functions like rebooting, factory reset, and password management.
Guides on connecting the configuration software to the safety controller.
Explains how to transfer the configuration to the safety controller, with important notes on overwriting.
Describes the verification process to confirm configuration accuracy and safety function compliance.
Details the procedure for simultaneously verifying configuration content and transfer.
Explains checksums used for verifying configuration integrity in the project and SmartPlug.
Guides on how to test the safety functions of the application after configuration.
Outlines checks to ensure hazardous area monitoring and prevent unprotected access during commissioning.
Describes regular checks to ensure hazardous area monitoring and prevent access.
Details regular checks to verify hazardous area monitoring and prevent access.
Explains the PWR and CV indications on the modules for troubleshooting.
Lists possible faults, their responses, and causes for the controller's inputs and outputs.
Covers using the Diagnostics area in Safety Designer, including error history.
Provides instructions for the proper disposal of unusable devices according to regulations.
Presents safety-related characteristic data for inputs, CPU logic, and outputs.
Details response times for functions, including calculation methods and examples.
Explains data exchange protocols like Modbus® TCP and SLMP, including input/output data and checksums.
Provides visual representations of the controller's physical dimensions.
Lists the components included in the standard delivery package of the safety controller.
Provides part numbers and type codes for ordering main modules.
Lists part numbers and type codes for ordering IO and gateway expansion modules.
Details part numbers and type codes for ordering accessories like front connectors and SmartPlugs.
Contains an extract of the EU declaration of conformity for the product.
| Brand | SICK |
|---|---|
| Model | FLX3-CPUC100 |
| Category | Controller |
| Language | English |