3.1 ዷᄲยԢڦ߾ፕጒༀ
3.1.1 ཨሏႜᅜࢫዷᄲยԢڦጒༀ
ߛუோ ࠲Կ
گუோ ࠲Կ
כ ߾ፕ࿋ዃ
ኈথةഗ ࢇቄ
থں࠲
3.1.2 כڦ࿋ዃ
߾ፕ࿋ዃ
ኈথةഗথజಇઍ၍ă
/ ᄓ࿋ዃ
ኈথةഗٗజಇઍ၍ฉLjߛუோᅜٶLj
ᇹ߰Ӏቷ DIN VDE 0670 ڼ 6 ևݴยڦăړோ
ٶᅜࢫLj߰ޙࢇ DIN VDE0670Ljڼ 6 ևݴ /IEC298 ᄲ൱ă
থں࠲ᅜ֡ፕǖ
• ړگუ֭ཀྵᅙ֭Ljժכتᇀ࿋ዃ
– ኈথةഗᅜႜ֪DŽᄺٗႜُ߾ፕDž
– භີཚLjጒༀኸ๖Ljۉഘڪڦ֪ă
• ړӚඁگუ֭ཀྵLjժכሞ࿋ዃLjߛუோփ
ీ࠲Կڦă
3.2 ߛუோ࠲Կᅜࢫڦ֡ፕ
3.2.1 כ
3.2.1.1 כٗ߾ፕ࿋ዃᅎ࿋ዃ
• ၠᆸઙ T ႙դ֭߃ӱڦդDŽ8Lj 14DžLjժդ
DŽ7Lj 14DžLj֭ت (6Lj 14Ă 15 ፑDžă
• ݒ้ኍገդ 90°Lj๑ٗĐۨđ࿋ዃĐđ࿋
ዃDŽ 15 ዐᄕ࿋ዃDžă
• ᆩդDŽ 15LjᆸDžכઙă
• դݒ้ኍݛၠገ 90°LjٗĐđ࿋ዃገĐۨđ࿋ዃă
• ൽူդă
3.2.1.2 כٗ࿋ዃᅎ߾ፕ࿋ዃ
• ၠᆸઙ T ႙դ֭߃ӱڦդDŽ8Lj 14DžLjժդ
(7Lj 14)Lj֭تă
• ຩ้ኍݛၠۯդLj๑ኮٗĐۨđ࿋ዃĐđ
࿋ዃă
• ᆩդכླྀዕኹ࿋ዃă
• ݒ้ኍݛၠۯդ 90°Lj๑ٗĐđ࿋ዃገĐۨđ
࿋ዃă
• ؏դă
3.1 Status of main equipments
3.1.1 Status of main equipments after putting into service
Door of withdrawable unit compartment Closed
Door of LV cubicle Closed
Withdrawable unit Service position
Vacuum contactor Closed
Earthing switch Open
3.1.2 Positions of withdrawable unit
Service position
The vacuum contactor is connected to the busbar and to
the outgoing feeders.
Disconnected/test position
The vacuum contactor is disconnected from the busbar and
from the outgoing feeders. The door of HV compartment
can be opened. The isolating distance is in accordance with
DIN VDE 0670; Part 6. When the door is opened the
segregation in accordance with DIN VDE 0670, Part 6/IEC
298 is assured.
The earthing switch can be operated:
• When the LV plug connector is applied and when the
withdrawable unit is in the disconnected position
– the vacuum contactor can be test-operated (also from
the control room).
– function such as switch position indication, electrical
interlocks etc. can be tested.
• When the LV plug connector is removed and when the
withdrawable unit is in the disconnected position the
door of the HV compartment cannot be closed.
3.2 Operation with HV door closed
3.2.1 Withdrawable unit
3.2.1.1 Moving the withdrawable unit from service
position to disconnected position
From the service to the disconnected position
• Shift the unlocking knob (8,Fog.14) to the right and
insert the hand crank (7,Fig.14) into the opening up to
the stop (6,Fig.14; Fig.15 left).
• Turn the crank anti-clockwise by 90˚ from the "locked"
position into the "free" position (Fig. 15 centre).
• Move out the withdrawable unit by means of the hand
crank (Fig.15; right).
• Turn the hand-crank anti-clockwise by 90˚ from the
"free" position into the "locked" position.
• Remove the hand crank.
3.2.1.2 Moving the withdrawable unit from disconnected
position to service position
From the disconnected to the service position
• Shift the unlocking knob (8,Fog.14) to the right and
insert the hand crank (7,Fig.14) into the opening (6,
Fig.15).
• Turn the hand crank clockwise by 90˚ from the "locked"
position into the "free" position.
• Move in the withdrawable unit up to the st
op by means
of the hand crank.
• Turn the hand-crank anti-clockwise by 90˚ from the
"free" position into the "locked" position.
• Withdraw the hand crank.
• ࠲ࢇথں࠲ຕْLjኻᆶሞස 3.2.3 ຎ൧้Lj
֡ፕ֍ᅜႜă
• כླྀ߾ፕ࿋ዃă
• ሞ࿄ཚߛუۉ้ࢇĂݴኈথةഗă
• ֱᆶႁࢅۉىLjሞփඪࢆྔ૰൧ူڦࠀీ
ޏă
• ֱሞాీޏኸ๖භີڦཚĂጒༀă
• ֱכڦ࿋ዃޏኸ๖ኟඓă
֖ቷۉୟƽ
2.5.3 ၄ׇ߾ೕఱუᄓ
ሞ֪ᅜമLjথټۉ၂๖ڦ֭ፗՂႷᆩ܌ୟ࣍থںժ
Նૃഗă
ጀᅪǖ7.2kV כฉڦ 3 ߲Նૃഗሞࠃ้ᇑ߾ڪᅃഐ
݀ሏڦLjሞ߾ೕఱუᄓຐࢫLjምҾጎሞኈথةഗူև
ڦෙ߲ةՅDŽՌཟಇDžᇑכ֨ӱኮLjᅜՆ௨ᄓዐ
்࣋ăՆૃഗᆶূຌఀಈڦᅃ܋ᆌ࿋ᇀכ֨ӱتLjኄᄣ
փࣷᆖၚ၎ᇹă
2.5.4 ֱ
ူຎՂႷሞ࠲ዐሞৎዐໜ้Ԣᆩǖᅎۯכ
ᆩڦ T ႙դLjٶฉோᆩڦሃLjথں࠲դఇె
၍ୟಈLj๑ᆩ֩ă
2.5.5 Ⴊ߀ۉୟ
සሞҾጎ้ۉୟՂႷ߀ۯLjᇱᆶڦۉୟᄺՂႷፕ၎ᆌڦ
Ⴊ߀ă
• Close and open the earthing switch several times.
Operation must only be possible as described under 3.2.3.
• Move the withdrawable unit into the service position.
• Close and open the vacuum-contactor as long as no HV
voltage has been applied.
• Check all the mechanical and electromechanical
interlocks for satisfactory functioning without using any
force.
• Check whether the switch position of the switchgear are
correctly indicated in the control room.
• Check whether the positions of the withdrawable unit
are correctly indicated.
Refer to the circuit diagramsl!
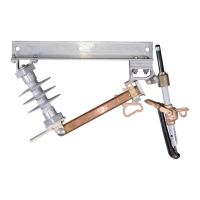
2.5.3 Power frequency withstand voltage test on site
Sockets for connecting capacitive voltage indicators must
be earthed by short-circuiting links before the test is
carried out and surge limiters disconnected.
Note: Surge arresters/limiters for 7.2kV switchgear are
supplied together with tools. In order to avoid being damaged
during voltage withstand test, they must be installed
between contact-bars and side plate of the truck after above
test is carried out. The ends of arresters with metal name
plates, should be placed near the side plate of the truck,
thus gives no affection to the insulation between phases.
2.5.4 Checking the accessories
The following accessories must be readily available in the
switchgear room or in the adjacent room: handcrank for
moving the withdrawable unit, double-bit key for locking
and unlocking the doors, handle for the earthing switches
block diagrams, operating instructions.
2.5.5 Revising the circuit diagrams
If circuits have to be modified during installation, the
existing circuit diagrams must be revised accordingly.
3. ֡ፕ ᄻْ
3.1 ዷᄲยԢڦ߾ፕጒༀ........................................ 21
3.1.1 ཨሏႜᅜࢫዷᄲยԢڦጒༀ .......................... 21
3.1.2 כڦ࿋ዃ...................................................... 21
3.2 ߛუோ࠲Կᅜࢫڦ֡ፕ................................. 21
3.2.1 כ ................................................................ 21
3.2.1.1 כٗ߾ፕ࿋ዃᅎ࿋ዃ ...................... 21
3.2.1.2 כٗ࿋ዃᅎ߾ፕ࿋ዃ ...................... 21
3.2.2 ኈথةഗ...................................................... 23
3.2.3 থں࠲ ......................................................... 23
3.3 ٶࢅ࠲Կߛუோ........................................ 23
3.3.1 ߛუோ ......................................................... 23
3.4 ٶߛუோڦ֡ፕ........................................ 24
3.4.1 כ ................................................................ 24
3.4.1.1 Ӛူگუ֭ཀྵ .................................................. 24
3.4.1.2 ཽכ ......................................................... 24
3.4.1.3 ླྀכ ......................................................... 24
3.4.1.4 থگუ֭ཀྵ .................................................. 25
3.4.2 ߸࣑භ࠶ ......................................................... 25
3 Operation page
3.1 Status of main equipments..................................21
3.1.1 Status of main equipments after putting into service.....21
3.1.2 Positions of withdrawable unit...............................21
3.2 Operation with HV door closed............................21
3.2.1 Withdrawable unit .................................................21
3.2.1.1 Moving the withdrawable unit from service position
to disconnected position........................................21
3.2.1.2 Moving the withdrawable unit from disconnected
position to service position ....................................21
3.2.2 Vacuum contactor .................................................23
3.2.3 Earthing switch .....................................................23
3.3 Opening and closing HV door ..............................23
3.3.1 HV Door ................................................................23
3.4 Operation with HV door open..............................24
3.4.1 Withdrawable unit .................................................24
3.4.1.1 Disconnecting the LV connect
or.............................24
3.4.1.2 Removing the withdrawable unit ...........................24
3.4.1.3 Inserting the withdrawable unit .............................24
3.4.1.4 Connecting the LV connector.................................25
3.4.2 Replacing the fuses................................................25
֡ ፕ
Operation
 Loading...