3.4.1.4 থگუ֭ཀྵ
• گუ֭ཀྵ֭כฉڦ֭ፗాժᆩഄă
• Ӏ 3.3.1 বຎײႾߛუோ࠲Կă
3.4.2 ߸࣑භ࠶
• භີڦ߾ፕጒༀᅜٗኸ๖ഗDŽ5Lj 14Džฉ࠵ִă
• כӀ 3.4.1.2 বຎײႾཽă
• ൽူභ࠶ă
ጀᅪƽභ࠶ీඤڦLj༠ƽ
– ࠦۨஅພLjൽူභ࠶ă
ጀᅪƽْཞ้࣑ฉෙߵභ࠶
• ስႎڦභ࠶
– භ࠶ڦጐኍՂႷܔጚጎዃă
• භີཚĂጒༀڦኸኍDŽ5Lj 17DžծᆸՉ࿋ዃĐIđDŽࢤDž
—Đཚđă
3.4.1.4 Connecting the LV connector
• Insert the LV connector into the connector base on the
withdrawable unit and lock it by means of the clip.
• Close the door to the withdrawable unit compartment as
described under 3.3.1
3.4.2 Replacing the fuses
• The operating state of the fuse links can be read off from
the indicator (5 Fig.14).
• Remove the withdrawable unit as described under
3.4.1.2.
• Remove the fuse links.
Caution! The fuse links might be hot.
- Pull the fuse links from the holders in upward direction.
Note! Always replace all three fuse links.
• Select and align new fuses
- so that the arrow on the fuse points in the front
direction (the striker points to the interlock device).
• Move the position indicator (5, Fig.17) of the HV "I"
(red)-"operational" .
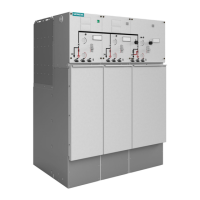
3.4 ٶߛუோڦ֡ፕ
ස 3.3.1 বຎLjٶߛუோă
3.4.1 כ ( 17)
3.4.1.1 Ӛူگუ֭ཀྵ
• ٗכฉӚူگཀྵ֭ཀྵ (1)LjྺُLj๚ံᄲ (2)
ၠฉገă
• گუ֭ཀྵূຌ࠶ࠬሞኧฉă
3.4.1.2 ཽכ
• ሞࡋాLjכևݴڦࡐዩዡሞࠦۨᇀڹӱڦࣂࡆฉᅎ
ۯLjړכཽࡋ༹ࢫLjҾጎሞכڹڦጱጲۯฦLj
ኄ้ሶׯྺᅃଈၭכLjړླྀࡋ้༹LjጱכڹLj
כᅈࡐዩዡᅎۯă
• כᇑሞڦ࠲ࡋፔฉՔă
• ޔכฉև௬ӱLjኮઙጽă
3.4.1.3 ླྀכ
• ሞࡋമۙኝᅃူכڦ࿋ዃă
• ޔכฉև௬ӱLjኮླྀࡋాă
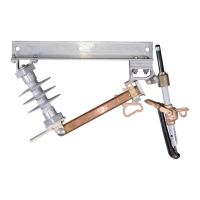
1. گუ֭ཀྵ
2. ዿگუ֭ཀྵڦ
3. ᅎۯכ้ڦӝۅ
4. ሞႴᄲ߀Վႜݛၠ้༵ഐכڦ
5. භີཚĂጒༀኸ๖
6. ӀҾጎۅ࡛Ӛߛ܈ۙኝኈথةഗڦᇮ
7. থں࠲ڦĐࢇ / ݴđኸ๖ഗDŽሞோူLj֖ለ 16 ڼ 1 ၜDž
8. ோ߇
9. ோཉ
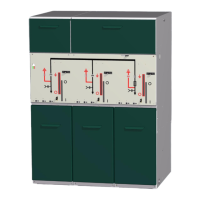
17 ٶߛუோڦ֡ፕᄲۅ
3.4 Operation with HV door open
Open HV the door as described under 3.3.1
3.4.1 Withdrawable unit (Fig.17)
3.4.1.1 Disconnecting the LV connector
• Disconnect the LV connector (1) from the connector base
on the withdrawable unit. For this purpose swing clip 2
upwards.
• Withdraw the LV connector and insert the metal hose
into the holder.
3.4.1.2 Removing the withdrawable unit
The withdrawable unit runs on ball bearings inside the
panel across a rail fixed in position by means of floor plate.
When racking out, the withdrawable unit slides from the
rail onto automatically folding out wheels and thus
becomes a trolley when removed from the panel. This
sequence of motion takes place in reserve order in the
same way when the withdrawable unit is racked in.
• Mark the withdrawable unit and the associated
switchpanel.
• Hold the frontplate of the withdrawable unit on top left
and withdraw the unit to the front.
3.4.1.3 Inserting the withdrawable unit
• Align the unit in front of the panel.
• Hold the frontplate of the withdrawable unit on top left
and push in the unit to the stop.
1 LV connector
2 Clip for locking the LV connector
3 Holding point for moving the unit
4 Opening for lifting the unit when changing the direction
of travel
5 Operating state indicator of fuses
6 Adjusting elements for adjusting the altitude of site of
the switchpanel on the vacuum contactor
7 Switch position indicator for earthing switch (concealed,
see 1, Fig.16)
8 Door locking bolt
9 Door locking strip
Fig.17 Operating elements with the door open
4
6
3
5
7
2
1
9
8
֡ ፕ
Operation
 Loading...