Figures
Multifunctional Danger Control and Indicating Panels SIGMASYS C and M (M-Modules) 123 / 128
Best.Nr. A24205-A337-B970 – Edition 12 (03/07)
Figures
Sorted in order of appearence
Figure 1: Dimensions for the SIGMASYS control and indicating panel ................................. 13
Figure 2: Console installation DT1000 operating panel console, tiltable ............................... 14
Figure 3: Console installation for empty housing remote operating panel............................. 15
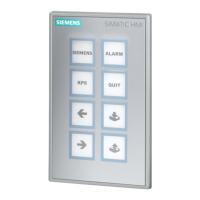
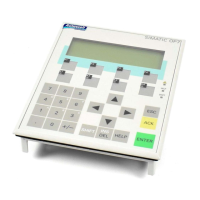
Figure 4: SIGMASYS C control and indicating panel assignment ......................................... 16
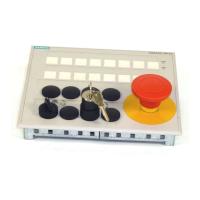
Figure 5: SIGMASYS M control and indicating panel assignment......................................... 18
Figure 6: Alarm organization.................................................................................................. 33
Figure 7: Physical connection................................................................................................ 51
Figure 8: Dual MPC ............................................................................................................... 56
Figure 9: Close-and-retain systems....................................................................................... 60
Figure 10: Line lenghts from periphery to power supply unit ................................................. 73
Figure 11: Assembly example 1............................................................................................. 74
Figure 12: Assembly example 2............................................................................................. 74
Figure 13: Assembly example 3............................................................................................. 75
Figure 14: SIGMAPLUS SDF2200 Optical smoke detector................................................... 82
Figure 15: Address element number and line lengths for a 0.8 diameter line........................ 83
Figure 16: Address element number and line lengths for a 0.6 diameter line........................ 84
Figure 17: FDnet overview..................................................................................................... 86
Figure 18: Additional signal bases and alarm sounders allowed for a given load factor ....... 91
Figure 19: Load factors in relation to line diameter and line length ....................................... 92
Figure 20: SIGMANET main block diagram........................................................................... 94
Figure 21: Modem links in SIGMANET.................................................................................. 96
Figure 22: Mobile operating panel connection – diagram of principle.................................... 99
Figure 23: Central AT release.............................................................................................. 100
Figure 24: Project planning form for processing .................................................................. 110
Figure 25: Project planning examplesw SIGMALOOP ........................................................ 110
Figure 26: SIGMALOOP at an existing star-configuration line network............................... 111
Figure 27: SIGMALOOP lines.............................................................................................. 111
 Loading...