Getting Started
4.3 Hardware assembly and commissioning of the S7–400H
S7-400H
42 System Manual, 03/2012, A5E00267695-11
4.3 Hardware assembly and commissioning of the S7–400H
Assembly of the hardware
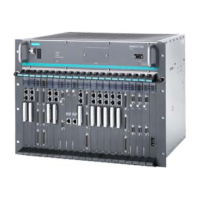
Follow the steps below to assemble the S7-400H as shown in the following figure:
6+DXWRPDWLRQV\VWHP
(7b0'LVWULEXWHG,2
5DFN
5DFN
Figure 4-1 Hardware assembly
1. Assemble both modules of the S7-400H automation system as described in the
S7-400
Automation Systems, Installation
and
Module Specifications
manuals.
2. Set the rack numbers using the switch on the rear of the CPUs.
An incorrectly set rack number prevents online access and the CPU might not start up.
3. Install the synchronization modules in the CPU. See chapter Synchronization modules
(Page 341).
4. Con
nec
t the fiber-optic cables.
Always interconnect the two upper and two lower synchronization modules of the CPUs.
Route your fiber-optic cables so that they are reliably protected against any damage.
You should also always make sure that the two fiber-optic cables are routed separately.
This increases availability and protects the fiber-optic cables from potential double errors
caused, for example, by interrupting both cables at the same time.
Furthermore, always connect at least one fiber-optic cable to both CPUs before you
switch on the power supply or the system. Otherwise both CPUs may execute the user
program as master CPU.
5. Configure the distributed I/O as described in the
ET 200M Distributed I/O Device
manual.
6. Connect the programming device to the first fault-tolerant CPU (CPU0). This CPU will be
the master of your S7-400H.
7. A high-quality RAM test (self-test) is executed after POWER ON. The self-test takes at
least 10 minutes.
The CPU cannot be accessed and the STOP LED flashes for the duration of this test. If
you use a backup battery, this test is no longer performed when you power up in future.
 Loading...